1/35 M48A3 Patton

J

Jamiedeal26

Guest
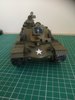
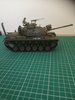
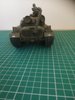
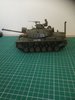
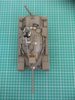
Still Only a basic build and paint job, I'm currently looking into buying a few cheap 2nd hand models to test out my weathering so not to ruin my completed tanks... And once I'm happy I will start weathering all of my completed projects... But for a basic build and paint I'm happy..
 

Attachments

  • IMG_20180813_171307.jpg
    IMG_20180813_171307.jpg
    56.7 KB · Views: 25
  • IMG_20180813_171343.jpg
    IMG_20180813_171343.jpg
    72 KB · Views: 26
  • IMG_20180813_171357.jpg
    IMG_20180813_171357.jpg
    65.6 KB · Views: 24
  • IMG_20180813_171410.jpg
    IMG_20180813_171410.jpg
    72.6 KB · Views: 21
  • IMG_20180813_171418.jpg
    IMG_20180813_171418.jpg
    99.9 KB · Views: 20

Jakko

Way past the mad part
SMF Supporter
Joined
Apr 28, 2018
Messages
10,729
Points
113
First Name
Jakko
I came here expecting to see a tank marked with the Playboy logo but I’m disappointed.

:smiling3:

Seriously, though it’s built straight from the box, you build them pretty neatly. My only real remark is that the exhaust extension should be vertical, not angled. (And as a historical remark: that thing was rarely used, probably hardly ever on a US Army tank, and even more rarely on one with field modifications like the machine gun on top of the cupola. But that’s my background in modelling Vietnam-era tanks showing through, I’m afraid :smiling3:)
 
J

Jamiedeal26

Guest
Thanks for feedback Jakko, i tend to follow the instructions when building, hence why snorkel is attached... As for it not being straight that's a manufacturer fault then as the position it goes in is on the tilt as you can see from pic of instructions I've attached. If it wasn't really used I'm more than happy to remove it as it does look rather odd if I'm honest. As for not having playboy bunny I'm really sorry lol
 

Attachments

  • IMG_20180813_182158.jpg
    IMG_20180813_182158.jpg
    74.8 KB · Views: 7

Jakko

Way past the mad part
SMF Supporter
Joined
Apr 28, 2018
Messages
10,729
Points
113
First Name
Jakko
As for it not being straight that's a manufacturer fault then as the position it goes in is on the tilt as you can see from pic of instructions I've attached.
The instructions show it going on straight :smiling3: The “problem” is that you’ve attached it so it’s perpendicular to its “base” which probably means you forced it somehow, as IIRC there’s a flat on the pin it goes onto (in all I’ve built about half a dozen of these Tamiya M48s, I think :smiling3:).

If it wasn't really used I'm more than happy to remove it as it does look rather odd if I'm honest.
There are very few photos showing it being used — as I recall, about the only ones in Vietnam are of USMC tanks very early in the war, but the Tamiya model doesn’t represent those particular vehicles very well, as they differed in a number of noticeable details. But it’s your model, so don’t change it just because I claim stuff about how “it wasn’t like that in the real world.”

As for not having playboy bunny I'm really sorry lol
You’ve probably already outgrown the age at which putting on those decals would have been an automatic choice :smiling3:
 
J

Jamiedeal26

Guest
Thank you, I'm going to give it a try on a 2nd hand build as to not ruin my work..... I have weathering powders from humbrol, that my wife bought as a present awhile back, are they any good do you know
 

scottie3158

SMF Supporter
Joined
Apr 27, 2018
Messages
12,666
Points
113
Location
Spalding
First Name
Paul
Jamie,
A great build, and a good idea to try out techniques. I have an old kit which I use to test on before using on my current build.
 

Jakko

Way past the mad part
SMF Supporter
Joined
Apr 28, 2018
Messages
10,729
Points
113
First Name
Jakko
I'm going to give it a try on a 2nd hand build as to not ruin my work
I usually use the bottom of the model’s hull to try out colours, techniques, the thickness of washes, etc. because it won’t be visible anyway, but it gives an excellent idea of what the weathering will be like against the colour of the rest of the model. Here’s what the underside of the Churchill I’ve been working on lately looks like at the moment, for example:

IMG_4575.jpg
 

papa 695

Moderator
Staff member
Moderator
SMF Supporter
Joined
May 9, 2011
Messages
20,329
Points
113
Location
Doncaster, South Yorkshire
First Name
Ian
Thank you, I'm going to give it a try on a 2nd hand build as to not ruin my work..... I have weathering powders from humbrol, that my wife bought as a present awhile back, are they any good do you know
Humbrol weathering powders are good, they do the job. ( but we all have our favorites ) There's plenty of how to do videos on youtube to look at.
 

Steve Jones

Steve Jones Scale Modelling Site
Joined
Apr 27, 2018
Messages
6,698
Points
113
Location
Plymouth
First Name
Steve
I lovely little build Jamie. The weathering process is a minefield and will take you some time to master. Remember You Tube is your friend and you will find some wonderful help there. Good luck
 
Top