Ferret Mk. 2 armoured car

Jakko

Way past the mad part
SMF Supporter
Joined
Apr 28, 2018
Messages
10,729
Points
113
First Name
Jakko
Now all I need to do is also put the other three wheels into the lathe so they’ll actually fit over the hubs :smiling3: There’s a difference of about half a millimetre between the outer diameters of the hub (both the “back plate” and the narrower bit that faces out) and the inner diameters of the corresponding parts of the wheels. I attribute it to shrinkage in casting, probably made worse because of the different materials involved.
 

Jakko

Way past the mad part
SMF Supporter
Joined
Apr 28, 2018
Messages
10,729
Points
113
First Name
Jakko
Almost there. I went back to my father’s lathe and increased the inside diameters of the remaining three wheels so they actually fit onto the hubs:
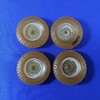
IMG_4691.jpg

The one at bottom right has its outer hub glued in because I managed to break it when trying to get the wheel into the lathe so it wouldn’t wobble. Turns out the material of the actual wheel part is fairly thin, and pressing on the but from the outer side of the wheel stands a good chance of shearing it off. Luckily resin tends to break quite neatly so you can glue it back perfectly in place.

Then I completed the turret:

IMG_4693.jpg
IMG_4695.jpg

The kit provides exactly six parts for the turret: the shell, the lower bit with turret ring, two hatches, the internal part of the periscope, and the machine gun. I left off that last one and put a few bits of plastic strip into the opening for it, because I noticed in photos that BATUS safety vehicles had a blanking plate there. I also filled in the two round ports in the rear sides, added lifting eyes to the lower front from 0.6 mm copper wire and tie-downs by glueing short lengths of 0.4 mm wire to the sides after marking out their locations (which I measured from a photograph). Finally, I added the hatch supports — the strange mushroom things at the front corners — from a 4.5 mm length of 0.5 mm plastic rod with a 1.25 mm punched-out disc of plastic card on top.

All that remains to do is add the upper hatch, but I left it off in the photo so the supports at the front are visible :smiling3:

One thing I forgot to mention earlier is that the turret opening in the hull is too small for the ring on the turret itself, by about 1.5 mm or so. I took a circle template, found the circle that the turret ring would just fit through, and used that to scribe a ring on the hull top around the existing opening, then cut and scraped it out with a knife until the turret fit.

And here’s the complete model, minus the fire extinguishers I still haven’t found (oh, and the hatch is still loose but just stayed in place for the photos):

IMG_4697.jpg
IMG_4699.jpg
 

Jim R

SMF Supporter
Joined
Apr 27, 2018
Messages
13,693
Points
113
Location
Shropshire
First Name
Jim
Hi Jakko
That looks really good. Credit to your patience and skill. All the different colours/materials show just what a mixed bag this is.
Jim
 

Jakko

Way past the mad part
SMF Supporter
Joined
Apr 28, 2018
Messages
10,729
Points
113
First Name
Jakko
That looks really good. Credit to your patience and skill.
Thanks, but I don’t think I’m overly skilled or patient :smiling3:

All the different colours/materials show just what a mixed bag this is.
The kit is more difficult to build than it seemed at first, I have to admit. If the suspension had been cast as single pieces rather than five parts each, and Sovereign had taken shrinkage into account better, it would be pretty suitable for people new to mixed-media kits. As it is, though, you probably don’t want to build this as your first foray into that kind of kit. OTOH, it’s not like you’re likely to find one easily so the risk of someone buying one and finding it too difficult is rather small anyway :smiling3:
 

Jakko

Way past the mad part
SMF Supporter
Joined
Apr 28, 2018
Messages
10,729
Points
113
First Name
Jakko
Thanks :smiling3:. Now all I need to do is paint it some more … I’ve got some paint on it, but the rest will probably have to wait until I’ve got another model to spray as well, because I don’t like cleaning airbrushes :smiling3:
 
  • Like
Reactions: JR

rtfoe

SMF Supporter
Joined
Apr 29, 2018
Messages
7,495
Points
113
Location
Malaysia
First Name
Richard
Gosh Jakko, so much work on this kit it just feels like a vacform on four wheels build. Turning out good and will be better with paint on.:thumb2:

Cheers,
Richard
 

Jakko

Way past the mad part
SMF Supporter
Joined
Apr 28, 2018
Messages
10,729
Points
113
First Name
Jakko
Nah, this wasn’t much work at all — no real corrections required, just a few added details and making sure the wheels fit (and the problems with one of them were my own fault anyway).
 

JR

Member of the Rabble and Pyromania Consultant
SMF Supporter
Joined
May 26, 2015
Messages
17,275
Points
113
Location
lincs
First Name
John
Nah, this wasn’t much work at all — no real corrections required, just a few added details and making sure the wheels fit (and the problems with one of them were my own fault anyway).

Most impressive work mate, just had a catch up .Certainly looks the part, with some fine detail.
John
AKA Arthur Brown.:smiling3:
 

Jakko

Way past the mad part
SMF Supporter
Joined
Apr 28, 2018
Messages
10,729
Points
113
First Name
Jakko
Now I’ve got people’s attention with this one, I may as well ask: anyone have recommendations for which model paint colour to use for British army green, ca. the 1980s?
 

papa 695

Moderator
Staff member
Moderator
SMF Supporter
Joined
May 9, 2011
Messages
20,329
Points
113
Location
Doncaster, South Yorkshire
First Name
Ian
Just caught up on this one Jakko, some nice work for a throw together kit you thought it was going to be.
 

Jakko

Way past the mad part
SMF Supporter
Joined
Apr 28, 2018
Messages
10,729
Points
113
First Name
Jakko
Which kit is? :smiling3:
 

JR

Member of the Rabble and Pyromania Consultant
SMF Supporter
Joined
May 26, 2015
Messages
17,275
Points
113
Location
lincs
First Name
John
Jakko .
Just read, Try using Vallejo model air olive drab 043,interior green 010 in a 50/50 mix, from a posting on Britmodeller. Does that make any sense.
John.
 

Jakko

Way past the mad part
SMF Supporter
Joined
Apr 28, 2018
Messages
10,729
Points
113
First Name
Jakko
*sigh* I wanted to spray this model green tonight, but when I was taping off the bits that need to remain red I noticed I had missed one of those areas. So I had to do that first and wait for it to dry before I can actually give it its green coat, probably tomorrow.

As for the colour of that: I think I came across the Britmodeller thread you found too, John. It has all sorts of recommendations, but the basic advice seems to be: most shades of medium military green are probably okay :smiling3: I’ve decided to go with Tamiya Field Grey with a bit of green mixed in, since apparently British Army green of the 1970s and 80s faded to something very close to that Tamiya colour — and I have it handy already, unlike most other paints that are recommended there.
 

JR

Member of the Rabble and Pyromania Consultant
SMF Supporter
Joined
May 26, 2015
Messages
17,275
Points
113
Location
lincs
First Name
John
Jakko
That will be interesting, I will check back tomorrow. I'll try to find a photo of my Scammell, it was around that time.
John.,
 

Jakko

Way past the mad part
SMF Supporter
Joined
Apr 28, 2018
Messages
10,729
Points
113
First Name
Jakko
I had primed the model a few weeks ago and sprayed the colours for a BATUS range safety vehicle on, but as mentioned above, I only noticed yesterday that I’d forgotten a bit. So here is the model after correcting that mistake:

IMG_4819.jpg

Red on the sides of the hull and the ammo box on the engine deck, yellow on the turret. This signifies a recce or guided weapon troop safety vehicle, according to the article Ferret Fever by Tim Neate in Military Modelling of May 1989. I picked it mostly because I thought the yellow and red would be more interesting that red hull and turret (tank troop safety vehicle) or red hull and white turret (squadron safety vehicle).

(For the record, I had forgotten the plate at the back of the hull. It did have some red paint on it, but the bottom half didn’t.)

And after masking the right hull side, the bits forward and aft of the spare wheel on the left, and the ammo box, and then spraying green:

IMG_4821.jpg
IMG_4823.jpg

I used a mixture of Tamiya XF-65 Field Grey and XF-56 Olive Green, but have no real idea of the proportions because I just put some paint into my airbrush cup — most of it was XF-65, though.

I didn’t spray the turret because only the underside and interior of that needs to be the outside colour, and most of the interior would be very hard to reach with an airbrush, so I’ll brush paint that instead.
 

Jakko

Way past the mad part
SMF Supporter
Joined
Apr 28, 2018
Messages
10,729
Points
113
First Name
Jakko
Now with more paint on!

IMG_4825.jpg
IMG_4827.jpg

I followed up the base coat with an overall wash of Humbrol HU-1 Medium Green 42 (yes, HU-1) and once that was dry, drybrushed with Humbrol 86 Olive Green. After removing the masking tape I also put washes over the red and green bits, of Citadel (Games Workshop) Mechrite Red and Tamiya XF-60 Dark Yellow respectively. The tyres are Tamiya XF-69 NATO Black at the moment. Oh, and I painted the lights and mirrors, and a flat black bit above the driver’s hatch for the registration number.

My main problem now is marking. I’ve got dry transfers that will probably just fit for the registration number, but the vehicle needs the number 27, 27A, 28 or 28A in black on the red bits on the left, right and rear, but so far I’ve not been able to find suitable ones in my fairly extensive stash of left-over kit decals and purpose-bought ones. I might have to resort to making a stencil and spraying.
 

rtfoe

SMF Supporter
Joined
Apr 29, 2018
Messages
7,495
Points
113
Location
Malaysia
First Name
Richard
Very nice, Jakko. The red and yellow are real standouts.

Cheers,
Richard
 

Jim R

SMF Supporter
Joined
Apr 27, 2018
Messages
13,693
Points
113
Location
Shropshire
First Name
Jim
Hi Jakko
Looking rather colourful. Military green is a real can of worms. Your paint job however looks really nice. Looks very different from the multi medium model before painting.
Mask making for the numbers will need a lot of work but the end result could actually look better than decals. Being black on red should spray nicely.
Jim
 
Top