Takom King Tiger w. Henschel Tur. 505 zimmerit & interior 1/35

J

Jens Andrée

Guest
Friulmodel tracks have arrived after a pretty lengthy trip from Hungary to Sweden... Perhaps it took a detour somewhere? ;)
It doesn't matter - it's here and the quality is outstanding!
My only ordeal right now is that you have to drill/ream out the pin hole with a 0.5 mm drill...
I've got drills from 0.5 mm to 1.5 mm with 0.1 mm increments, but they are for my PCB work so they are short and aren't really usable for this.
I don't even know where to find long 0.5 mm drills because such a thing would snap in a fraction of a second when used for most applications?
Perhaps a home-made reamer is the best choice instead?

There's very little flashing on the track links so this is going to be fun to try!

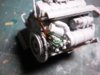
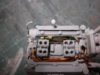
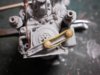
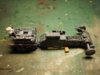
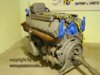
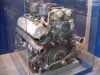
I've started to paint the lower hull assembly and I make everything as modules so I can paint larger bits before assembly rather than piece by piece.
I read somewhere that a couple of builders have experienced wonky/unaligned road wheels after assembly. I don't seem to have that problem, which is nice.

I've quit using AMMO primer and instead are using Tamiya paint as primer. Much simpler and more consistent. The rest of the paint are AMMO though and I'll just have to take it slow and apply thin layers until the wanted colour is achieved. I still think Tamiya & co with their "almost acrylic paints" are nicer to work with than AMMO's solvent free paint. At least for us beginners.

I will take some pictures on the next paint session so you can see what's happening!

Cheers,
Jens
 
J

Jens Andrée

Guest
Not having a long enough 0.5 mm drill made the prep work for the Friulmodel track links a royal pain in the rear end, but slowly each track link was fixed and I've test assembled a large enough bit to see how it looks and I have to say that I'm really impressed with the quality and how they look!
Weight doesn't scale like most things but they look really realistic I think and they certainly have a realistic sag?!

I've assembled them with the included brass wire just to test, hence why I've left them sticking out, but I will use flattened staples (from a stapler gun) when I do it properly later.
I've also toyed with the idea to use pin needles as track pins since the ones with metal heads might look like a real track pin, but they can be tricky - and very hard! - to cut to length so I might give that a pass even before trying.

How do you do your Friulmodel tracks with regards to preparation and drilling/reaming etc?

atl-16-1.jpg


Now a request for help: Does anybody have one, or several, pictures of a Maybach HL230 P30 that includes the electric wiring?
My model doesn't include this and I've not been able to find any reference pictures with this either. I was hoping that the King Tiger restoration project in Switzerland had documented this but they'd already pulled that of before they took their pictures. If they did take some complete pictures I missed it.
I would like to try to add this detail if possible because it would look great if successful. I'm toying with the idea to display the engine outside the tank when I build the display later...? Might look good?

The picture below shows some detail and the technical drawing further below also shows wiring, but nothing beats a good photograph of the real deal!
Sadly I don't remember where I found these two pictures so I can't give credit nor link to the originator. If this breaks any rules regarding copyright then please let me know and I'll remove them.

HL230P30-bw.jpg


The drawing is big so if you want to see it in full resolution you have to click the picture, or download it and use an external viewer.

hl230p30.jpg


Many thanks in advance!

Cheers,
Jens
 
J

Jens Andrée

Guest
Tracks are done and I couldn't find the right staples so I went with the included brass wire instead.
It took roughly 8 hours to prep and assemble whilst watching TV and later listening to music, but I'm very pleased with the end results!

If I do it again I will get a proper 0.5 mm drill (a few of them actually in case one breaks) for my dremel to make things easier because it was a bit tricky without, unless someone has got a better method?

My fingers are really sore right now and it feels like I've been rubbing my fingertips on sandpaper the whole time so next time I'll use nitril gloves or something...

Now it's time to sleep I guess ;)
 
Joined
Oct 12, 2015
Messages
185
Points
43
Location
Antwerp
First Name
Michaël
lol listen to music???i live 500m from Tomorrowland here in Belgium
Sleep last night 4 hours....
and next weekend to start all over again pfff

abt that engine.....i have almost the same,if i can reach my pc i upload it to you
 
Joined
Oct 12, 2015
Messages
185
Points
43
Location
Antwerp
First Name
Michaël
see pictures i hope this works
 

Attachments

  • image (8).jpg
    image (8).jpg
    59 KB · Views: 14
  • image (9).jpg
    image (9).jpg
    57.7 KB · Views: 14
  • image (10).jpg
    image (10).jpg
    58.3 KB · Views: 15
  • image (11).jpg
    image (11).jpg
    93.1 KB · Views: 14
  • maybach_hl230_01.jpg
    maybach_hl230_01.jpg
    102.3 KB · Views: 14
  • Maybach_HL-230_Ch_01-1.jpg
    Maybach_HL-230_Ch_01-1.jpg
    127 KB · Views: 15
J

Jens Andrée

Guest
Fantastic reference pictures Michaël - huge thanks!!! :smiling3:
Exactly what I was looking for!!!

Apart from the engine construction I started the actual turret tonight and this was the first module that had some issues with fitting. The roof part of the turret didn't exactly match and even with a fair bit of surgery it didn't fit 100%. It's not going to show and I used some putty on the inside to hide a small gap, but apart from this the over all quality of this kit is awesome!
Very fiddly to assemble but awesome!

I've had a stomach bug for the last 10 days or so that haven't exactly been great for hours upon hours of modelling... In fact there's not been a whole lot apart from minor things and some figure painting.
I hope it's over now so I can resume this fantastic hobby.

Finally picking up a new rifle tomorrow after waiting a whole eternity for a license that should've taken max 2 weeks to process but took almost 6 months... Almost fitting here since it's viewed by some as a "hand cannon" due to the large calibre, and recoil. It's a .416 Rigby - a very manly rifle indeed! :D
If I ever to a full metal 1/4 scale tank the armament is sorted... hehe...

I've also drawn up the plans for a future build - when the desk is cleared - which is going to be a really crazy build. I'll let you know in due time but it's going to be a very big tank ;)

Cheers!
 
J

Jens Andrée

Guest
The day started badly. Left the house at 07:30 this morning for a 2.5 hour drive.
Didn't make it too far before I noticed that the engine was stuttering ever so slightly and when I put the foot down a bit (to check if it was a case of a dirty injector) black smoke came out the back of the car... FFFFFFF.....
It might be a turbo diesel but this isn't right!
I turned around and limped home having one thought about total engine failure after the other all the way back home, and honestly I still haven't stopped...
If it's something major it's going to cost a large chunk of money which I probably don't have, so yes - the day started very badly.

Also living very rural with no access to bus nor taxi, and being handicapped + two autistic kids means the car is our lifeline and must always work!
I'll have to make the call to the garage later this week when I've calmed down a bit.

On the way home I stopped halfway back to buy the isopropanol I've been trying to get hold of for a long time now and I knew this place had it. Finally something good!
As I've already mixed several of my Tamiya jars I've yet to try it but is it ok to pre-mix the paint in the jars, like I do with cellulose thinner, with the isopropanol?
I can't see a reason why not but I thought I'd ask before something else goes tits up today...

I also picked up new staples to use on the last 12 links of my Friulmodel tracks for the King Tiger but of course they were too big - which I just noticed... sigh.
Not a great day.

Been putting primer on an Elefant Jagdpanzer tonight and also painted Uncle Rommel for my DAK Panzer III Aufs.L
I tried using Buff as colour on his uniform and it doesn't look too bad colour-wise. Perhaps a bit dark? The highlights should fix that though... I hope.

Since I'm obviously gifted with the Sadim touch today (think reverse Midas, but everything turning into shit instead of gold) I'm now giving up doing anything else because I don't want to have a (bigger) mental breakdown tomorrow.
Perhaps a bottle of beer to calm the nerves... ;)
 
Last edited by a moderator:
J

Jens Andrée

Guest
Apart from the engine construction I started the actual turret tonight and this was the first module that had some issues with fitting. The roof part of the turret didn't exactly match and even with a fair bit of surgery it didn't fit 100%. It's not going to show and I used some putty on the inside to hide a small gap, but apart from this the over all quality of this kit is awesome!
Very fiddly to assemble but awesome!

I've been kicking myself for the last couple of day because of this comment I made on Tuesday...

I wasn't going to glue the roof of the turret!!!
Now it's not going to be possible to display the interior of the turret... :sad:

I thought I'd carefully planned everything but apparently not. I've also glued another two sub assemblies together that shouldn't be clued until after they'd been painted, but that's doable compared to the turret. I was just happily modelling on Tuesday apparently and lost track of my notes.

I can either live with the turret like it is and making a mental picture of the inside to remember - or I break out the dremel?

TakomKingTiger23.jpg

TakomKingTiger24.jpg

I don't know what will look good or bad, but the 2:nd picture feels better I think... Still, I didn't want to cut into this model and that's why I decided to build it so it could be displayed in 4 separate parts. (possibly 5 with the engine on a pallet between the lower and the upper hull. IF I decide to cut into the turret I might as well cut into more pieces to show other parts better - but it's not what I set out to do...
Lack of experience is what put me in this position. I won't do the same mistake again! (I hope...?)

This is the type of fudge that doesn't taste well.

I thought I was going to get the AMMO thinner earlier this week when the box o plastic turned up, but it was also listed as "coming soon" so I've not yet been able to start painting the modules that are done. My modelling store is now shut until the 7:th of August so I can't do much more before I get the thinner. AMMO paint doesn't spray well with my airbrush straight out of the bottle so I need thinner.

This is pretty much what can be done to the lower hull before painting, otherwise it'll be impossible. Most of the interior - all static pieces - will be painted in rotbraun but the torsion bars schwartzgrau, as will a few other details. After this I can start adding all the other details like drive train, radio, electrics and the rest before the turrets sub-assemblies can be joined. I've actually assembled more here than I'd planned to before paint, but it is possible to paint the lower hull like this.

TakomKingTiger25.jpg


TakomKingTiger26.jpg


TakomKingTiger27.jpg


It's a shame the cement leaves a shiny surface where you've applied it, but luckily it doesn't who when painted.

I was really hoping to be able to build more this weekend but I'll have to park this project yet again for a week. Luckily there are a few other models is various stages of painting so I don't have to twiddle my thumbs and do nothing ;)
 
Last edited by a moderator:
A

Airfix Modeller Freak

Guest
THat's the problem with these kits- YOu fork out a lot for the interior and it ends up being covered up forver. Personally, I wouldn't open it up
 

Mr Bowcat

SMF Supporter
Joined
Dec 29, 2016
Messages
3,647
Points
113
Location
London
First Name
Bob
I've had a similar dilemma with the Bradley I am building, I've spent weeks on the interior, with most of it not to be seen again, other than peering though hatches.

If I was you, and had my heart set on being able to take the top off the turret, I would email the manufacturer, re-buy the necessary parts and start again.

Good luck with it. :smiling3:
 
J

Jens Andrée

Guest
I've had a similar dilemma with the Bradley I am building, I've spent weeks on the interior, with most of it not to be seen again, other than peering though hatches.

If I was you, and had my heart set on being able to take the top off the turret, I would email the manufacturer, re-buy the necessary parts and start again.

Good luck with it. :smiling3:

You know what - that's an angle I hadn't thought of?!
I've vaguely heard about people ordering "spares" for things missing/broken/gone wrong but I didn't think of it here for some reason.

I've not built the whole turret shell yet since I realised I strayed from my plan, so perhaps we're talking about 2 sprues (out of 16-ish?) + turret shell that needs replacing.
It must be cheaper than buying another kit and worth the extra money for finishing the project like I've planned it. Mechanically anyway...

I will drop Takom an email tonight and see what procedure there is?

Big thanks for great advice Bob! :smiling3:

p.s. I also might just write it off to experience and learn by doing and live with it. That way I'm sure to not do the same mistake again. Hopefully...
 
Last edited by a moderator:
J

Jens Andrée

Guest
Friulmodel tracks are finally assembled after running out of brass wire for the pins and having to resort to slightly thicker steel wire - which required another round of drilling and reaming, and yet more painful fingers...
Before I'm using Friulmodel tracks again I shall buy longer 0.7 mm drills for sure but the quality and look & feel was worth all the work putting them together.

TigerIIFriul1.jpg


I did try assembling them with straightened staplers but mine were just a bit too thick, but if you buy the right ones that's the way to go I think. Beware though that the metal in staplers are much harder than brass and plastic so use proper hardened side cutters (for piano wire) and not your best ones for modelling! I've done that mistake in the past and damaged my expensive side cutter for electronics...

The shop I'm buying all my modelling supplies, and models, from are back from holiday tomorrow (I hope) so with a bit of luck I'll receive my AMMO by Mig thinner on Tuesday so I can paint the modules that are prepared in order for me to continue my build.
The ordeal with the turret and the glued roof that shouldn't have been glued is what it is and I'm going to put it down to experience and live with it rather than getting spares. Best way to learn from my mistakes and it's still going to be an awesome model if I do my part and not doing any more fudge! ;)

Apart from this I haven't done any serious modelling in a few weeks since it's the last couple of weeks of the summer break for the kids and it's been the worst summer in their life so far... We had a handful of nice days in the beginning of the summer but that quickly changed and not once have they been able to go swimming, and BBQ wasn't on the menu either with all the rain and abysmal weather...
I've tried to cheer them up and to come up with some activities, but kids their age (12 & 14) tends to just want to play computer games when there's bad weather... I tried.
School starts again on the 17:th and that marks the end of these 10 weeks of school summer break (which is one benefit of living in Sweden) - but without renewed energy due to lack of sun. I hope there's still a chance that the weather changes so we get a nice end of August and September, but it sure isn't looking like it :sad:
I'm keeping my fingers crossed though!

Cheers,
Jens
 
Top