Tamiya 1/32 P51D Mustang - Passion Wagon

BarryW

SMF Supporter
Joined
Jul 23, 2011
Messages
5,030
Points
113
Location
Dover
First Name
Barry
Last night I masked the nose and sprayed MRP's Medium Sea Grey on the underside. This aircraft was sprayed with RAF colours, rather than Olive Drab/Neutral Grey, so tonight I will be spraying the topside with the MRP, RAF Dark Green.

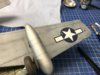
I first went over the whole of the underside with a very light almost mottled coat. Then I built up the colour with more very thin coats. Here is a pics part way through the process:
IMG_2457.JPG
Ignore the wheel well covers, they are just there for masking of course....Eventually I ended up concentrating in small areas including but not exclusively the inside of panels. I wanted an interesting varied modulated colour taking advantage of the black base to provide areas of light and dark.
I ended up with this:
IMG_2458.JPG
The colour modulation is quite subtle in places and is deliberately uneven. When people just spray carefully inside the panels all over the aircraft it just looks quilted and unrealistic, the play of light just is not even across a surface so these carefully sprayed patterns just do not look right. By variating the depth of colour without focussing entirely on the inside of panels I think you get a better impact. Some of the more subtle effects do not show well in the photo.

I finished with an overall light mist coat to bring it all together.

Usually when I spray a 1/32 aircraft using Vallejo Model Air I end up using a full cup of colour, sometimes more. At the end of the session I popped the lid and found:
IMG_2459.JPG
Lots of paint left. Given the cup narrrows sharply towards the bottom I estimate that about 40% of the paint could be poured back into the bottle.....

I had a feeling with my earlier work with this paint that I was using less colour and this proves it. Applying this very thin paint at a low (10-15psi) pressure in light coats results in using a lot less paint. It is not as expensive as people tend to think. When I summarise the MRP paint review I will do some cost calculations.

Also, it is worth noting - after 10 minutes, as soon as I finished the airbrush clean up, I ran my finger over the painted surface. It was smooth, so unbelievably smooth and with a sheen to it. It also seemed quite hard and resistant to scratches, not that I tried to scratch it. We all know how much longer it takes for Vallejo to get touch dry and how vulnerable it is until it has cured for 24 hours or more (a lot more when you have high humidity). I honestly think that I could have masked up right then to spray the next colour - I didn't as I ran out of time. Oh - it does take a bit longer to lay down your MRP paint in these thin coats but it is well worth taking the time for this result.

I will not need to lay down a gloss coat for decalling.
 
Last edited:

BarryW

SMF Supporter
Joined
Jul 23, 2011
Messages
5,030
Points
113
Location
Dover
First Name
Barry
At this stage I really need to decide on whether I need to paint the single white stripes inboard on each wing.

The photos are not much help, though here are a lot of them. You cannot always tell the full configeration of the aircraft when they were taken. They are with and without the fillet, with and without the invasion stripes, with and without the 8 kills.... This aircraft certainy had an interesting history.

There are plenty of depictions of the aircraft with no fillet and no invasion stripes with 6 kills but they are both with and without the inner wing stripes... confusing. None of these depictions are photos..... some are models, many are drawings and illustrations.

Who is right?

I will soon need to decide. Perhaps both are right? so which to choose....

Any thoughts?
 

dave

SMF Supporter
Joined
Nov 16, 2012
Messages
1,918
Points
113
Location
Brussels
First Name
Dave
It is always difficult to do a particular aircraft, as there can be a lot of conflicting information about.

I would go with the original photos and see if you can roughly timeline them and then choose based on your personal preference.

Even photos can be mislabelled but there is much less artistic licence than with drawings and illustrations.
 

BarryW

SMF Supporter
Joined
Jul 23, 2011
Messages
5,030
Points
113
Location
Dover
First Name
Barry
Well I painted the tops and side with MRP RAF Dark Green with the black-based modulated appearance. As my colour modulation process shows up better on dark colours I have a sequence of pics to show how I got there.

In using these paints I did not modify my approach from when I used Vallejo and AKI but this session has showed me how I should modify it and I will explain below.

It all starts, of course with masking up. I used the white-tac snake method for this. As you can see I do not mask under the main wings just areas that protrude and may be vulnerable to overspray. I blow paint directly down onto the wing to get the demarcation.
IMG_2462.JPG

Here is a top view before laying down paint.
IMG_2463.JPG
A light coat went down all over and then I concentrated spraying into the centre of panels and in areas where the aicraft would catch the light. I followed through with spraying a mix 50:50 of white and RAF Dark Green into areas that might be bleached by the sun. The result is unconvincing as it is meant to be but it does widen the range of shades. Next I will need to blend it together.
I mixed Mr Levelling Thinner and RAF Dark Green, about 30% thinner. I then used a fairly higher pressure than normal, about 25psi and mist coated the model. I kept building this up until I achieved the effect I want.
IMG_2464.JPG
IMG_2465.JPG
This is the result.
IMG_2466.JPG
After the model has received various weathering treatments and a matt coat the effect will blend a bit more improving the appearance. The trick really is knowing when to stop the mist coats.

How will I adapt next time with MRP?
1/ I will mist spray the MRP paint unthinned. This paint is thin enough and I will need to use less mist coats.
2/ I will 'target' some areas more than others to get a more varied effect. I in fact ended up doing this at the end anyway with the unthinned paint but in future it will just be part of the same stage.
3/ I will finish off with a mist coat of Mr Levelling Thinner - sprayed neat as it is.....

Why the latter?
Some magic happens when you do. This became quite apparent when I examined this model after spraying. The thinner seems to reactivate the underlying paint and ends up 'levelling and smoothing' the surface leaving you with a glossy smooth, perfect, surface for applying decals and enamel washes to. It is like a combination of a sander stick and varnish, a liquid sander and varnish. The surface I was left with is better than any I have managed with gloss varnishes. I thought the MRP paint left a superb good glossy surface anyway but the Mr Levelling Thinner improves it even more...

Next up - detail painting and decals, direct onto the MRP.
 
Last edited:

BarryW

SMF Supporter
Joined
Jul 23, 2011
Messages
5,030
Points
113
Location
Dover
First Name
Barry
Decision made.

I have spent the lunch period Googling and looking at dozens of representations of this aircraft. Most of them are after D Day with the D-day stripes, many but not all after the tail fillet was retrofitted and with either with 6 or 8 kills. Pics showing the aircraft with and without the single white i.d. stripe and with or without the remains of the D Day stripes.... It seems for post-D Day you can represent it pretty much how you want and no-one can say that you are wrong, not with certainty. But those are later than this depiction.

It is very confusing.

What is certain before D Day of course is having no D-day stripes, six kills only (or less perhaps) and there is no doubt the tail fillet was fitted after D-day as well.

But there is still no definative answer as to white wing stripe or not...

With or without - no-one can tell me I am wrong whatever way I go.

My decision - to get on and finish the build without the stripes. Later if there is evidence that it should have the stripes then it will be easy enough to add them... easier than trying to paint over them with camo and trying to blend in the weathering etc. besides, not adding them knocks a day off the build and I am looking forward to finishing and starting my next build...
 

colin m

Moderator
Staff member
Moderator
SMF Supporter
Joined
Dec 26, 2008
Messages
8,595
Points
113
Location
Stafford, UK
First Name
Colin
Great work Barry and great to catch up. It's also very inspiring, I need to 'get a move on' with my build and stop looking at everyone else's.
 

BarryW

SMF Supporter
Joined
Jul 23, 2011
Messages
5,030
Points
113
Location
Dover
First Name
Barry
One quick shot...
You can see the finish of the nose.
I have not decided yet whether it is worth doing a little minor touching up as when I weather it I can easily include these very minor flaws in the process. A little chipping along the edge for instance.
IMG_2467.JPG
I am getting on with detail painting and decals for now. More pics in a few days.
 

BarryW

SMF Supporter
Joined
Jul 23, 2011
Messages
5,030
Points
113
Location
Dover
First Name
Barry
As I will not be doing any more painting with MRP - my matt coats will be AKI Ultra Matt, though I may decide to seal the decals with MRP I will put a detailed paint review summarising my findings in the Product Review section of the forum.
 
J

Jens Andrée

Guest
Barry - apart from the obvious fact that your Mustang is amongst the finest I've ever seen in my life - I can now see why you are an advocate for Mr.Paint!
You've just made this German tank fanatic really keen on building a plane for my next project...

Building a plane is also a good excuse to test Mr.Paint because my late Wehrmacht colour selection would have to be updated regardless ;)
 

BarryW

SMF Supporter
Joined
Jul 23, 2011
Messages
5,030
Points
113
Location
Dover
First Name
Barry
Decals are on, these are a mix of the Tamiya kit ones for the stencils and national insignia and the Kitsworld decals for this specific aircraft.

Why oh why can't all decals be like the Kitsworld ones? You can really tell the difference between them and the appalling Tamiya ones. The latter were living down to expectations splintering and being difficult to bed down. The Kitsworld by contrast are so forgiving and accommodating, bedding in nicely and completely tolerating my efforts to get them in position with no splintering at all. A couple of coats of softener and I was ready to apply a thin gloss coat to seal them ready for washes.

Photo below is after applying decals but before touching up the splintered Tamiya ones.
IMG_2468.JPG

Once the touch up paint was dry I applied a nice MRP gloss coat.
IMG_2469.JPG

Tomorrow I will do panel line washes before applying the first matt coat.
 

BarryW

SMF Supporter
Joined
Jul 23, 2011
Messages
5,030
Points
113
Location
Dover
First Name
Barry
This morning I applied panel line washes using AKI Panel liner and followed up with the first matt coat.
The underside where you can see the effect more clearly.
IMG_2472.JPG
A close up of the nose art
IMG_2470.JPG
Here are the materials I will be using the finish the weathering some of which I will do on the first matt coat but some will be after the second matt coat.
IMG_2471.JPG
I like the MRP matt varnish but it will take at least two coats for a decent matt finish but it may be three coats.
I decided not to use the AKI Ultra Matt after all. I might finish off with it if I think the aircraft is not matted enough after the second MRP coat.
 

BarryW

SMF Supporter
Joined
Jul 23, 2011
Messages
5,030
Points
113
Location
Dover
First Name
Barry
I can report that the second coat of MRP did what was needed. Not as matted as the AKI Ultra MATT achieves but it certainly is matt enough.
Anyway that was applied after some smoke/exhaust weathering with pigment.
I also did some weathering streak effects.
IMG_2473.JPG
IMG_2474.JPG
IMG_2475.JPG
There are some thing that have to be done after the final matt coat where you need a different sheen or shine.
Lights for instance with a chrome pen
IMG_2476.JPG
I will paint the transparency covers with transparent colours.
Paint chipping also. I love this stuff...
IMG_2477.JPG
For this
IMG_2482.JPG
IMG_2483.JPG
I have a little more chipping to do and then the kerosene splills before final fittings.

Hopefully tomorrow - on the last leg now.
 

BarryW

SMF Supporter
Joined
Jul 23, 2011
Messages
5,030
Points
113
Location
Dover
First Name
Barry
Made a start on final fittings. Ran out of time so I will have to finish tomorrow. Progress so far.
Not happy with rear wheel assembly. A wash will help but there is too wide a join. Should have worked as usual by glueing into place early before painting but on the previous two builds there was no suggestion this would be a problem.
IMG_2484.JPG
IMG_2485.JPG
Above the centre of the wheel wells snapped in

IMG_2486.JPG
Legs screwed in nicely.
IMG_2487.JPG
Long range tanks in place.
 

Attachments

  • IMG_2488.JPG
    IMG_2488.JPG
    74.9 KB · Views: 4

BarryW

SMF Supporter
Joined
Jul 23, 2011
Messages
5,030
Points
113
Location
Dover
First Name
Barry
Just looking at the above the photos really bring out how awful these rubber tyres are, they dont look as bad in reality but even so they let the model down. I have resin for my next Spitty and need to conside them for the Corsair and all other models in my stash with them...
 

yak face

Wossupwidee?
Staff member
Moderator
SMF Supporter
Joined
Jun 13, 2009
Messages
12,373
Points
113
Location
sheffield
First Name
tony
Looking superb now barry , the weathering is perfect . The tyres look ok apart from the obvious seam down the middle! I imagine youve already tried sanding it off ?
 

BarryW

SMF Supporter
Joined
Jul 23, 2011
Messages
5,030
Points
113
Location
Dover
First Name
Barry
Looking superb now barry , the weathering is perfect . The tyres look ok apart from the obvious seam down the middle! I imagine youve already tried sanding it off ?

I have in the past and found the process left me with a worse result than when I started. Resin is the answer to this.
 

yak face

Wossupwidee?
Staff member
Moderator
SMF Supporter
Joined
Jun 13, 2009
Messages
12,373
Points
113
Location
sheffield
First Name
tony
The good thing is theres plenty of aftermarket available , and it shouldnt cost a packet to fix , even the eduard brassin ones arent too dear
 
Top