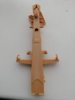
Found a nice high res photo. It looks like the welds are on the corners of the leg/beam/support thingies!
- Home
- Forums
- Military Vehicles
- Military Vehicles Under Construction
- Artillery pieces Under Construction
You are using an out of date browser. It may not display this or other websites correctly.
You should upgrade or use an alternative browser.
You should upgrade or use an alternative browser.
1:35 Dragon 6287 88mm Flak 37 (build version: 37, transport, extended shield)
- Thread starter Gauge1TrainsDK
- Start date
rtfoe
SMF Supporter
Hi, looking at the Ians reference and enlarging it there is a faint seam right through the center of the arm but very well polished down by German engineering. The corners seem to have been grinded down to bevel the sharp corners so it appears welded. I could be wrong but there is a seam alright...very faint. The Germans must have used Vallejo putty. 
Cheers,
Richard
Cheers,
Richard
- Joined
- Apr 28, 2018
- Messages
- 10,784
- Points
- 113
- First Name
- Jakko
I use body putty intended for use on cars, and find it works quite well on models too. I was also quite happy with Revell Plasto (I switched to the car putty a while after the last local model shop closed some years ago) though you need to squeeze all the liquid glue-like stuff out of the tube first, then use the fairly dry putty that’s left.I am actually crap with filler - I have only used Vallejo Plastic Putty so far, and I am just not good at it. It usually just scrapes right off, even the next day. I am a bit uneasy with what to do about that. I do not use oil-based products or the like.
You can try out putty of your choice on the underside of the mounting, I’d think — or else take some part that you won’t use from a kit, preferably a fairly large one (say, a gunshield for the FlaK if you decide to build it without), then make some deep scratches on it with your knife and fill them.
Steve Jones
Steve Jones Scale Modelling Site
Here are some photos of the arms for you. Looks like you may have to do some more filling and sanding I'm afraid. It would be worth doing as this is a terrific build.


rtfoe
SMF Supporter
Fantastic reference Steve, the last two images show a distinct faint line which now could have been the meeting of casting blocks...I probably am guesstimating. It surely shows no gaps so I'm afraid filler is needed as all have said. At this point of your assembly and painting, Christian, I would suggest two part putty...perhaps a pinch of the kneaded parts placed at the seam with a toothpic and with a wet finger or cutip to press and smoothen. A little bit is enough as your seam is quite small. You can paint it right away as it doesn't shrink and will cure on its own. No sanding required.Here are some photos of the arms for you. Looks like you may have to do some more filling and sanding I'm afraid. It would be worth doing as this is a terrific build.
View attachment 363884View attachment 363885View attachment 363886View attachment 363887View attachment 363888View attachment 363889
Cheers,
Richard
- Joined
- Apr 28, 2018
- Messages
- 10,784
- Points
- 113
- First Name
- Jakko
According to US Army Technical Manual E9-369A, German 88-mm Antiaircraft Gun Materiel from 29 June 1943:Fantastic reference Steve, the last two images show a distinct faint line which now could have been the meeting of casting blocks.
9. BOTTOM CARRIAGE.
a. The bottom carriage is of box-section type construction, welded, and riveted.
The photos in the book mostly show the 8,8-cm-FlaK 18, not 37, though (recognisable by the round rather than square feet), and the carriage of that has a lot more rivets than the one in Steve’s photos. Still, I don’t think construction would have changed markedly except for simplification.
Steve Jones
Steve Jones Scale Modelling Site
Some nice rust photos there Steve.
Yeah its falling apart like me mate. I took a load of photos of it when I was in Ambleteuse with the view of building it one day. Its on about page 38 of all the builds I want to do LOL
Gauge1TrainsDK
SMF Supporter
- Joined
- Mar 1, 2017
- Messages
- 298
- Points
- 43
- First Name
- Christian
Thanks, Andrew - much appreciated!Looking very nice indeed, well done!!
Andrew
Gauge1TrainsDK
SMF Supporter
- Joined
- Mar 1, 2017
- Messages
- 298
- Points
- 43
- First Name
- Christian
To all those who provided advice on the filler issue:
Thank you and sorry for my absence which is due mainly to a heavy workload taking over both days and nights. When a hindrance such as the need for filler appears, it has a tendency to halt my builds because of my everyday workload, but I am of course neither giving up nor setting it aside for long! It's much too cool of a kit
Thank you and sorry for my absence which is due mainly to a heavy workload taking over both days and nights. When a hindrance such as the need for filler appears, it has a tendency to halt my builds because of my everyday workload, but I am of course neither giving up nor setting it aside for long! It's much too cool of a kit
shovelhead 1977
SMF Supporter
- Joined
- Feb 28, 2019
- Messages
- 179
- Points
- 43
- First Name
- raymond
hi Christian, I had the same problem and i just used the glue which i used for building it, just build the glue up slowly , let dry and sand it slow work but it worked ' you can see the different colour down the middle of the leg, just a little bit more and its ready for paintingThere wasn’t a seam there on the real gun, a quick look at some photos tells me, and those parts look like they have a very obvious one, yes. My suggestion would be to get the filler out
Attachments
Gauge1TrainsDK
SMF Supporter
- Joined
- Mar 1, 2017
- Messages
- 298
- Points
- 43
- First Name
- Christian
hi Christian, I had the same problem and i just used the glue which i used for building it, just build the glue up slowly , let dry and sand it slow work but it worked ' you can see the different colour down the middle of the leg, just a little bit more and its ready for painting
Thanks, Raymond!
I have been trying that on other models, I just thought it would not work with so deep a seam. Yours proves it works, though! Well done, Sir.
Gauge1TrainsDK
SMF Supporter
- Joined
- Mar 1, 2017
- Messages
- 298
- Points
- 43
- First Name
- Christian
I realised, based on your feedback, that maybe I should water down the waterbased Vallejo putty, with saliva for instance.
Well, a small bit of putty on the model and a lick of the little finger produced the results in the pics below. I will try to sand it now, since it has hardened from last night, and see how it looks. If it doesn't work, maybe I will try the glue technique!


Well, a small bit of putty on the model and a lick of the little finger produced the results in the pics below. I will try to sand it now, since it has hardened from last night, and see how it looks. If it doesn't work, maybe I will try the glue technique!
Gauge1TrainsDK
SMF Supporter
- Joined
- Mar 1, 2017
- Messages
- 298
- Points
- 43
- First Name
- Christian
Sanded it, and I have difficulty assessing whether or not I will get a smooth surface when I paint. Time will tell, and if not, I can go back or maybe cover it up with dirt. Maybe!
Gauge1TrainsDK
SMF Supporter
- Joined
- Mar 1, 2017
- Messages
- 298
- Points
- 43
- First Name
- Christian
Going back in time a little bit, I finished the wheels for separate painting (always love when the tires are separate, like Tristar did on I believe all their models - why won't Dragon, Meng, Takom and RFM do that?), as well as the first of two wheel suspensions and covers.
The wheel constructions have exquisite detail, typical for Dragon, and look absolutely awesome
Unfortunately, I spilled some Tamiya Extra Thin on one of the big wheel protectors, as you can see on the bottom picture. I tried to make it smooth and feel I succeeded enough to paint and weather it well enough. It is a vehicle of war, after all.
Last edited:
Best thing with that kind of glue is to not touch it and let it evaporate away. It's when you start fiddling with it while 'wet' the damage happens...Unfortunately, I spilled some Tamiya Extra Thin on one of the big wheel protectors
Looking very nice this kit.
- Joined
- Sep 4, 2019
- Messages
- 9,491
- Points
- 113
- First Name
- Andrew
IanBest thing with that kind of glue is to not touch it and let it evaporate away. It's when you start fiddling with it while 'wet' the damage happens...
Looking very nice this kit.
Great tip. Why didn't I think of that!!!! DOH!!
Andrew
Gauge1TrainsDK
SMF Supporter
- Joined
- Mar 1, 2017
- Messages
- 298
- Points
- 43
- First Name
- Christian
Thanks, Ian!Best thing with that kind of glue is to not touch it and let it evaporate away. It's when you start fiddling with it while 'wet' the damage happens...
Looking very nice this kit.
I've tried just leaving the glue, and it created a "glue pool" which was visible in the paint work, so I thought I'd better do something else this time, since it was in a very visible place
