1/35 - German Panther Aus A - My First Historical Model

KevWhalen90

SMF Supporter
Joined
Jul 20, 2021
Messages
13
Points
13
First Name
Kev
Hi All,

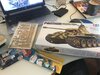
This is my first project in quite a while (7 years or so) and my first full actual historical kit so was looking to get back into things with my FAV of the German WW2 tanks.... the Panther.

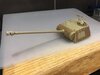
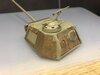
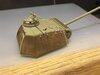
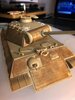
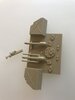
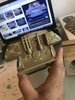
The kit arrived yesterday all well and good, looking through all the parts and pieces seems fairly straight forward so I began today by putting together the rear section of the tank with the exhaust system and couple of wee storage units. All good!!

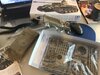
However, to add a bit of detail and texture to the model I had decided, in my wisdom, to also pick up an Eduard Zimmerit kit to add to the Tamiya model...... and here the issues of the day began! :tears-of-joy:

First of all..... the Eduard kit has been produced for the "Dragon Panther Aus A" kit and so nothing actually fit to the Tamiya variant. I had initially thought to just drop the Zimmerit altogether for this first build but my tendency to make things harder for myself got the better of me and I decided instead to "modify" the etched brass and try to fit it that way.......

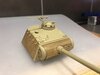
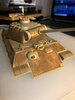
To be fair the stuff was easy enough to cut and shape (just time consuming) and overall I am pretty happy with the end result.... its a wee bit wonky in spots but hey...... aren't we all!? Most of the tricky bits are around the back sections so I am hoping the rest of the brass will be able to be altered to fit as well!

So the rear section is done and glued...... pics below..... and I would really love to hear some comments from anyone..... good or bad on your thoughts with how this has turned out so far......

Cheers,

Kev
 

Attachments

  • IMG_7337.JPG
    IMG_7337.JPG
    154 KB · Views: 41
  • IMG_7338.JPG
    IMG_7338.JPG
    155.1 KB · Views: 41
  • IMG_7340.JPG
    IMG_7340.JPG
    52.2 KB · Views: 38
  • IMG_7343.JPG
    IMG_7343.JPG
    80 KB · Views: 43
  • IMG_7346.JPG
    IMG_7346.JPG
    121.8 KB · Views: 42

Dave Ward

Still Trying New Things
SMF Supporter
Joined
Apr 27, 2018
Messages
8,635
Points
113
Location
South Gloucestershire
First Name
David
Kev,
Zimmerit was applied by hand - a form of putty/cement that was applied by trowel & rake, so it shouldn't be too regular! - any large gaps - that's where it didn't stick, or has flaked off! It's looking good so fat - the tricky bits are around the ball mounting for the bow machine gun.............
Dave
 

KevWhalen90

SMF Supporter
Joined
Jul 20, 2021
Messages
13
Points
13
First Name
Kev
Kev,
Zimmerit was applied by hand - a form of putty/cement that was applied by trowel & rake, so it shouldn't be too regular! - any large gaps - that's where it didn't stick, or has flaked off! It's looking good so fat - the tricky bits are around the ball mounting for the bow machine gun.............
Dave

Thanks so much for the info Dave, much appreciated! Yeah I wanted it to look non uniform or symmetrical so will continue with this technique and see how it ends up!

Cheers,

Kev
 

Jakko

Way past the mad part
SMF Supporter
Joined
Apr 28, 2018
Messages
10,772
Points
113
First Name
Jakko
the Eduard kit has been produced for the "Dragon Panther Aus A" kit and so nothing actually fit to the Tamiya variant.
That is not surprising — you’ve got the ancient Tamiya Panther there, which has a well-deserved reputation for being very inaccurate. Have you noticed a whole row of roadwheels is missing yet? :smiling3:
 

spanner570

SALAD DODGER
SMF Supporter
Joined
May 26, 2009
Messages
12,981
Points
113
First Name
Ron
Kev, don't let your enthusiasm be dampened.

Enjoy the build, warts and all. It's a great kit to cut your teeth on.

The zimmerit looks good and shouldn't be neat anyway.

Have fun and be happy with the end result. I was, when I made my 'inaccurate' Panther.
 
Last edited:

KevWhalen90

SMF Supporter
Joined
Jul 20, 2021
Messages
13
Points
13
First Name
Kev
Hey all,

Thanks again... really appreciate each comment and like!

Having a cracking wee time so decided to go ahead and give the turret a crack.....got it dry fitted just now and again hacked the Zimmerit to pieces to get it to "fit" ....... :thumb2:

You may notice that on one side of the turret.... the Zim is in one big piece and the other has a large hole in it........ well guess who glued on the first piece and completely forgot about leaving an area for the tanks ID markings!! :smiling5: 
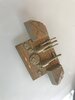
... still.... i like the fact its going to be Asymmetrical....

Cheers,

Kev
 

Attachments

  • IMG_7348.JPG
    IMG_7348.JPG
    86.6 KB · Views: 24
  • IMG_7349.JPG
    IMG_7349.JPG
    78.1 KB · Views: 25
  • IMG_7350.JPG
    IMG_7350.JPG
    96.4 KB · Views: 26
  • IMG_7351.JPG
    IMG_7351.JPG
    68.8 KB · Views: 22

KevWhalen90

SMF Supporter
Joined
Jul 20, 2021
Messages
13
Points
13
First Name
Kev
Wow... what a
Kev,
one of the most valuable resources can be found here SCALEMATES it lists a vast range of models, date of introduction, reviews and even downloadable instructions, it can be useful, when researching which model to buy!
Dave

Wow... what a fantastic resource! Many thanks!
 

JR

Member of the Rabble and Pyromania Consultant
SMF Supporter
Joined
May 26, 2015
Messages
17,275
Points
113
Location
lincs
First Name
John
Nice start Kev, nothing like the the satisfaction in being able to use the PE in the end .Good for you .
 

rtfoe

SMF Supporter
Joined
Apr 29, 2018
Messages
7,502
Points
113
Location
Malaysia
First Name
Richard
Hi Kev, what can I say about PE...you either love them, hate them or just plain work with them to get the results you want. From your efforts I know you're not a bin guy. Great stuff and you get extra points.:smiling2:
If it looks good it is good.

Cheers,
Richard
 

KevWhalen90

SMF Supporter
Joined
Jul 20, 2021
Messages
13
Points
13
First Name
Kev
Hi all,

Hope everyone has had a good start to their week!

Managed to get some more Zimm added to the upper hull and finish the turret of the Panther this morning....

Really liking how the flaws and blemishes in the brass ... along with the sections of superglue that have dried a bit chunky and have filled some of the wee gaps are making it look like an uneven surface and something that might look "applied" once the primer coat goes on.... if that makes any sense! lol!

Going to add some more Zimm to the hull and get all of the tools and accessories added before looking at the lower hull, wheels and tracks!

Oh........ and from just looking at the pics as i am uploading them...... the front hull machine gun "bulge" needs some too.....

Cheers,

Kev
 

Attachments

  • IMG_E7366.JPG
    IMG_E7366.JPG
    141.2 KB · Views: 24
  • IMG_E7367.JPG
    IMG_E7367.JPG
    114.5 KB · Views: 24

CarolsHusband

SMF Supporter
Joined
Feb 9, 2021
Messages
430
Points
93
Location
Sunny Cornwall
First Name
Dan
My two penneth...

Kev,
Zimmerit was applied by hand - a form of putty/cement that was applied by trowel & rake

I think that's the key. Unless you were a plasterer, etc, any soldier charged with the job would have varying results. I have a Tiger 1 somewhere I Zimmerited with a thin skin of filler and a piece of plasticard cut to 2.5 mm. It's in no way perfect but I always thought it looked pretty good realistic.

I'll dig it out, take a pic & prove myself wrong !
 

Tim Marlow

Little blokes aficionado
SMF Supporter
Joined
Apr 27, 2018
Messages
16,764
Points
113
Location
Somerset
First Name
Tim
I must admit, I wondered why the Germans bothered with it. It was another factory build stage that slowed down production and none of their main protagonists regularly used magnetic anti tank weapons. Oh, and apparently it caught fire quite readily as well, being made mostly from pine resin and sawdust :surprised:
 

Jakko

Way past the mad part
SMF Supporter
Joined
Apr 28, 2018
Messages
10,772
Points
113
First Name
Jakko
That’s one of the great mysteries of Zimmerit, AFAIK: the only people using magnetic mines in any numbers were the Germans themselves, yet they’re the only ones with a widespread countermeasure to them.

The composition was apparently:—
analyzed by C.S.A.R. and found to be the following: Polyvinyl Acetate-25%, as binder or glue; Wood Fiber-10%, as filler; Barium Sulphate-40%; Zinc Sulphide-10%; Ochre Pigment-15%, for the dark yellow color.
(source)

It wasn’t really susceptible to fire, but it was thought to be, which is one of the reasons why it was discontinued. The difficulty of applying it and the resulting slowing down of production must surely have contributed, though: according to a text quoted in Spielberger’s Sturmgeschütz, after application, it was to be hardened with a blowtorch, then the pattern was applied, and a bit later on a blowtorch was applied some more before the Zimmerit was allowed to dry naturally. This in a country where resources were becoming ever more scarce.
 
Last edited:

KevWhalen90

SMF Supporter
Joined
Jul 20, 2021
Messages
13
Points
13
First Name
Kev
Love that.... thanks for all the info!! Yeh that's a really interesting wee article!! giving me some more ideas!

Thanks again for all the comments!
 

Jim R

SMF Supporter
Joined
Apr 27, 2018
Messages
13,710
Points
113
Location
Shropshire
First Name
Jim
Hi Kev
Late in - sorry. Great start and the zimm looks fine. It sounds as if you have cracked the most important thing about this hobby - having fun!! :tongue-out3:
Jim
 
Top