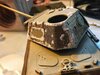
I know bugger all about zimmerit lol.
Basically, it’s a paste that was applied to the tank and then given a pattern using some basic tools; the point of it was to prevent magnetic charges (explosive devices equipped with magnets) from sticking to the tank. The idea is simply that if there is a thick enough non-magnetic layer on the armour, the magnets won’t get enough grip and the charge won’t stick to the vehicle. The pattern served to raise some of the material to a greater thickness and thereby increase the distance between magnets and armour, making them even less likely to stick. (For this reason also, it was only applied to vertical and sloping surfaces, not to horizontal ones where it would be pointless, and only to the main armour — not to side skirts, stowage bins, mudguards, etc.)
The most common way to make the pattern was with a wide spatula, which was pressed into the paste at regular intervals to create columns of ridges all along the armour plate. Other patterns and methods were used as well, though. On the Panther, for example, the ridged columns were commonly combined with a grid pattern scored into the material, for reasons I don’t know (maybe to stop large chunks flaking off by creating break lines?).

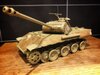
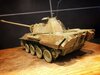
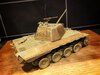
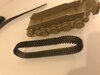
 but in the end am really happy with how they are fitted and how they are looking....
")