1:35 Sturmgeshutz IV (Tamiya kit)

mrtintheweb

mrtinthweb
Joined
May 16, 2020
Messages
222
Points
43
Location
East Sussex
First Name
Toby
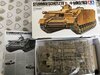
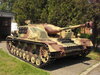
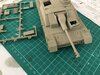
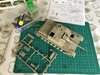
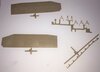
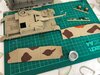
Whilst Stugs seem to be the current build of choice for so many I looked to do something similar. Found this kit cheap on eBay for £15. I had hoped to do a Marder but the kits were either not available or above my £30 max spend.
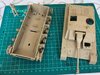
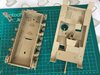
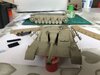
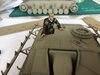
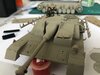
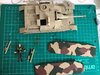
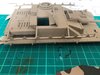
I finished a Panzer IV not too long ago and a quick look shows a lot of similar parts, particularly the chassis which with hindsight is like...... DERRRRRRRR!
T
 

Attachments

  • IMG_4396.JPG
    IMG_4396.JPG
    182.8 KB · Views: 17

mrtintheweb

mrtinthweb
Joined
May 16, 2020
Messages
222
Points
43
Location
East Sussex
First Name
Toby
Slow start on this as I had an Airfix Jag to finish first which was hateful. This kit is like deja-vu so far having already done a Panzer 4 which shares a near identical lower hull and tracks. Not sure on paint job as I am thinking of doing some kind of dessert camo but struggling on images to copy. Found one (attached). Might just make one up that fits other Africa Corps vehicles of the era, even though the Stug IV never went to Africa. The below scheme used in Italy is my go-to at the moment.
T
 

Attachments

  • 1280px-Sturmgeschutz_iv_Muzeum_Broni_Pancernej_CSWL_2.jpg
    1280px-Sturmgeschutz_iv_Muzeum_Broni_Pancernej_CSWL_2.jpg
    266.4 KB · Views: 16
Last edited:

mrtintheweb

mrtinthweb
Joined
May 16, 2020
Messages
222
Points
43
Location
East Sussex
First Name
Toby
On the build I've done the easy bits.
T
 

Attachments

  • IMG_5361.JPG
    IMG_5361.JPG
    151.8 KB · Views: 8
  • IMG_5362.JPG
    IMG_5362.JPG
    146.2 KB · Views: 8
  • Like
Reactions: JR

JR

Member of the Rabble and Pyromania Consultant
SMF Supporter
Joined
May 26, 2015
Messages
17,275
Points
113
Location
lincs
First Name
John
Toby, Steve Jones is the man for camo, he finds things in the strangest of places. Drop him a pm.
I've got the same kit in my stash, so will watch yours being built if you don't mind.
 

Jakko

Way past the mad part
SMF Supporter
Joined
Apr 28, 2018
Messages
10,778
Points
113
First Name
Jakko
Not sure on paintjob as I am thinking of doing some kind of dessert camo but struggling on images to copy. Found one (attached). Might just make one up that fits other Africa Corps vehicles of the era.
StuG IV production started only in December 1943, when the Axis armies in Africa had already been defeated about six months before. Desert camouflage would be unlikely on one of them :smiling3:
 

mrtintheweb

mrtinthweb
Joined
May 16, 2020
Messages
222
Points
43
Location
East Sussex
First Name
Toby
StuG IV production started only in December 1943, when the Axis armies in Africa had already been defeated about six months before. Desert camouflage would be unlikely on one of them :smiling3:
I was thinking that myself, but the kit is presented in a yellow camo. What would be the relevant campaign for such a scheme? Or was it just another example of them using what they had in stock I wonder. Trying to research Stug IV's is not all that easy it seems. But seems they were used in France, Russia and Italy. I suppose I will likely try to resemble that shown in the photo above.
The picture looks like a mix of green, primer and desert yellow.
T
 
Last edited:

Steve Jones

Steve Jones Scale Modelling Site
Joined
Apr 27, 2018
Messages
6,698
Points
113
Location
Plymouth
First Name
Steve
Hi Toby

On 18 February 1943, all vehicles were ordered to be painted in a base coat of Dunkelgelb RAL 7028 (dark yellow).They were also allowed to add a camouflage scheme of Olivgrün and Rotbraun. Hence the two pictures of one all yellow and the other in a camo pattern. Your museum photo shows patterns that were popular in Normandy as well as Italy.

If you search Stug IV camo schemes in pinterest you will get a lot of comprehensive schemes to chose from as well as pictures from all sides of the vehicle

Steve
 

mrtintheweb

mrtinthweb
Joined
May 16, 2020
Messages
222
Points
43
Location
East Sussex
First Name
Toby
Hi Toby

On 18 February 1943, all vehicles were ordered to be painted in a base coat of Dunkelgelb RAL 7028 (dark yellow).They were also allowed to add a camouflage scheme of Olivgrün and Rotbraun. Hence the two pictures of one all yellow and the other in a camo pattern. Your museum photo shows patterns that were popular in Normandy as well as Italy.

If you search Stug IV camo schemes in pinterest you will get a lot of comprehensive schemes to chose from as well as pictures from all sides of the vehicle

Steve
Thanks Steve, though it does require me to join the quagmire of Pinterest lol.
So glad I joined this forum. Really keeping me sane in lockdown!
T
 
Last edited:

Jakko

Way past the mad part
SMF Supporter
Joined
Apr 28, 2018
Messages
10,778
Points
113
First Name
Jakko
I was thinking that myself, but the kit is presented in a yellow camo.
Like Steve said, dark yellow (a kind of greenish tan, not desert sand!) was the basic colour for German vehicles from early 1943 on, with olive green and red-brown camouflage over the top of it. Basically, if you paint the model dark yellow and then add patches or stripes of one or both the other colours, you’ll have a plausibly painted StuG IV. If you want more historical accuracy, you can find pictures of real ones and copy the patterns, but really, any reasonable-looking camouflage is not wrong as such.
 

mrtintheweb

mrtinthweb
Joined
May 16, 2020
Messages
222
Points
43
Location
East Sussex
First Name
Toby
So I completed the commander paint-job. Not sure on the paler colour on his coat. Might re-look at that.
First try the yellow was wayyyyyy to bright, the new colour better and the German Grey trousers are a better colour too.
 

Attachments

  • commander.jpg
    commander.jpg
    117.8 KB · Views: 17
  • IMG_5374.JPG
    IMG_5374.JPG
    96.9 KB · Views: 17

mrtintheweb

mrtinthweb
Joined
May 16, 2020
Messages
222
Points
43
Location
East Sussex
First Name
Toby
The vehicle itself is moving on fine. The fiddly bits to create the up-armouring was a faff but I think it will look good when finished.
 

Attachments

  • IMG_5370.JPG
    IMG_5370.JPG
    150.3 KB · Views: 14
  • IMG_5371.JPG
    IMG_5371.JPG
    172.9 KB · Views: 14
  • IMG_5376.JPG
    IMG_5376.JPG
    48.4 KB · Views: 15
  • IMG_5379.JPG
    IMG_5379.JPG
    91.4 KB · Views: 13
  • IMG_5382.JPG
    IMG_5382.JPG
    87.5 KB · Views: 14
  • IMG_5383.JPG
    IMG_5383.JPG
    78.4 KB · Views: 14
  • IMG_5384.JPG
    IMG_5384.JPG
    85.8 KB · Views: 14

JR

Member of the Rabble and Pyromania Consultant
SMF Supporter
Joined
May 26, 2015
Messages
17,275
Points
113
Location
lincs
First Name
John
That's some nice paint work Toby, all progressing well .
 

mrtintheweb

mrtinthweb
Joined
May 16, 2020
Messages
222
Points
43
Location
East Sussex
First Name
Toby
That's some nice paint work Toby, all progressing well .
Thanks John. Now comes the tougher bit to get the camo looking authentic. I got a tin of Humbrol enamel 100 but having put on a layer it deffo looks too orange. Need to rethink the paint I will use for the reddish/brown.
Any ideas? Note I'd rather not mix and don't have an airbrush. Will cycle down to my local model shop later today to see what he has.
T
 

Steve Jones

Steve Jones Scale Modelling Site
Joined
Apr 27, 2018
Messages
6,698
Points
113
Location
Plymouth
First Name
Steve
Hi Toby

I'm Mr Vallejo through and through so I would use Vallejo Model Air 71041 Armour Brown for the Rotbraun and Vallejo Model Air 71092 Medium Olive for the Olivgrun. The Tamiya equivalent would be XF9 and Humbrol 160 for the Brown. There are no exact equivalents for the green but if you go for a medium shade of Green I'm sure you will be fine
 

JR

Member of the Rabble and Pyromania Consultant
SMF Supporter
Joined
May 26, 2015
Messages
17,275
Points
113
Location
lincs
First Name
John
Toby, like Steve I use acrylic paints A-MIG and Vallejo, so can't offer any help I'm afraid.
 

Jakko

Way past the mad part
SMF Supporter
Joined
Apr 28, 2018
Messages
10,778
Points
113
First Name
Jakko
The Tamiya equivalent would be XF9 and Humbrol 160 for the Brown.
Tamiya XF-9 is hull red, though, and is far more red than brown. The old recommended Tamiya colours for German WWII camo are XF-64 Red Brown and XF-56 Olive Green, and I suspect these are called out on this StuG’s instruction sheet. However, in recent years they’ve introduced new colours for this camo that are supposed to be more accurate, XF-88 Dark Yellow 2, XF-89 Dark Green 2 and XF-90 Red Brown 2.
 

mrtintheweb

mrtinthweb
Joined
May 16, 2020
Messages
222
Points
43
Location
East Sussex
First Name
Toby
Thanks Jakko. I got the XF-89 Dark Green 2 but my local shop and hobbycraft were out of red brown (both variants). The guy at the model shop suggested a set which I thought would work also in a 3-pack of Nato Brown/Green and Grey.
I'll have a play. I've put a layer of the brown over the 'red' I used and will see if layered it works. I'm using the side armour plates as my test beds.
T
 

mrtintheweb

mrtinthweb
Joined
May 16, 2020
Messages
222
Points
43
Location
East Sussex
First Name
Toby
So pic 1 shows what the original Tamiya red-brown gave as a finish (it was the enamel, not he acrylic) and I just didn't like it.
To get the actual paint was either going to take too long or was going to cost close to £8.50 with P&P so I went with Nato Brown on top of the red-brown enamel. I've left one piece clear to show the difference.
The paint job on the up-armour panels is okay but I am using two reference pics to paint it, one the brown and green touch, the other they are separated with the sand colour surrounding sections of paint.
Now I've done the armour panels I guess I need to keep it the same on the hull. But wonder if I could do the 'separated' pattern.

Lastly I read that camo was often painted on with brushes by the crews. Yet the images I've seen it's clearly been sprayed on with lighter edges so I guess I will just do a 'Toby' camo that looks like it might be real and accept that.

Last pic shows the hatch. Doesn't look the same as the image of artwork I've seen but again will live with it. Up until now, the kit has fitted very well. But the side armour isn't going on easily and I've snapped bits trying to sit it right.
 

Attachments

  • IMG_5389.JPG
    IMG_5389.JPG
    149.3 KB · Views: 18
  • IMG_5390.JPG
    IMG_5390.JPG
    152.2 KB · Views: 18
  • IMG_5391.JPG
    IMG_5391.JPG
    107 KB · Views: 16
  • IMG_5392.JPG
    IMG_5392.JPG
    103.8 KB · Views: 16
Last edited:

Steve Jones

Steve Jones Scale Modelling Site
Joined
Apr 27, 2018
Messages
6,698
Points
113
Location
Plymouth
First Name
Steve
There are many examples of camouflage patterns being applied with a brush out in the "field". Also there are many examples of the Schürzen being added to already camouflaged Stugs in one pattern and the Schürzen having a different one. So if you want to brush on different or the same camo patterns all over the Stug then crack on and make out it was done on the field.
 

mrtintheweb

mrtinthweb
Joined
May 16, 2020
Messages
222
Points
43
Location
East Sussex
First Name
Toby
There are many examples of camouflage patterns being applied with a brush out in the "field". Also there are many examples of the Schürzen being added to already camouflaged Stugs in one pattern and the Schürzen having a different one. So if you want to brush on different or the same camo patterns all over the Stug then crack on and make out it was done on the field.
Yup..... Karl did it in the field! :tongue-out3:
 
Top