Panamera1103
SMF Supporter
- Joined
- Aug 25, 2020
- Messages
- 18
- Points
- 13
- First Name
- Yuming
I became very interested in formula 1 cars between the 60s and 90s recently. I wish I was born a few decades earlier.....
Bought this kit from a Japanese seller on eBay for a bargain because off some parts fallen off the sprue, tyres and decals aging and a dented box. All of which didn't matter as I wasn't gonna keep this kit in the storage.
This Tamiya kit was manufactured in 1991 (4 years older than myself) according to the texts on the box but it was designed back in 1968. Yes, the year when this car won the Wold title. However, this model is designed based in the first gen Lotus 49, known as the R1, which debuted in 1967. The differences between R1 and R2 from the exterior, as far as I'm aware of, was that R1 had a smaller windshield covering basically only the front view while R2 had a 'panoramic' windscreen surrounding the whole cockpit.
Everything about this kit, the box, the manual, the parts, gives out an antique vibe but everything was new and refreshing to me. The instruction manual is in Japanese only and it looks like it was printed from hand drawing. It also had texts explaining each building step. More surprisingly, the last pages lists the name for all parts, just like on a real car!
At the time of starting this thread, I have already finished building the engine, gearbox and both front n rear suspension. Let's see some photos.


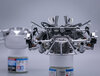
Fitting 16 tubes up down and through the gaps between intakes wasn't easy.


For such an old kit, I realised that test-fitting became especially important. Otherwise, I would've run into problems such as large gaps, uneven binding surfaces or connections that just wouldn't fit !!
I washed off all the chrome parts with bleach. Those chrome parts was not of great quality and had some terrible seam lines. I repainted the exhaust pipes in chrome and the suspension arms in bright aluminium which was Almost equally shiny as chrome In the end. The down pipes were painted flat white with a slightly dry mist of brown as the dust particles collected in races. R1 cars had red plugs above the spark plugs and a quick hand paint with flat red acrylic accurately reproduced them. I applied some black panel line accent to the engine and gearbox for some simple weathering to bring up contrast.
Building the suspension was overall easily done, except for some arms I was really afraid they would snap because of tight fit, but none was broken in there end. Tamiya quality after all I guess?
That good impressions so far was soon ruined by build quality from the last century lol... Look at thsee gaps between the body panels. I had to fill the gaps with putty. Then came the problem: rivets. Do I cover the rivets with masking tapes and carefully use putty so as not to lose the rivets? Or do I be brave with putty and redo the rivets afterwards? Since the rivets on the side panels were literally on the very edge of the panel, I just couldn't keep them away from putty. I'd be happy if anyone had some advice on this.
Anyway I went on with putty, sanded away the evenness, including the rivets..... Then I spent a whole afternoon, only to open new wholes and fit in new rivets. After drilling 174 wholes of 0.5mm diameter and fitting 168 brass rivets, and 3 rounds of priming, reapplying putty and sanding, the cockpit finally looked alright.


Bought this kit from a Japanese seller on eBay for a bargain because off some parts fallen off the sprue, tyres and decals aging and a dented box. All of which didn't matter as I wasn't gonna keep this kit in the storage.
This Tamiya kit was manufactured in 1991 (4 years older than myself) according to the texts on the box but it was designed back in 1968. Yes, the year when this car won the Wold title. However, this model is designed based in the first gen Lotus 49, known as the R1, which debuted in 1967. The differences between R1 and R2 from the exterior, as far as I'm aware of, was that R1 had a smaller windshield covering basically only the front view while R2 had a 'panoramic' windscreen surrounding the whole cockpit.
Everything about this kit, the box, the manual, the parts, gives out an antique vibe but everything was new and refreshing to me. The instruction manual is in Japanese only and it looks like it was printed from hand drawing. It also had texts explaining each building step. More surprisingly, the last pages lists the name for all parts, just like on a real car!
At the time of starting this thread, I have already finished building the engine, gearbox and both front n rear suspension. Let's see some photos.
Fitting 16 tubes up down and through the gaps between intakes wasn't easy.
For such an old kit, I realised that test-fitting became especially important. Otherwise, I would've run into problems such as large gaps, uneven binding surfaces or connections that just wouldn't fit !!
I washed off all the chrome parts with bleach. Those chrome parts was not of great quality and had some terrible seam lines. I repainted the exhaust pipes in chrome and the suspension arms in bright aluminium which was Almost equally shiny as chrome In the end. The down pipes were painted flat white with a slightly dry mist of brown as the dust particles collected in races. R1 cars had red plugs above the spark plugs and a quick hand paint with flat red acrylic accurately reproduced them. I applied some black panel line accent to the engine and gearbox for some simple weathering to bring up contrast.
Building the suspension was overall easily done, except for some arms I was really afraid they would snap because of tight fit, but none was broken in there end. Tamiya quality after all I guess?
That good impressions so far was soon ruined by build quality from the last century lol... Look at thsee gaps between the body panels. I had to fill the gaps with putty. Then came the problem: rivets. Do I cover the rivets with masking tapes and carefully use putty so as not to lose the rivets? Or do I be brave with putty and redo the rivets afterwards? Since the rivets on the side panels were literally on the very edge of the panel, I just couldn't keep them away from putty. I'd be happy if anyone had some advice on this.
Anyway I went on with putty, sanded away the evenness, including the rivets..... Then I spent a whole afternoon, only to open new wholes and fit in new rivets. After drilling 174 wholes of 0.5mm diameter and fitting 168 brass rivets, and 3 rounds of priming, reapplying putty and sanding, the cockpit finally looked alright.