AIRFIX 1/72 Avro Shackleton AEW.2

simontie

SMF Supporter
Joined
Jan 13, 2010
Messages
997
Points
93
Location
Morayshire Scotland
First Name
simon
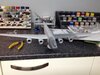
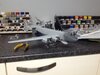
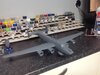
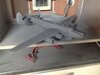
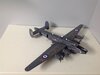
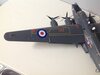
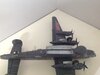
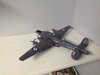
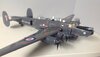
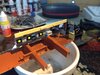
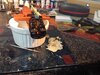
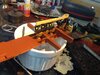
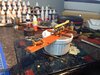
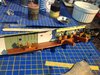
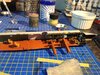
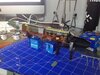
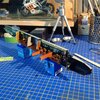
Started back in late Septembers, internal cabin’s went together well as did the cockpit. The only snag being that you lovingly paint these items add decals and that‘s the last you see of them!!!
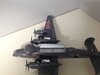
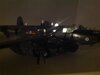
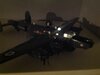
so i decided to pop some LED‘s in to the cabin and hoped this would
 

Attachments

  • 2AE4F425-C06A-44FE-9E3A-96D24D2FFE17.jpeg
    2AE4F425-C06A-44FE-9E3A-96D24D2FFE17.jpeg
    112.9 KB · Views: 21
  • E42A535B-A2CD-4EA5-B1B6-AA5A07CBD7B0.jpeg
    E42A535B-A2CD-4EA5-B1B6-AA5A07CBD7B0.jpeg
    134.8 KB · Views: 20
  • F23F0D92-CAF5-4046-82D5-832D226EA4F1.jpeg
    F23F0D92-CAF5-4046-82D5-832D226EA4F1.jpeg
    111 KB · Views: 20
  • 07E3EC3A-A682-4FC8-AB15-D7975486E260.jpeg
    07E3EC3A-A682-4FC8-AB15-D7975486E260.jpeg
    136.3 KB · Views: 21
  • 834668A6-5F17-4B1F-845F-87B4716736D7.jpeg
    834668A6-5F17-4B1F-845F-87B4716736D7.jpeg
    182 KB · Views: 21
  • E566AF5A-2B00-4D5F-A000-71BD80C7EEBD.jpeg
    E566AF5A-2B00-4D5F-A000-71BD80C7EEBD.jpeg
    153.5 KB · Views: 21
  • 229501F5-E0BC-46DF-BDD7-1557144AE1B8.jpeg
    229501F5-E0BC-46DF-BDD7-1557144AE1B8.jpeg
    185.2 KB · Views: 20
  • 70B9C8B3-0A3A-4C92-8ECD-D00970A27307.jpeg
    70B9C8B3-0A3A-4C92-8ECD-D00970A27307.jpeg
    182.9 KB · Views: 18
  • 00EEDE0B-8D03-4C39-9CFE-88394775EBD2.jpeg
    00EEDE0B-8D03-4C39-9CFE-88394775EBD2.jpeg
    134.1 KB · Views: 19
  • F2C68B30-32EE-42C3-83AF-37871135006F.jpeg
    F2C68B30-32EE-42C3-83AF-37871135006F.jpeg
    261.3 KB · Views: 17
  • 8546517D-E017-4245-AD91-6FC4A67893F1.jpeg
    8546517D-E017-4245-AD91-6FC4A67893F1.jpeg
    173.7 KB · Views: 19
  • 78883074-63FF-4BCE-B0F5-3FA11069F213.jpeg
    78883074-63FF-4BCE-B0F5-3FA11069F213.jpeg
    189.8 KB · Views: 17
Last edited:

simontie

SMF Supporter
Joined
Jan 13, 2010
Messages
997
Points
93
Location
Morayshire Scotland
First Name
simon
After fitting the LED’s i put the fuselage sections together and married up the wings complete with engines no under carriage fitted as yet...wing fit was spot on just a little filling & fettling just a nice fit. Engine nacelles need a wee bit of triming and a bit of putty but nothing to stress over....
fitted the glass sections using micro set and its worked out quite well masked up ready for painting
 

Attachments

  • 77AC557B-38DB-4A11-B579-12B88DE22D99.jpeg
    77AC557B-38DB-4A11-B579-12B88DE22D99.jpeg
    123.8 KB · Views: 14
  • 30E8E4BB-EBE9-420B-8F1B-DEFD2DCF8BA1.jpeg
    30E8E4BB-EBE9-420B-8F1B-DEFD2DCF8BA1.jpeg
    115.7 KB · Views: 14
  • 13F0BDBF-2AD8-471C-84B6-37CE0CD42A65.jpeg
    13F0BDBF-2AD8-471C-84B6-37CE0CD42A65.jpeg
    128.2 KB · Views: 17
  • CA1F09C4-2A32-4642-ACC3-8F2537067B6E.jpeg
    CA1F09C4-2A32-4642-ACC3-8F2537067B6E.jpeg
    131.6 KB · Views: 17
Last edited:

simontie

SMF Supporter
Joined
Jan 13, 2010
Messages
997
Points
93
Location
Morayshire Scotland
First Name
simon
Okay so that when my issues started not with the kit just my painting tried mixing the humberol enamels and they mixed well and sprayed well but dried with white spots everywhere so I tried several coats thick thin same, turns out its an impurity in the white spirt no being as well refined as either humberol or proper paint thinners so once purchased and mixed paint was fine dried well and covered well too (thanks for the assistance from others on this site) the origional white spirt is fine for cleaning down but not for mixing...
painted the peripheral parts and stuck it all together looks okay clear coat when like the paint no matter how i mixed the clear (humberol 35) water humberol thinners (acrylic) just never sprayed well needless to say i rubber down repainted and re applied several times in the end I just knew i would not get the results i wanted so i pressed on cleaned up as best i could and applied the decals not what i wanted to mark up as i had hoped to mark as WL 757 but ended up being 960 as per the kit WL 757 was my dads aircraft and i thought fitting but the finish was not as good as i hoped so will add to another aircraft.
 

Attachments

  • 83B9AF19-4574-40C2-8158-5BC64E1691F8.jpeg
    83B9AF19-4574-40C2-8158-5BC64E1691F8.jpeg
    77.3 KB · Views: 23
  • 9CCC0B02-937E-4703-9F60-489FC73BDF9F.jpeg
    9CCC0B02-937E-4703-9F60-489FC73BDF9F.jpeg
    80.4 KB · Views: 21
  • 05082B7B-360B-445A-B64D-C94DC6D2A517.jpeg
    05082B7B-360B-445A-B64D-C94DC6D2A517.jpeg
    83.4 KB · Views: 19
  • 8CD85541-DD45-4782-8629-BEFBF7DF69DC.jpeg
    8CD85541-DD45-4782-8629-BEFBF7DF69DC.jpeg
    90.7 KB · Views: 19
  • C5B9A35A-2E3C-49F3-9E6A-87DDCC939EE6.jpeg
    C5B9A35A-2E3C-49F3-9E6A-87DDCC939EE6.jpeg
    109 KB · Views: 20
  • 55019831-D1B2-4AF6-BA73-09F63B4D77FE.jpeg
    55019831-D1B2-4AF6-BA73-09F63B4D77FE.jpeg
    73.6 KB · Views: 22
  • AD753122-D933-41D8-A200-F172632DEBB7.jpeg
    AD753122-D933-41D8-A200-F172632DEBB7.jpeg
    67.3 KB · Views: 23
  • FDA5AB9A-007A-4F1D-853A-9727330BD74D.jpeg
    FDA5AB9A-007A-4F1D-853A-9727330BD74D.jpeg
    93.7 KB · Views: 18
  • 45E7CDCE-10C2-4FEE-99DE-F7B549881B54.jpeg
    45E7CDCE-10C2-4FEE-99DE-F7B549881B54.jpeg
    94.4 KB · Views: 18
Last edited:

simontie

SMF Supporter
Joined
Jan 13, 2010
Messages
997
Points
93
Location
Morayshire Scotland
First Name
simon
Okay so there you have it i have added as under construction as i would like to add a diorama for the final finished project, dark pictures with the leds on looked okay photes don't do it justice.
thanks for looking i have a whole fleet of these to build mk2 mk3 & another aew, it said skill level 5 on the box should have been 6 lol
thanks
simon
 
Joined
Feb 25, 2020
Messages
577
Points
93
Location
Gloucestershire
First Name
Carl
Okay so that when my issues started not with the kit just my painting tried mixing the humberol enamels and they mixed well and sprayed well but dried with white spot every where so tried several coats thick thin same, turns out its an 8mpurity in the white spirt no being as well refined as either humberol or proper paint thinners so once purchased and mixed paint was fine dried well and covered well too (thanks for the assistance from others on this site) the origional white spirt is fine for cleaning down but not for mixing...
painted the peripheral parts and stuck it all together looks okay clear coat when like the paint no matter how i mixed the clear (humberol 35) water humberol thinners (acrylic) just never sprayed well need less to say i rubber down repainted and re applied several times in the end I just knew i would not get the results i wanted so i pressed on cleaned up as best i could and applied the decals not what i wanted to mark up as i had hoped to marl as WL 757 but ended up being 960 due as per the kit WL 757 was my dads aircraft and i thought fitting but the finish was not as good as i hoped.
Looks great Simon, I’ve considered building this one a few times. You’ve done a nice job.
Carl
 

Archetype

FAA plane builder
Joined
Mar 31, 2019
Messages
925
Points
93
Location
Sussex
First Name
Chris
I think that looks good!

I got a tour through one of these from an ex cold war pilot at Gatwicks museum.
The plane itself is a tight fit inside and alongside masses of navigation and other such consoles does include a kitchen! Was this in there?
If I remember correctly this thing could patrol for up to 18 hours so had everything you’d need for the duration!
 

simontie

SMF Supporter
Joined
Jan 13, 2010
Messages
997
Points
93
Location
Morayshire Scotland
First Name
simon
I think that looks good!

I got a tour through one of these from an ex cold war pilot at Gatwicks museum.
The plane itself is a tight fit inside and alongside masses of navigation and other such consoles does include a kitchen! Was this in there?
If I remember correctly this thing could patrol for up to 18 hours so had everything you’d need for the duration!
Yes the galley was just behind the door but not fitted in this kit, i had a look around one in the 70s at RAF Lossie even as a boy i remember it being tight for space funny thing was i wondered why they had the benches across the cabin next to the wing stupid place for them lol (never realised they were wing spars)
can still sense the smell of leather, aviation fuel all mixed with brill cream...:tears-of-joy::tears-of-joy::tears-of-joy:
 

Archetype

FAA plane builder
Joined
Mar 31, 2019
Messages
925
Points
93
Location
Sussex
First Name
Chris
Yes the galley was just behind the door but not fitted in this kit, i had a look around one in the 70s at RAF Lossie even as a boy i remember it being tight for space funny thing was i wondered why they had the benches across the cabin next to the wing stupid place for them lol (never realised they were wing spars)
can still sense the smell of leather, aviation fuel all mixed with brill cream...:tears-of-joy::tears-of-joy::tears-of-joy:

Haha, the spars! I was by far the youngest member of the tour and the only one that managed to get to the cockpit!

Mind you, not as tight as the submarine at Gosport
 

simontie

SMF Supporter
Joined
Jan 13, 2010
Messages
997
Points
93
Location
Morayshire Scotland
First Name
simon
Haha, the spars! I was by far the youngest member of the tour and the only one that managed to get to the cockpit!

Mind you, not as tight as the submarine at Gosport
never had the pleasure of a sub yet.
average flights for the aew 12 to 14 hours around 4200 miles range traveling at 290mph up to 24 hours max duration,
sounds like a fun day out......
 

stillp

SMF Supporter
Joined
Nov 17, 2016
Messages
7,218
Points
113
Location
Rugby
First Name
Pete
I was lucky enough to have a crawl around the Shack at Newark a couple of years ago, although they wouldn't let me sit in the driver's seat! Yes, it is narrow, and the spars get in the way, but we have to remember the fuselage is a widened Lancaster. The galley reminded me of a canal narrowboat, but narrower.
Must get round to building the Frog kit I picked up at the Shuttleworth collection.
Pete
 

colin m

Moderator
Staff member
Moderator
SMF Supporter
Joined
Dec 26, 2008
Messages
8,604
Points
113
Location
Stafford, UK
First Name
Colin
I understand what you mean about the internals. I built the Revell version, which has no inside bits, but that doesn't matter, as you can't see inside.
 

simontie

SMF Supporter
Joined
Jan 13, 2010
Messages
997
Points
93
Location
Morayshire Scotland
First Name
simon
I understand what you mean about the internals. I built the Revell version, which has no inside bits, but that doesn't matter, as you can't see inside.
I have 2 of the revels to start, never noticed they had no internals....but pointless having them after the cock pit. just kicking off on my 2nd Avro Shack MK2 Airfix but not AEW, No224 squadron Gib 1967 WR 963 so far same build as the last one hope I don't get tripped up no excuse's this time.:rolling:
 

colin m

Moderator
Staff member
Moderator
SMF Supporter
Joined
Dec 26, 2008
Messages
8,604
Points
113
Location
Stafford, UK
First Name
Colin
I have 2 of the revels to start, never noticed they had no internals....but pointless having them after the cock pit. just kicking off on my 2nd Avro Shack MK2 Airfix but not AEW, No224 squadron Gib 1967 WR 963 so far same build as the last one hope I don't get tripped up no excuse's this time.:rolling:
For me the choice was really rivets (Revell) or panel lines (Airfix) I preferred rivets, the lack of interior was just a bonus.
 

Archetype

FAA plane builder
Joined
Mar 31, 2019
Messages
925
Points
93
Location
Sussex
First Name
Chris
I have 2 of the revels to start, never noticed they had no internals....but pointless having them after the cock pit. just kicking off on my 2nd Avro Shack MK2 Airfix but not AEW, No224 squadron Gib 1967 WR 963 so far same build as the last one hope I don't get tripped up no excuse's this time.:rolling:

Look forward to seeing it!
 

simontie

SMF Supporter
Joined
Jan 13, 2010
Messages
997
Points
93
Location
Morayshire Scotland
First Name
simon
For me the choice was really rivets (Revell) or panel lines (Airfix) I preferred rivets, the lack of interior was just a bonus.
I did buy a rivet cutter and sought some advice on its use but after all the paint issues I decided not to glad i skipped them, i havent looked to closly at the revel kits but will soon enough the other mk 2 I will post as it progresses luckily its a flying model no gear down it seem’s a lot simpler to assemble and the plans are very similar to last one so hoping to progress a lot faster!!!!!
simon
 
Top