Andrew's resurrected 1/72 Armourfast Farmhouse....

adt70hk

I know its a bit sad but I like quickbuild kits!!!
SMF Supporter
Joined
Sep 4, 2019
Messages
9,480
Points
113
First Name
Andrew
Andrew,to my eternal shame I completely missed your mention of roughing up the walls. The effect is excellent.

Very well done that man!
Thanks and no need to feel any shame.... Let's face it there is a lot of waffle in the above posts. ;) :smiling5:

ATB.

Andrew
 

adt70hk

I know its a bit sad but I like quickbuild kits!!!
SMF Supporter
Joined
Sep 4, 2019
Messages
9,480
Points
113
First Name
Andrew
Good evening all

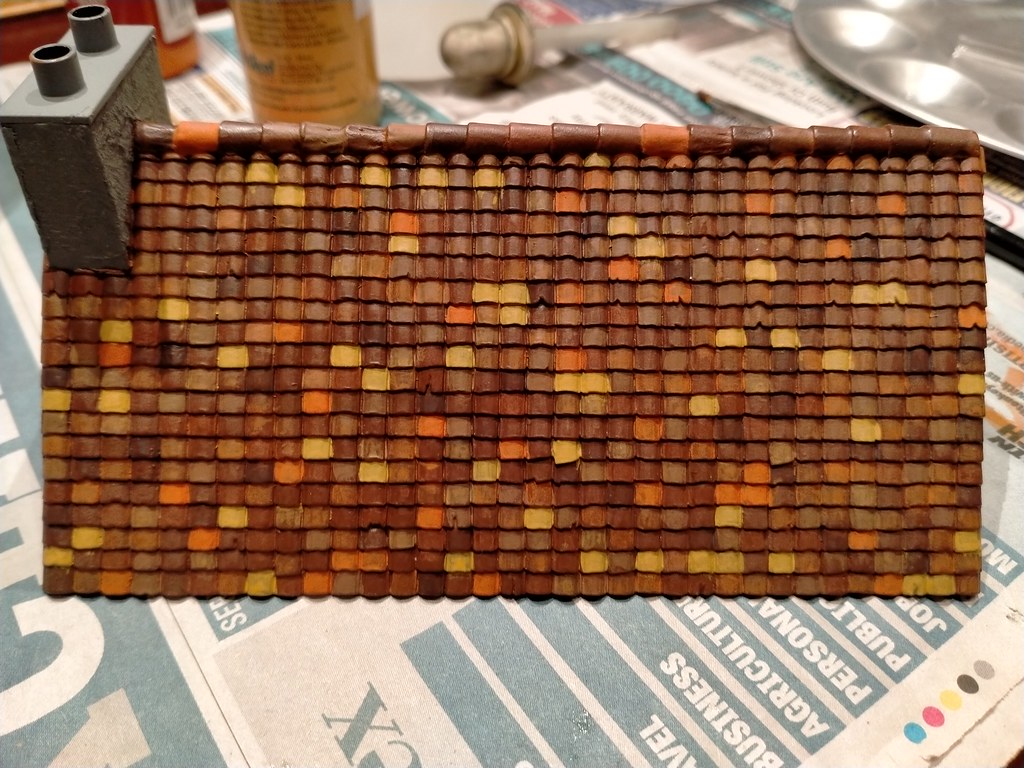
So I spent a thoroughly enjoyable hour on Sunday evening doing some of the tiles. I started very carefully but the first colour was closer to the base coat than I thought, so stepped up to something with more contrast and took it from there.

I also started with very thin coats, so as to not risk overwhelming it with one colour that would then stick out like a sore thumb - especially as lighter shades can sometimes 'pop' a bit too much at this scale.

An unexpected benefit of this approach was that it allows the base coat to come through a bit, as a sort of pre-shade. It also means I can add two or three more layers of each paint to help with the tonal variation of each colour I have on the mixing palette - effectively creating two or three variations of each colour - and doubling or trebling the number of colours in use without opening a lot of paints. It also helps to stop it looking too 'toy' like.

I had to stop for dinner but that was probably not a bad thing as it forced me to stop and take stock of where I'd got to.

I'm going to do a few more tiles from the initial colour palette below, before moving onto some lighter colours now I have the hang of it - I reckon I've done no more than a quarter so far and probably less

Below are two pictures from each side - one close up and one from a more normal viewing distance of about 3 feet, although it looks farther away than that.

Please be honest with your comments!

ATB

Andrew

PS it's all a bit browner/darker in real life....

-----------------------------

The initial colour palette...


After one hour.....


adt70hk

I know its a bit sad but I like quickbuild kits!!!
SMF Supporter
Joined
Sep 4, 2019
Messages
9,480
Points
113
First Name
Andrew
Thanks again all for the support

So I had a bit more of a play with a brighter colour last night.

At first glance I thought it stuck out too much but then it occurred to me that I've been using pretty muted colours so far and so that as I add other lighter/brighter colours, it will look less obvious. That said, if it is too bright I can always tone it down a bit.

As before it's a bit darker/browner in real life

ACW please!

Andrew


adt70hk

I know its a bit sad but I like quickbuild kits!!!
SMF Supporter
Joined
Sep 4, 2019
Messages
9,480
Points
113
First Name
Andrew
Hi Andrew
Most definitely not shabby.
Jim
Thanks Jim. I really am very pleased with how it's gone since it's my first go at this sort of thing.

Looking good, take it that you'll be giving it a matt finish?

Gerry

Thanks for stopping by.

Indeed it will be getting a coat of Matt varnish. That slight sheen you can see was created Tamiya NATO Brown base coat. No idea why it did that.

It would be getting a Matt varnish coat anyway, even if it wasn't doing that, to protect it for our wargaming.

ATB.

Andrew
 

adt70hk

I know its a bit sad but I like quickbuild kits!!!
SMF Supporter
Joined
Sep 4, 2019
Messages
9,480
Points
113
First Name
Andrew
Good morning all

So I'm calling the roof done for the time being, until I paint the house and so can put it in a proper context. I can always make some adjustments later.

I had a bit of painting good fortune earlier this week. The brighter tile, painted a 'clay' colour still looked too bright at this scale so I gave it a thin coat of Vallejo 70.875 Beige Brown and was left with a nice faded terracotta looking colour - exactly was I was looking for....

So last night I painted a fair few tiles solidly in the clay colour and a dark yellow called 'antique gold' (non-metallic). The clay then got one or two coats of the Vallejo Beige Brown depending on the effect I was looking for. The antique gold got a thin coat or two of Humbrol enamel H113 rust. A few tiles then got a coat of the beige brown.

I have no idea how many tiles I've painted in the past week but bearing in mind some got as many as four coats, it was a lot.....

All in all as a first attempt I'm really very pleased with the effect and it was a surprisingly therapeutic process....nothing technical or difficult and the time went surprisingly quickly.

The phone camera still can't pick the colours correctly, so I'll try grabbing some better shots at the weekend.

ACW as usual.

Andrew

PS Apologies for the sheen on the Tamiya paint. No idea why it did that.....

------------------------------------------

The two bright colours unwashed........


The final effect....


Last edited:

spanner570

SALAD DODGER
SMF Supporter
Joined
May 26, 2009
Messages
12,970
Points
113
First Name
Ron
Great result Andrew.

Excellent painting coupled with endless patience!
 

Tim Marlow

Little blokes aficionado
SMF Supporter
Joined
Apr 27, 2018
Messages
16,720
Points
113
Location
Somerset
First Name
Tim
Looks good Andrew. There is a nice depth to the colour variation.
 

adt70hk

I know its a bit sad but I like quickbuild kits!!!
SMF Supporter
Joined
Sep 4, 2019
Messages
9,480
Points
113
First Name
Andrew

GerryW

Rest In Peace
Joined
Feb 14, 2021
Messages
1,688
Points
113
Location
Suffolk
First Name
Gerry
They're looking great, good that the experiments worked - I'd be worried about mixing the different paints!
 
Top