Chris's 1/72 Hasegawa Harrier FRS.1 - Animal Antics GB

Archetype

FAA plane builder
Joined
Mar 31, 2019
Messages
925
Points
93
Location
Sussex
First Name
Chris
Hey all.

A bit late to this, however I have until the end of March so I thought I'd up the ante on myself and permit you all to be motivation.
I once learned in a course that a goal is but a dream until to tell someone, so here we go!

IMG-2357.jpg
IMG-2358.jpg
IMG-2359.jpg
IMG-2367.jpg

I also picked an Eduard PE set, but for the Airfix version, in the hope that they were't hugely different.

IMG-2366.jpg

You will notice there are some small parts missing from the sprues....that's because I started this following completion of my Attacker, so apologies for not being strictly to the rules.

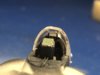
This is where I am currently.

IMG-2360.jpg

The cockpit and PE needed some adjustment to marry up, but I'm pleased with the result. There is some touching up to do and I've only applied primer to exterior parts.

IMG-2361.jpg
IMG-2362.jpg
IMG-2363.jpg

Next steps will be getting the intakes painted, the front section attached and then the wings.


Thanks.
 

flyjoe180

Joe
SMF Supporter
Joined
Jan 18, 2012
Messages
12,419
Points
113
Location
Earth
First Name
Joe
Nice start, it's an older kit but looks like you've got the measure of it
 

Jim R

SMF Supporter
Joined
Apr 27, 2018
Messages
13,718
Points
113
Location
Shropshire
First Name
Jim
Hi Chris
An iconic Harrier :thumb2: I hope the PE doesn't need too much fettling. Nice start. Cockpit looks nice.
Jim
 

Archetype

FAA plane builder
Joined
Mar 31, 2019
Messages
925
Points
93
Location
Sussex
First Name
Chris
Nice start, it's an older kit but looks like you've got the measure of it
Thanks Joe. It seems old with some flash, but generally it's pretty good.

Cockpits looking good chris , cheers tony
Thank you Tony.

Hi Chris
An iconic Harrier :thumb2: I hope the PE doesn't need too much fettling. Nice start. Cockpit looks nice.
Jim
Thanks Jim. Just external PE to go. I'm hoping it's straight forward enough! The Harrier was my favourite growing up and still has a special place, so I'm pleased to get round to this. It might even make the 1/48 shortlist.

Small update.

The Fleet Air Arm museum have an FRS.1 on display, so there is a decent catalogue of photos online and I've been using these for the intakes since they are a prominent feature of the Harrier and I want to get something close to realistic.

I've given it a coat of primer, a lick of a similarish grey and a brush painting undercoat of black for the blades, which I plan to develop with increasingly lighter shades of metallics.

IMG-2372.jpg

I also applied the same to the intakes on either side of the nose.

IMG-2373.jpg

I've also mounted the wings, which fit pretty well. A little cleaning up required where a little too much glue was applied.

IMG-2374.jpg
 

Archetype

FAA plane builder
Joined
Mar 31, 2019
Messages
925
Points
93
Location
Sussex
First Name
Chris
Thanks Ian, Ralph and Paul!

In order to progress this build I needed to take care of the painting inside the intakes. Nothing new here, except that one of the 'features' of FFA schemes is they often wrap over or around intakes and wing leading edges.
The harrier intakes are no different and after deliberating and mocking up the parts I decided that masking post assembly would be impossible.

So here is a shot of the intake blades after damp brushing over black with vallejo real steel and dry brushing on top of that with humbrol aluminium. This all then got glued in to place. This was all then masked and I painted the white & EDSG to the fuselage that would be out of reach with the intake cowls on.

IMG-2376.jpg

I also painted the cowls at the same time.

IMG-2375.jpg

Finally I mounted them. You can see what I meant about it being an impossible masking task.

IMG-2378.jpg

I managed a clearer shot of the IP too, which includes the EDSG behind the seat and the first application of black to the anti glare panel.

IMG-2377.jpg
 

Archetype

FAA plane builder
Joined
Mar 31, 2019
Messages
925
Points
93
Location
Sussex
First Name
Chris
I have been beavering away at the PE the last few days when I'm able to snatch some time to myself.

I'm guessing this is an airbrake. The main part is a little smaller than the kit part so a little fettling required and then bending and placing the hydraulic bracket. Tip of my thumb for scale!

IMG_2395.JPG

A pair of winder rails. These may be the wrong way round, I couldn't find anything for reference and the instructions were poor.

IMG_2396.JPG

Inside the canopy there is a small half round piece which didn't fit at all, so I knocked up a quick backing piece from some plasticard and attached it. Also added the rear view mirror. The PE kit came with the canopy shattering thingamijig, but the canopy has one moulded in and didn't fancy buffing it off, so discarded that.

IMG_2397.JPG

Got the HUD screen and the windscreen in place too.

IMG-2404.jpg

Side on view.

IMG_2399.JPG

Also got the undercarriage on.

IMG_2400.JPG

Some PE required for the undercarriage. Front undercarriage door and landing light.

IMG_2401.JPG

Rear undercarriage, also with door and a brake line.

IMG-2402.jpg

Finally the exhaust deflector plates, which oddly are two piece. These required curving too.

IMG_2403.JPG

A few more little additions, pitot and refuelling probe and a host of little PE antennae and sensors, and then prep for paint.
 

Attachments

  • IMG_2398.JPG
    IMG_2398.JPG
    62.6 KB · Views: 2

Archetype

FAA plane builder
Joined
Mar 31, 2019
Messages
925
Points
93
Location
Sussex
First Name
Chris
Thank you Andy! If you thought those parts were small...

PE completed!

The parts behind the cockpit caused me a headache. The plans show the positioning of these in totally the wrong place, and then much head scratching when looking at the real thing drew the conclusion that the scale is slightly off. I also ummed and aahed because I intend having the canopy open, and these will sit underneath the canopy!

IMG_2416.JPG

All the nose stuff is on.

IMG_2417.JPG

Here's a snap of the underside.

That part with the red arrow is TINY, and I've stuck it back on four times. I have no confidence that it'll survive painting!

IMG_2418_LI.jpg

And the underside of the tail.

IMG_2419.JPG

Next is prep for paint!
 

Archetype

FAA plane builder
Joined
Mar 31, 2019
Messages
925
Points
93
Location
Sussex
First Name
Chris
Over the last couple of days I have applied primer and preshade.

IMG_2424.JPG

IMG-2433.jpg

IMG-2434.jpg

I have intentionally gone lighter underneath and heavier on the top. The vallejo white is very translucent and I want to apply no more than 3 coats if I can and when I did the 2 coats of EDSG on the attacker the preshade wasn't visible.
 

Archetype

FAA plane builder
Joined
Mar 31, 2019
Messages
925
Points
93
Location
Sussex
First Name
Chris
Also forgot to mention...after all the work with the intakes I started priming without masking them
 

Archetype

FAA plane builder
Joined
Mar 31, 2019
Messages
925
Points
93
Location
Sussex
First Name
Chris
Thanks chaps!

I cursed everybody that sprang to mind doing it, however I do like the result and won’t be put off in future.
 
Top