Dragon Wagon.

Wookie2486

SMF Supporter
Joined
Apr 28, 2018
Messages
219
Points
43
First Name
Martyn
Hi all,

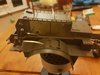
My kit for welcoming in 2019 will be Tamiya's 1:35 Dragon Wagon.
I built my first one when I started modelling again when I was in Germany back in 2007 but it was only the tractor unit. So this time I thought I would have ago at the tractor and trailer now I have a bit more experience I wanted to see what I can do with this kit. Luckily I managed to pick the kit up with the eduard internal and external and trailer photoetch and just for good measure I got the Tankograd in detail book all for just over £100 .
 

scottie3158

SMF Supporter
Joined
Apr 27, 2018
Messages
12,655
Points
113
Location
Spalding
First Name
Paul
Looking Forward to watching this come together. I built one last year the fit is very good
 

Jakko

Way past the mad part
SMF Supporter
Joined
Apr 28, 2018
Messages
10,716
Points
113
First Name
Jakko
the eduard internal and external and trailer photoetch
Those are about 75% useless :sad: 
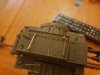
I bought the kit when it was first released, and got the etched sets with it as well — most of the etched parts replace plastic parts that don’t need replacing, like the lids on the trailer sides (that’s just one example, if you want I can post pics of what I had left of the sets :smiling3:) because the etched parts won’t look better than the plastic ones do.
 

Wookie2486

SMF Supporter
Joined
Apr 28, 2018
Messages
219
Points
43
First Name
Martyn
Scottie I remember after following your build I thought I would have another go at it. I will post some of what I have done already. I don't know if I can do it the same justice though. Thanks for following along any pointers would be good.

Jakko

That would be helpful mate. So far I have only used the some of the internal parts of the photoetch set. Any help or comments are most welcome.

Marty.
 

Mini Me

SMF Supporter
Joined
Jun 1, 2018
Messages
10,159
Points
113
First Name
Rick
Martyn, I have a 1/87 scale Dragon Wagon in the stash. Will be following your build to see how things turn out.
Cheers, Rick H.
 

Wookie2486

SMF Supporter
Joined
Apr 28, 2018
Messages
219
Points
43
First Name
Martyn
Welcome a long Rick I hope it stands up to your expectations. I absolutely love these wagons so I hope you will enjoy it.

Martyn
 

Jim R

SMF Supporter
Joined
Apr 27, 2018
Messages
13,691
Points
113
Location
Shropshire
First Name
Jim
Hi Martyn
I'll watch this with interest. These truly are monster vehicles. At 1/35 it will be a huge model.
Jim
 

Wookie2486

SMF Supporter
Joined
Apr 28, 2018
Messages
219
Points
43
First Name
Martyn
So far I have swapped out the cotton cord for wire for the front winch and also used the eduard internal photoetch to add in the buckles and straps for the water Jerry cans and also replaced the pedals for etch stuff. The top of the engine compartment I have also put on the 50 cal storage fittings and put straps in for tie down area for the crews kit
 

Attachments

  • 20190102_193146.jpg
    20190102_193146.jpg
    53 KB · Views: 50
  • 20190102_193059.jpg
    20190102_193059.jpg
    46.7 KB · Views: 52
  • 20190102_193041.jpg
    20190102_193041.jpg
    58.2 KB · Views: 46
  • 20190102_193316.jpg
    20190102_193316.jpg
    43.1 KB · Views: 47
  • 20190102_193212.jpg
    20190102_193212.jpg
    47.2 KB · Views: 45

scottie3158

SMF Supporter
Joined
Apr 27, 2018
Messages
12,655
Points
113
Location
Spalding
First Name
Paul
Martyn, Your off to great start I added all the internal etch and the sad thing is you can see virtually didley when the cab goes on but We will both will know its there.
 

Wookie2486

SMF Supporter
Joined
Apr 28, 2018
Messages
219
Points
43
First Name
Martyn
Scottie
I know mate but as you said at least we know it is there. What did you use to make the black tool box behind the engine cover.
 

scottie3158

SMF Supporter
Joined
Apr 27, 2018
Messages
12,655
Points
113
Location
Spalding
First Name
Paul
I used evergreen for the box bottom and pewter for the curved top edge, with wire for the handles. I will see if I can find a pic.
 

Mini Me

SMF Supporter
Joined
Jun 1, 2018
Messages
10,159
Points
113
First Name
Rick
Wow, that's going to be hard to improve on. Will you be doing the trailer on the current build?
Cheers, Rick H.
 

Wookie2486

SMF Supporter
Joined
Apr 28, 2018
Messages
219
Points
43
First Name
Martyn
Rick i will be or trying to anyway. Im gonna spend a little time justlooking at the oiling system for the rear axle chains.

Martyn
 

JR

Member of the Rabble and Pyromania Consultant
SMF Supporter
Joined
May 26, 2015
Messages
17,275
Points
113
Location
lincs
First Name
John
Martyn.
Front row if any seat left please mate.
Good to see you back as well .
John .
 

Wookie2486

SMF Supporter
Joined
Apr 28, 2018
Messages
219
Points
43
First Name
Martyn
John,
Theres always a seat for you. Its good to be back mate with the deployment to Oman I kind of lost my mojo mate.

Marty
 

Lee Drennen

Box Stock Builder with a Twist/ Rabble Member
SMF Supporter
Joined
Apr 29, 2018
Messages
5,623
Points
113
Location
Wortham Mo
First Name
Lee
Marty
Looking very good what kind of engines did these have a Hercules or continental or was they powered by a Detroit diesel. John can you move over just a little then I can sit on the front row too.
 
  • Like
Reactions: JR

Ian M

Administrator
Staff member
Administrator
Moderator
SMF Supporter
Joined
Dec 14, 2008
Messages
19,669
Points
113
Location
Falster, Denmark
First Name
Ian
It's a good kit. Built one last year, Its on here somewhere... And yes it is a big bugger.
 

Wookie2486

SMF Supporter
Joined
Apr 28, 2018
Messages
219
Points
43
First Name
Martyn
Lee welcome along it had a Hall-Scott engine 6-cylinder, water cooled, 4-cycle petrol engine.
Ian any chance you remember the name of your build on here it's always good to look at other builds.

Marty
 
Top