Fernando N's Ace British Light Tank Mark.VI C

Fernando N

Aviation fan and the Roadrunner, meep meep!
SMF Supporter
Joined
Apr 27, 2018
Messages
1,889
Points
113
Location
Almere, Netherlands
First Name
Fernando
Hi everyone,

With just more than a month in this GB I thought I add this one to the line-up:
331002
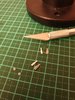
Although not so many parts, they need a lot of clean-up and I probably will replace the barrels with some brass rod:
331003
Instructions, tracks and decals:
331004
Four marking options, I’ll be building the Maltese variant as it caught my eye in the first place:tongue-out3::
331005
Started on the hull and cleaning the first bits of the running gear which took at fair share of time:
331006
The side of the box also states: ’’This box contains a plastic kit made under short run technology.’’ nothing lied there but with some patience and TLC it will end up fine, I hope...:rolling:

Thanks for looking in.
Fernando
 

Steve Jones

Steve Jones Scale Modelling Site
Joined
Apr 27, 2018
Messages
6,698
Points
113
Location
Plymouth
First Name
Steve
A 1 72 tankette!!! Rather you than me mate :smiling2:

I have been very interested in this camo scheme and seen it on a few completed models. No idea how to do it. I assume it will be with the brush.??? Will you be having a go yourself?

Good luck with the build
 

Fernando N

Aviation fan and the Roadrunner, meep meep!
SMF Supporter
Joined
Apr 27, 2018
Messages
1,889
Points
113
Location
Almere, Netherlands
First Name
Fernando
Evening all, sorry for the late update, progress continued at a steady pace but forgot to share it with you all….

Pete, they make lots of interesting subjects and as far as I know only in 1/72 and hopefully others are better fitting….:rolling:

Steve, thanks:thumb2: and this little critter reminds me of a CVR(T) but maybe I made the barrels too long, more on that later.
For the camo it’ll be a combo of AB and brush work, done before on a 1/76 sd.kfz.9 with good result.:smiling:

Been quite busy modifying or replacing parts with scratch built ones as the kits offerings are sometimes pretty simplified….
First replaced the mudguards, only after cleaning I realised that their shape was off to the box-art and corresponding photos of this tank on the net:
332395332396332397
Then came the turret, after careful cleaning it up the sides were quite barren:
332398
Made a bunch of rivets for it, although a bit large 0.6mm is the smallest size I could punch out:
332399
Also made new barrels from 0.4 and 0.8mm brass tube with styrene cones and beefed up some of the hinge details :
332400332401332402
The smoke dischargers were moulded quite badly, so making new ones was quicker than cleaning them up:
20190305_205027_resized-jpg.332403

Last bits were installed on the hull and turret, added 0.3mm brass wire for the antenna and drivers mirror instead of the kits advised 0.8mm???
So ready for paint here:
332404
332405
Yesterday I gave it a coat of Vallejo Dark Yellow primer as a start to see if it looked the part (found a painting instruction of a 1/35 Vulcan models variant telling to use Desert Yellow and Nato Green for the scheme):
332406
As the Dark Yellow was a bit too dark for my taste, I mixed up VJ 71.025 Dark Yellow and 71.001 White in a 8/3 ratio for the look I was after:
332407
With more than a day old the paint is still tacky, doesn’t help with this weekend being all rain here and humidity high in the house.:rolling:
I’ll give it a couple more days to dry and then it’s on to the ‘’Stone Wall camo’’.

Thanks for looking in.
Fernando

ps. Not intended to make an accurate version here, just my take on the matter….:tongue-out3:
 

Attachments

  • 20190305_205027_resized.jpg
    20190305_205027_resized.jpg
    82 KB · Views: 86

Dave Ward

Still Trying New Things
SMF Supporter
Joined
Apr 27, 2018
Messages
8,635
Points
113
Location
South Gloucestershire
First Name
David
Fernando,
the 1/35 version was small enough for me!
I seem to remember Airfix did a 1/76 Mark VI many years ago - a rebox of JB models original. With the Vulcan model, not bad coverage for such a small tank
Dave
 

Si Benson

SMF Supporter
Joined
Apr 27, 2018
Messages
3,322
Points
113
First Name
Si
Top work mate,
You’ve really knocked that into something decent looking. Some really nice additions :thumb2:
 

Jakko

Way past the mad part
SMF Supporter
Joined
Apr 28, 2018
Messages
10,769
Points
113
First Name
Jakko
I seem to remember Airfix did a 1/76 Mark VI many years ago - a rebox of JB models original. With the Vulcan model, not bad coverage for such a small tank
S-Model have one in 1/72 — well, two, actually, because with S-Model you normally get two to a box :smiling3: I found it to be a very nice model, quick-assembly like wargaming-oriented kits but with the kind of detail and finesse I’d expect of a modellers’ kit.
 

Mini Me

SMF Supporter
Joined
Jun 1, 2018
Messages
10,159
Points
113
First Name
Rick
Hi Fernando, just like working in 1/87 scale ! lol:smiling5:. Terrific progress and much scratchery is a
Huge improvement over the kit parts. Rick H.
 

Jim R

SMF Supporter
Joined
Apr 27, 2018
Messages
13,709
Points
113
Location
Shropshire
First Name
Jim
Hi Fernando
Well Sir you have made a cracking job of this. Definitely an improvement on the kit.
Jim
 

Steve Jones

Steve Jones Scale Modelling Site
Joined
Apr 27, 2018
Messages
6,698
Points
113
Location
Plymouth
First Name
Steve
Absolutely gobsmaked!! What a stunning little build. You have excelled yourself on this one mate. Looking forward to seeing how the the paint job turns out.
 

Fernando N

Aviation fan and the Roadrunner, meep meep!
SMF Supporter
Joined
Apr 27, 2018
Messages
1,889
Points
113
Location
Almere, Netherlands
First Name
Fernando
Evening everyone,

Dave, Si, Peter, Rick, Jim, Ralph and Steve thanks for the kind comments guys.:thumb2::smiling:

Not so much photo’s in this update but the work involved almost took up the same amount of hours.:smiling5:

The instructions were next to useless in painting, telling one to look at the box-art for the Malta version and not even calling out the colours needed….
Luckily I found a Polish webstore who has a hi-res copy of the Vulcan models painting instructions, making painting a lot easier.:thumb2:
As I intended to extend the camo scheme to the running gear too, I still had to scour the net for some usable pics and add a guess here and there to complete the pattern.:rolling:

Hand-painted A.MIG-084 NATO Green for the pattern with a 5/0 brush, Revell and Humbrol enamels for the remaining details and the search and head lights were done with a chrome pen (unseen here):
333127
333128
It’s under a coat of gloss now, in preparation for the decals (all two of them) and weathering.

Thanks for looking in.

Fernando
 

Steve Jones

Steve Jones Scale Modelling Site
Joined
Apr 27, 2018
Messages
6,698
Points
113
Location
Plymouth
First Name
Steve
It just keeps getting better mate. Fantastic base coat. Really looking forward to seeing where this one goes. Great stuff :thumb2::thumb2::thumb2::thumb2:
 

Graeme C.

SMF Supporter
Joined
Apr 29, 2018
Messages
1,485
Points
113
First Name
Graeme
Nice work Fernando, the stone wall camo looks great.:thumb2:
 

Si Benson

SMF Supporter
Joined
Apr 27, 2018
Messages
3,322
Points
113
First Name
Si
Very nice Fernando, I imagine getting the camo lines on was a headache!
 

Mini Me

SMF Supporter
Joined
Jun 1, 2018
Messages
10,159
Points
113
First Name
Rick
Looks like it turned out great! Cheers, Rick H.
 

Fernando N

Aviation fan and the Roadrunner, meep meep!
SMF Supporter
Joined
Apr 27, 2018
Messages
1,889
Points
113
Location
Almere, Netherlands
First Name
Fernando
Evening all,

Steve, Greame, Paul, Si and Rick thanks guys for the great comments.:thumb2::thumb2:
Oh and Si the pattern was a headache indeed, it was easy to stray too much into one’s own pattern instead of the ref’s.:confused:

With the gloss dry I gave it a wash of AK 121 Brown to let the details pop out but not too much.

Then came a highly anticipated moment, fitting the tracks, will they fit and look good? (forgot to do so earlier):rolling:
The clean-up was very easy compared to the rest of the kit with little to no flash, only after welding them with a hot nail I found out they were way too long, cut out a couple of links on each side and glued them on.
Good thing they react well to CA.:smiling4:

A little layer of MIG Airfield dust pigment was applied to the tracks and a bit here and there on the top side, followed by a coat of VJ Matt varnish to seal it all in.
With the Matt dry a touch of gloss was painted on the lights again to regain the chrome look and this little tankette is finished (just in time):
334556
334557
I tried to keep the weathering light as in all the photo’s I saw on the net they were kept pretty clean.
More photo’s in the completed section.

Fernando

Ps. This GB was a great idea of Paul, had some good fun at building in the small scale again.:thumb2:
 
Last edited:

JR

Member of the Rabble and Pyromania Consultant
SMF Supporter
Joined
May 26, 2015
Messages
17,275
Points
113
Location
lincs
First Name
John
Fernando.
Appolgies, missed this completely, had a good read through, my word you've turned this into a little gem. It's so small when standing next to the Tamiya bottle, just don't know how you manage to work on it .
John .
 
Top