Fine Molds Type 3 Chi-Nu, 1:35

Jakko

Way past the mad part
SMF Supporter
Joined
Apr 28, 2018
Messages
10,782
Points
113
First Name
Jakko
The Type 3 Medium Tank Chi-Nu (三式中戦車 チヌ, San-shiki chū-sensha Chi-nu, meaning “Imperial Year 2603 Medium tank Model 10”) was one of the last tank types produced by Japan in the Second World War, essentially an improved Type 97 Chi-Ha with a larger turret mounting a bigger gun, a 75 mm to cope with Allied tanks. It didn’t actually see combat service, as all were kept on the Japanese home islands to defend against the expected Allied invasion.

Fine Molds has a kit of this tank, which I bought second-hand some months ago and which I now intend to build. Here’s the box front:

9613B457-6224-4989-8175-2498828EA0D3.jpeg

It includes instructions as well as a four-page pamphlet with what I assume to be information about the tank, but as it’s all in Japanese, I can’t read it. I might give it a go with Google Translate at some point, though :smiling3:

F7B5BD67-3F9F-4D53-B812-82FD9E7A902E.jpeg

The instructions are mostly in Japanese, but have shorter English bits where important, like for the colours. It leaves me with the strong feeling that Fine Molds consider Japan their primary market, though.

Inside the box:

A9A22967-5947-4DE0-BF0A-F290FC027770.jpeg

And shots of the contents:

B503DD5A-3E1A-469F-95FB-2F72B154CBBA.jpeg3CC67527-97E9-48FD-B648-E410E5A231BB.jpeg

I also bought some additional things for this kit:

A2F02A13-CFF8-454C-B80F-81E09D1D7AB5.jpeg

The first-ever set of Friul tracks I’ll ever build, because they’re one of two options for replacements for the soft-plastic ones in the kit. Since the tracks on all these Japanese tanks were both dead and slack, single-link tracks are almost a necessity, I think. Also a set of Mr. Hobby Japanese colours, to get the colours right.

The turned gun barrel was very cheap, which is mainly why I bought it when ordering something else. However, somebody made a mistake somewhere:

04FC847F-D484-4A4D-8D1B-80606894BD1E.jpeg

This is clearly not the barrel for this type of tank … So, obviously, I won’t be using it :smiling3:

Generally, I think I’ll be building this straight from the box. The parts look very good and well-detailed, so there’s no need for major detailing etc. other than the tracks, so this should hopefully be another quick build :smiling3:
 
Last edited:

adt70hk

I know its a bit sad but I like quickbuild kits!!!
SMF Supporter
Joined
Sep 4, 2019
Messages
9,497
Points
113
First Name
Andrew
Interesting one Jakko. I think I saw Night Shift do a Chi Nu, minus the barrel IIRC.

Shame about the metal barrel. On the barrel front, i'm sure all the pictures I've seen show a small muzzle brake fitted. Is there one in the box?

ATB

Andrew
 

Jakko

Way past the mad part
SMF Supporter
Joined
Apr 28, 2018
Messages
10,782
Points
113
First Name
Jakko
It does, don’t worry :smiling3: I’ll just use the plastic barrel — I normally would have anyway, but for the €3.50 this barrel cost I decided to buy it. Not sure what exactly went wrong, though. Is it the wrong sticker on the bag, or is it intended for some other Type 3 Chi-Nu that I’m not aware of? I assumed the former, but a bit of quick research reveals that there is also this kit:

144455-10244-pristine.jpg

Looks like the gun is for that, not for my variant of the tank. It doesn’t look like the required parts for this version are included in my kit, though, so I’ll just keep the barrel in case I ever want to build this one too.
 

Jim R

SMF Supporter
Joined
Apr 27, 2018
Messages
13,717
Points
113
Location
Shropshire
First Name
Jim
Hi Jakko
An interesting choice. Many swear by Friul tracks so hopefully you'll like them. Definitely looks like the barrel fits the other version.
Jim
 

Steve Jones

Steve Jones Scale Modelling Site
Joined
Apr 27, 2018
Messages
6,698
Points
113
Location
Plymouth
First Name
Steve
or is it intended for some other Type 3 Chi-Nu that I’m not aware of?

Initially the Chi Nu had the shorter Type 95 field artillery gun/barrel. Later the armament was strengthened and the longer Type 90 field artillery gun/barrel was used. However the longer barrel wasn't very reliable so the shorter barrel was the primary barrel used. I don't have figures of how many short barrel compared to long barrel Chi Nu's were made but the longer barrel was a lot less. Which begs the question why are RB Model and Fine Molds marketing a long barrel??
 

Jakko

Way past the mad part
SMF Supporter
Joined
Apr 28, 2018
Messages
10,782
Points
113
First Name
Jakko
Many swear by Friul tracks so hopefully you'll like them.
I’m still wondering if I’ll swear by or at them :smiling3:

Initially the Chi Nu had the shorter Type 95 field artillery gun/barrel.
That’s obviously the version I have, with the obvious cradle below the barrel.

Which begs the question why are RB Model and Fine Molds marketing a long barrel??
My guess is that Fine Molds simply decided to release every variant of the Type 97 chassis they could. As it’s a simple parts-swap for the gun, making both makes sense. I maintain that I would rather see one kit with both options, though, but it seems some manufacturers don’t think like that.
 

Jakko

Way past the mad part
SMF Supporter
Joined
Apr 28, 2018
Messages
10,782
Points
113
First Name
Jakko
The basic shapes of the upper and lower hull are easy enough to put together:

28C07832-DA97-4A2C-973E-37CBE3B67554.jpeg

This being a Japanese kit, making comparisons to Tamiya is almost inevitable, I suppose. The first thing to note, then, is that this model is clearly not intended for motorisation — hurrah! Second, that sponson bottoms are provided, even if they need some filler at the front:

F79D451F-360C-48E4-8498-89AC9C74D508.jpeg

Talking of filler, one issue I noted is sink marks in several of the parts, like here on the suspension arms:

5E1B9B76-6C6C-4673-BE78-CEE758B4599A.jpeg

This needs filling on the smaller pair at least, which isn’t all that simple with that fine line around the circumference of the hub. But better to lose that than to have a whopping great sink mark on show. The larger ones show a bit of a depression, but it’s not very noticeable and they will be out of sight behind roadwheels, so no need to fill them.

Each of the inner wheel hubs also has a sink mark, but those will be out of sight, so I won’t bother filling them either. (In fact I’m already wondering why I bothered to glue them to the wheels at all :smiling3:)
 

Isitme

SMF Supporter
Joined
Nov 2, 2020
Messages
707
Points
93
First Name
Mike
The basic shapes of the upper and lower hull are easy enough to put together:

View attachment 437432

This being a Japanese kit, making comparisons to Tamiya is almost inevitable, I suppose. The first thing to note, then, is that this model is clearly not intended for motorisation — hurrah! Second, that sponson bottoms are provided, even if they need some filler at the front:

View attachment 437433

Talking of filler, one issue I noted is sink marks in several of the parts, like here on the suspension arms:

View attachment 437434

This needs filling on the smaller pair at least, which isn’t all that simple with that fine line around the circumference of the hub. But better to lose that than to have a whopping great sink mark on show. The larger ones show a bit of a depression, but it’s not very noticeable and they will be out of sight behind roadwheels, so no need to fill them.

Each of the inner wheel hubs also has a sink mark, but those will be out of sight, so I won’t bother filling them either. (In fact I’m already wondering why I bothered to glue them to the wheels at all :smiling3:)
You could always fill in the 'dimples' sand smooth and then punch out the rims from 10thou card using two different punch sizes.
 

Jakko

Way past the mad part
SMF Supporter
Joined
Apr 28, 2018
Messages
10,782
Points
113
First Name
Jakko
Not a method that had occurred to me, but I’ll keep it in mind for future models that have similar problems — thanks :smiling3:
 

Tim Marlow

Little blokes aficionado
SMF Supporter
Joined
Apr 27, 2018
Messages
16,771
Points
113
Location
Somerset
First Name
Tim
Looks like it may give you a few interesting moments Jakko. Unusual subject though…..
 

Jakko

Way past the mad part
SMF Supporter
Joined
Apr 28, 2018
Messages
10,782
Points
113
First Name
Jakko
It’s quite a good kit, to be honest. The biggest problem is these kinds of sink marks on many of the thicker parts, as well as some minor flash. The fit is good, the moulding is sharp (other than those problems I mentioned) and the detail is pretty good for a kit of around 20+ years old (as the basic parts are). I’d say it’s about Tamiya quality without the Tamiya drawbacks of moulded-on grab handles, open sponson bottoms, motorisation features and stuff like that.
 

Jakko

Way past the mad part
SMF Supporter
Joined
Apr 28, 2018
Messages
10,782
Points
113
First Name
Jakko
Construction is now finished, as far as possible before painting that is:

3247EC9E-8CE9-4757-80DD-A061064E0915.jpeg0B343C29-0C71-4C25-84C0-82FCAF791DF3.jpeg

I’m leaving off the wheels, suspension arms, mufflers, commander’s hatch and a few other parts so I can actually get paint onto and underneath them. Well, and I still need to assemble the tracks, I’ve half cleaned up the links for one of the two so far …
 

Tim Marlow

Little blokes aficionado
SMF Supporter
Joined
Apr 27, 2018
Messages
16,771
Points
113
Location
Somerset
First Name
Tim
Nice to see this making progress Jakko. It almost looks a little toon like, probably the large turret :smiling2:
 

Jakko

Way past the mad part
SMF Supporter
Joined
Apr 28, 2018
Messages
10,782
Points
113
First Name
Jakko
Yes, I also thought the turret looks rather big. Bigger than I had expected from the box art and photos, certainly.
 

Jakko

Way past the mad part
SMF Supporter
Joined
Apr 28, 2018
Messages
10,782
Points
113
First Name
Jakko
Here’s what I have built, all the other parts are still on the sprue for painting:

5D52D0CD-728E-42A5-9D74-E8C1BC997DE9.jpeg

I also built a little jig to hold about ten track links for assembly:

58FF4E3A-E796-4265-BCB8-3C1C3AE1A52E.jpeg

I put together five links without, and decided that wasn’t going to do for the whole track :smiling3: This is just two pieces of balsa spaced apart by two more (the same wood but filed a bit thinner) so that the links are held between them rather than falling to the side. I can put runs of ten together like this, insert the wire and snip it off.
 
Last edited:

Jim R

SMF Supporter
Joined
Apr 27, 2018
Messages
13,717
Points
113
Location
Shropshire
First Name
Jim
Hi Jakko
Looks good. I like the track jig. I think some manufacturers supply a jig with their tracks? Probably a good idea.
Jim
 

Jakko

Way past the mad part
SMF Supporter
Joined
Apr 28, 2018
Messages
10,782
Points
113
First Name
Jakko
These are the first Friuls I’ve ever built, and I’m not overly thrilled with them. That they don’t supply a jig is fine by me, I’m a modeller so I can make my own if I need one :smiling3: But the amount of cleanup was more than I expected, about as much work as for many plastic links, but more fiddly because of having to drill out the holes for the pins.
 

Jakko

Way past the mad part
SMF Supporter
Joined
Apr 28, 2018
Messages
10,782
Points
113
First Name
Jakko
Slight update on the jig: I made two improvements that make it much easier to use. One is to put a pencil line on it to indicate how far to fill it with ten links so that I don’t need to count them — it’s long enough that it will probably hold twelve links at a squeeze, but I only want ten so I can easily count how much track I’ve made. The second is to cut a little wedge of the same balsa, so that after putting in ten links, I can wedge them all in and prevent them moving while I add the wire. This has made assembly far easier.
 

Jakko

Way past the mad part
SMF Supporter
Joined
Apr 28, 2018
Messages
10,782
Points
113
First Name
Jakko
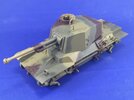
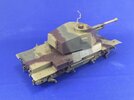
After the lacquer paint fiasco this one went rather on the back burner, but today, as I was spraying my M4A2 Sherman, I also put the camouflage onto the Chi-Nu:

618D9968-AFEA-47C4-A78A-F5027E316812.jpegE48EE48F-A9CC-402E-859A-A2E47DB7E475.jpeg

Though I have the Mr. Paint set of Japanese colours, I wasn’t about to try those again, so instead, I opened the two remaining bottles, stirred them and then found paints in my collection that came close: Vallejo armour brown (for German AFVs) and olive drab (a bottle I found too pale and too green for American vehicles, despite having the same number as one with a much better colour in it). The pale line on the top of the turret is not intentional, but I hope to fix (or at least hide :smiling3:) that later when I add lighter patches inside all three colours.

The camouflage pattern is as per the instructions, but because those only include front, left and rear views, the top and right side are partly based on what I could make out, and partly complete conjecture.

Oh, and I also managed to knock the right headlight off the tank :sad:
 
Top