Hasegawa 1/72 Lockheed F-117A Nighthawk

flyjoe180

Joe
SMF Supporter
Joined
Jan 18, 2012
Messages
12,419
Points
113
Location
Earth
First Name
Joe
Turning to the Dark Side :cool: No introduction required for this beast, it has to be one of the most instantly recognisable aircraft ever to enter service. Retired a while ago, some have recently been reactivated and are flying as stealth adversary aircraft inside the US. Or so they say. :upside:

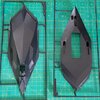
Hasegawa's F-117 is moulded in black, and is a relatively low 'number of parts' kit. Here's what you get.

20210318_161506.jpg

20210318_161536.jpg

20210318_161601.jpg

20210318_161621.jpg

20210318_161749.jpg

Should be good for tonal variation in the black stealth paint. There are thousands of photos online showing varying degrees of wear and fading, exhaust staining, liquid streaks, etc. I'll be going for the 37th TFW based in Tonapah Nevada, as the squadrons of that Wing were the first to employ the F-117 over operations in Panama in 1989, and in every conflict that the F-117 has been deployed to since then. Hard to believe this aircraft was in service for so many years before it was made public, and even harder to believe, that it has been retired from front line service. Anyone feeling old? Let's make a start!
 
Last edited:

flyjoe180

Joe
SMF Supporter
Joined
Jan 18, 2012
Messages
12,419
Points
113
Location
Earth
First Name
Joe
I assembled the various cockpit components, primed them and planned the required ballast. Exhaust area of rear fuselage was also primed.

20210319_120718.jpg

The instructions call for 5 grams of ballast positioned to the left of the cockpit area. I didn't have any ballast that would fit without disturbing the fit of the two fuselage halves, so placed two 7g weights either side as seen here. I squashed them with grip pliers so they had some surface texture for the super glue to work into.
20210319_143543.jpg

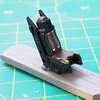
Ignoring the instructions and using references of the cockpit found online, I painted the various cockpit components and added some basic straps from Tamiya tape on foil. They add at least something to the seat. I've also painted the rear of the HUD, not seen here, clear green.
20210320_144156.jpg

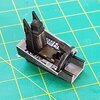
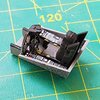
Decals were applied and assembly of the tub completed.
20210320_151726.jpg

20210320_151754.jpg
 

flyjoe180

Joe
SMF Supporter
Joined
Jan 18, 2012
Messages
12,419
Points
113
Location
Earth
First Name
Joe
The cockpit is then attached to the lower fuselage. The black plastic, I have found, terrible to photograph. It is also quite hard and brittle, so care needs to be taken
20210320_152307.jpg

20210320_152333.jpg

This is Hasegawa's attempt at providing some ballast. It is a solid clear section that fits into the nose of the upper fuselage half. Weighs nothing, but I added it anyway. It gives the lower section something to grab on to later. I thought it migh tbe hollow so you can pour something into it, but that isn't the case.

20210320_152435.jpg

The rear exhaust section is given a rough coat of burnt iron. It looks messy and crude, but looks okay from the rear with the fuselage halves mated. It will need to be touched up and weathered later on anyway.
20210320_153319.jpg

Fuselage halves mated, no fit issues so far! It's a difficult airframe to clamp because of the sloped surfaces. Tamiya Cement used to fit the halves initially, and followed up later with Tamiya Extra Thin.
20210320_154838.jpg

It's building up quickly with no real issues so far. I can see potential self inflicted pain arising soon though if I'm not careful.
 

David Lovell

SMF Supporter
Joined
Apr 27, 2018
Messages
1,491
Points
113
Location
Poole Dorset
First Name
David
Good stuff Joe I enjoy when you guys do a honest bit by bit build ,wingy things aren't my bag but for some unknown reason I keep adding them to the stash , every now and then I have a light bulb moment pull one out jump up to the table look at the faf with the cockpit and glazing and switch the light off again , I dont seem to be able to get past the idea of cockpit first then you can crack on with the rest ,would be nice if someone did a little SBS on how they mask up the glazing. Keep it coming as I said love looking in on these projects. Dave
 

flyjoe180

Joe
SMF Supporter
Joined
Jan 18, 2012
Messages
12,419
Points
113
Location
Earth
First Name
Joe
Good stuff Joe I enjoy when you guys do a honest bit by bit build ,wingy things aren't my bag but for some unknown reason I keep adding them to the stash , every now and then I have a light bulb moment pull one out jump up to the table look at the faf with the cockpit and glazing and switch the light off again , I dont seem to be able to get past the idea of cockpit first then you can crack on with the rest ,would be nice if someone did a little SBS on how they mask up the glazing. Keep it coming as I said love looking in on these projects. Dave
Thanks David. Glad you are enjoying the build. I'll try to explain the canopy masking, but to be honest this isn't a typical scenario as we shall see shortly.
 

flyjoe180

Joe
SMF Supporter
Joined
Jan 18, 2012
Messages
12,419
Points
113
Location
Earth
First Name
Joe
I've attached the air intake guards (mesh cover), and the HUD to top of the instrument panel shroud (previously given a clear green coat). I dry fitted the tail fins. If they had given me an excellent fit then I'd have left them off until later for decal application and to ensure good access to the exhaust area for it's paint work after the main airframe is painted. However, the fin-to-fueslage fit is not excellent, so on they went. Some filler will be required later, along with the underside seams.
20210320_221632.jpg
20210320_221657.jpg

My canopy had a scratch on the starboard side, even though it had been protected in a plastic bag. No problem, using Tamiya Polishing Comounds, starting with 'Coarse' and working to 'Finish' grade, and using cotton buds to buff, the scratch is removed and the canopy polished.
20210321_133640.jpg
20210321_133659.jpg

Then I moved on to masking...
 

flyjoe180

Joe
SMF Supporter
Joined
Jan 18, 2012
Messages
12,419
Points
113
Location
Earth
First Name
Joe
For David: Canopy masking is usually done using Tamiya tape or equivalent, and a sharp, new No.11 blade. You can use liquid masking solution (maskol, Micro Mask etc) to cover areas away from the frames. The new blade is important. Place a size of tape over the canopy section, and using a toothpick gently settle the tape into the recesses. Then use your knife with the new No.11 blade, and gently score around the edge. You will be able to pull the remaining tape away, leaving the canopy clear panels masked. Touch up with liquid mask as required if you want to, rather than using more tape.

However, if you look at this canopy, when the tape is placed over it, the panels do not show. Sometimes the lines are so fine that you could use a light source (cellphone torch, etc) under the canopy to highlight them, and gently/carefully use the same technique as described above. This canopy framing is weird, it is not internally moulded, and it doesn't appear to be recessed. It must be so fine that not even my usual technique can detect the framing outlines. And to add to the difficulty, some edges consist of those pesky jagged shapes. The framing you can see is the broad outline of that whole canopy side, not the areas to be masked off.

20210321_153140.jpg

You need time and patience, it is advisable to go for a walk or do something else if you find yourself getting stressed, annoyed or flustered in any way. Or you will screw it up, speaking from prior experience.

So, on this example I used thin strips to go into the squared corners and straight edges. You can see I used many sections of tape. The jagged edges were done using tiny triangles, layered over the edge of each other, until the final layer which is secured with a longer strip over the top. I regularly checked inside the canopy to ensure I had the correct position for the tape.
20210321_153202.jpg

At this stage you can either fill it with liquid mask, or more tape. Repeat the process for the other side, and the thin triangular windshield sections, which also have jagged lower edges. And this is the result of 2 hours of masking:
20210321_153218.jpg

I would really, strongly advise anyone doing this kit to get an aftermarket masking sheet. But I'm happy with what I have done.

The canopy is fixed to the cockpit using small dabs of PVA (white glue) glue. Excess glue is wiped clean using a moistened cotton bud. This leaves a clean edge, and has the added benefit of filling small gaps between the canopy and fuselage along the way. Others use alternative methods and materials to achieve the same thing, this is my personal favourite technique. The fit of the canopy is excellent.
20210321_153246.jpg

For the nose sensor cover, i placed it onto tape and cut the edges. The jagged bottom line was achieved by carefully cutting hard against the clear part with the sharp blade. Some migh tleave this off until after painting and varnishing and not mask the part at all, again this is my preference as I don't trust myself with any adhesive on a completed obvious surface.
20210321_160934.jpg

Same with the underside sensor:
20210321_162048.jpg


That's it for today, next up I'll be dealing with those seams to create a smooth underside, and the tail fins. A dry fit of the wings is not ideal, I feel I have some work to do with filler and sanding paper.

Thanks for looking in guys. David, I hope that helped to explain how I mask my canopies, and that this particular example is a rarity. I'm beginning to appreciate bubble canopies!
 

David Lovell

SMF Supporter
Joined
Apr 27, 2018
Messages
1,491
Points
113
Location
Poole Dorset
First Name
David
Jo many thanks as awkward as that canopy was you've seem to have covered most base's, looking forward to the next installment once again many thanks for your input. Dave
 

Archetype

FAA plane builder
Joined
Mar 31, 2019
Messages
925
Points
93
Location
Sussex
First Name
Chris
Incredible patience displayed with that canopy Joe. Did you have that moment where you realised that it wasn't going to be straight forward as you thought and just how much time it was going to take? :tears-of-joy::tears-of-joy:
 

boatman

SMF Supporter
Joined
Nov 8, 2018
Messages
12,875
Points
113
Location
NORFOLK UK
First Name
christopher
HI Joe VERY VERY well done on this model so far an as for those pesky trianglel's IT would be Aaaaarrhhh from me to try to build this as this plane is in my opinion is one ive never liked due to the shape an yes i know its all to do with stealth but lookin at your build you have converted me to likeing it an im looking forward to seeing this go togeather keep the pics comin
chris
 
Last edited:

Jim R

SMF Supporter
Joined
Apr 27, 2018
Messages
13,711
Points
113
Location
Shropshire
First Name
Jim
Hi Joe
It looks so futuristic. Almost believe it is some kind of alien craft.
I like that Tamiya polishing set - I have found it can save a canopy which looks beyond hope. Black plastic is almost as bad to work with as white and if it's britttle as well then ... :sad: :rolling: :sad:. Well done with the masking, worth all the time and effort.
Jim
 

flyjoe180

Joe
SMF Supporter
Joined
Jan 18, 2012
Messages
12,419
Points
113
Location
Earth
First Name
Joe
Incredible patience displayed with that canopy Joe. Did you have that moment where you realised that it wasn't going to be straight forward as you thought and just how much time it was going to take? :tears-of-joy::tears-of-joy:
I did have that moment Chris, I just readjusted my expectations for the day's work and plodded along

Interesting build Joe great detail in the cockpit on such a small scale.
Thanks Vaughan

HI Joe VERY VERY well done on this model so far an as for those pesky trianglel's IT would be Aaaaarrhhh from me to try to build this as this plane is in my opinion is one ive never liked due to the shape an yes i know its all to do with stealth but lookin at your build you have converted me to likeing it an im looking forward to seeing this go togeather keep the pics comin
chris
Thanks Chris. Yeah, it is an ugly fella! Certainly no beauty contest winner.

Great progress joe , very nice masking job on the canopy , cheers tony
Cheers Tony

Hi Joe
It looks so futuristic. Almost believe it is some kind of alien craft.
I like that Tamiya polishing set - I have found it can save a canopy which looks beyond hope. Black plastic is almost as bad to work with as white and if it's britttle as well then ... :sad: :rolling: :sad:. Well done with the masking, worth all the time and effort.
Jim
Cheers Jim. I dislike plastic that is anything other than grey, it must be the dye or something that they use that makes it stiffer or more brittle. I've had red and white moulded kits that have also been rather hard compared to the usual grey. Or maybe they used cheaper plastic?
 

flyjoe180

Joe
SMF Supporter
Joined
Jan 18, 2012
Messages
12,419
Points
113
Location
Earth
First Name
Joe

flyjoe180

Joe
SMF Supporter
Joined
Jan 18, 2012
Messages
12,419
Points
113
Location
Earth
First Name
Joe
Next I moved in to the underside fuselage and tail fin seams. Sanding the filler takes some care as there are angles all over the place that need to be retained and not smoothed over.
20210322_134919.jpg

20210322_163500.jpg

Reference photos show there are no seams on the wings whatsoever, so I dealt with all of those. I attached the wings as best I could to the fuselage. There's a positioning lug for each wing, but the starboard one was out of alignment so I cut the lug down in size and held the wing in place for a better fit. You can see the small gaps at the wing roots.
20210325_170516.jpg

20210325_170537.jpg

20210326_153912.jpg

20210326_153936.jpg

It's now smooth and the gaps filled. I also filled the lines that join the wing at the leading edges. I've also added an anti-collision light to the port underside, created from the clear sprue tree. The airframe will next be given a wipe down with IPA.
20210326_153954.jpg

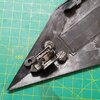
The nose landing gear leg was then assembled. The landing light face was lightly sanded, polished up, and then masked using Humbrol Maskol. The rear section of the light was given a coat of chrome paint. After painting I hope the lens looks okay. It looks messy in this very close up picture.
20210323_143621.jpg

The landing gear components have been cleaned up on the sprue, and all parts are now ready for priming. Stay tuned.
 
Top