HMS Hood 1/200 Amati Models

Bigfoot57

SMF Supporter
Joined
Jun 24, 2015
Messages
860
Points
93
First Name
Colin
Well here we go again with my next build this time another frame and plank wooden kit from Amati although the kit was published in weekly parts by Hachette which is where this one came from back in 2011 when it cost £5.99 per issue so with 140 that’s around £900 probably nearer £10.00 in todays market as the Bismarck which I’ve been collecting & building over the last 3 years or so is £35.99 for 4 issues each month that too has 140 parts as well I’m up part 134 so nearly finished
Which brings me onto the Hood as the unfortunate recipient of I believe was the Bismarck’s 4th salvo got blown out of the water so I thought we’ll I’ve got the 1/200 scale Bismarck and I’ve had the Hood in my stash for 10 years and 2 house moves so it’s time this was built
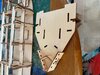
So onto the build the 1st 4 issues are just simple punch out the parts and assemble them no drama here although I did have some reinforcing struts missing in part 3 which were easily fashioned out of scrap wood as can be seen with my sawing down to size said scrap material
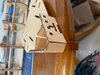
I used superglue to initially tack the parts on and hold them securely then applied good old pva wood glue on all the joints afterwards as can be seen with the clamps holding some reinforcing struts together whilst the glue dries

Regards

Colin80D69AC3-A276-44A5-9F0F-E471C9C8E46F.jpeg60D76B0B-BAB9-45BD-A562-F03D19964A29.jpegF97B8D1B-A214-4AE1-A7B8-14A3ECAF3622.jpeg60157648-488A-4074-8D23-3E373837E417.jpeg0F2E9C17-DE5A-40D3-BBC3-D2229BF4C73F.jpegC201B20E-E543-4D75-896D-65985F5F3F96.jpeg6C7E79CB-7D2B-430E-93D9-4CC4F377889D.jpegA5D12279-04CE-4DE9-8274-77651BBAC82D.jpegB041148A-907D-4B43-AA09-5F77177570A7.jpeg6343E1D9-4422-4F54-B04C-12606E272469.jpeg
 
Last edited:

Jim R

SMF Supporter
Joined
Apr 27, 2018
Messages
13,695
Points
113
Location
Shropshire
First Name
Jim
Hi Colin
I'll enjoy watching this built. These part works always look interesting although they do work out quite expensive. Certainly a lot of work and I'm sure it will be a long project.
Jim
 

peterairfix

SMF Supporter
Joined
Jul 19, 2012
Messages
7,346
Points
113
Location
Taunton
First Name
peter
I am pulling up a chair I have the early bismarck part work with a few mags missing but this one eluded me.
 

Bigfoot57

SMF Supporter
Joined
Jun 24, 2015
Messages
860
Points
93
First Name
Colin
I also have that Bismarck kit along with the Titanic , The Victory by Del Prado which I know had serious issues such as only 4 skids when there should be 6 etc Sovereign of the seas which I’m missing issues 1& 2 so I can’t even start it yet I’m hoping with it’s re release I might be able to obtain my missing issues I have emailed deagostini but got no reply yet
Another Del Prado The Cutty Sark and 2 Others HMS Bounty & the Endeavour

Regards

Colin
 

boatman

SMF Supporter
Joined
Nov 8, 2018
Messages
12,853
Points
113
Location
NORFOLK UK
First Name
christopher
HI Colin lookin a good start are you building this on your missus's kitchen table ?
chris
 

Bigfoot57

SMF Supporter
Joined
Jun 24, 2015
Messages
860
Points
93
First Name
Colin
HMS Hood 1/200 Hachette /Amati Wooden kit Build Parts 5 & 6
Ok so with the basic structure now in place it’s time to start adding on the bow and stern sections
So 1st off prepare the pieces

After these were built and added to the structure I had to clamp the port side as it did not want to co-operate like the starboard for some reason anyway the clamps did the trick

Next the actual bow piece was added along with some bracing and to ensure everything is straight and level I dunno about how you do it but I use a corner of one of the scrap frets as these are laser cut and perfectly square as you can see from the several shots of the bow formers perfectly 90 degrees to the vertical not a spirit level in sight

Next a front bracing struct was added and then we moved onto the stern section with a single piece and 2 bracing pieces then we moved onto the stern and did more less the same thing and as you can see in the last photo the model is now as long as my kitchen table which is mine as I live alone so any scratches marks etc it’s down to me to repair etc
So next up will be parts 7 to 10 from the looks of it
Regards

Colin

DEB7EA03-80E8-4A96-B553-CDCA05394CE1.jpeg41B163DD-47F2-49F6-89C0-410294351CBC.jpegE83DF3F3-4CDF-4E17-9725-DA035EDB01ED.jpegA5D0B22D-EBF5-49E9-9284-E4C7D4EAB1D5.jpeg9933C442-2E7D-4992-9C6A-B6E8217A9051.jpeg92B589F8-5707-4524-B438-97FE77E96659.jpeg10937230-7E50-46E8-8B14-F7537D489566.jpeg9800E1A9-9CBA-4071-9CBC-69C75B74C813.jpegAE77DB0C-9F34-42F9-AA32-673FBB62F033.jpeg6D5C77D4-ADC7-42D5-A96D-BEF1A23D48B4.jpegE5988754-A8B7-49A1-AAF2-504200ACC4AE.jpeg2B95B721-3599-4F44-8ABA-4F64A810DEE7.jpeg94289E0B-E137-4C6F-AFE9-3744841F393F.jpegCA4B073F-08E8-4F19-AD45-E3097687F8CC.jpeg5ACFB573-FB20-482C-967B-51A4EBD53037.jpeg
 
Last edited:

Dave Ward

Still Trying New Things
SMF Supporter
Joined
Apr 27, 2018
Messages
8,625
Points
113
Location
South Gloucestershire
First Name
David
HMS Hood 1/200 Hachette /Amati Wooden kit Build Parts 5 & 6
Ok so with the basic structure now in place it’s time to start adding on the bow and stern sections
So 1st off prepare the pieces

After these were built and added to the structure I had to clamp the port side as it did not want to co-operate like the starboard for some reason anyway the clamps did the trick

Next the actual bow piece was added along with some bracing and to ensure everything is straight and level I dunno about how you do it but I use a corner of one of the scrap frets as these are laser cut and perfectly square as you can see from the several shots of the bow formers perfectly 90 degrees to the vertical not a spirit level in sight

Next a front bracing struct was added and then we moved onto the stern section with a single piece and 2 bracing pieces then we moved onto the stern and did more less the same thing and as you can see in the last photo the model is now as long as my kitchen table which is mine as I live alone so any scratches marks etc it’s down to me to repair etc
So next up will be parts 7 to 10 from the looks of it
Regards

Colin

View attachment 439405View attachment 439406View attachment 439407View attachment 439408View attachment 439409View attachment 439410View attachment 439411View attachment 439412View attachment 439413View attachment 439414View attachment 439415View attachment 439416View attachment 439417View attachment 439418View attachment 439419
Gonna need a bigger table! :tongue-out2:
Dave
 

adt70hk

I know its a bit sad but I like quickbuild kits!!!
SMF Supporter
Joined
Sep 4, 2019
Messages
9,480
Points
113
First Name
Andrew
Interesting.... Won't be small either....
 

Bigfoot57

SMF Supporter
Joined
Jun 24, 2015
Messages
860
Points
93
First Name
Colin
HMS Hood 1/200 Hachette /Amati Wooden kit Build Parts 7 to 10

Hello again with these issues we can see the true length of this beastie and I do need a bigger table but as I haven’t got one it’s gonna hang over the sides
So 1st off the 4 sprues that makes up parts 7 to 10
2 for the bow
A1BADAEB-ED04-4433-AD68-2B0387FEFB8D.jpegB4B9BB15-FA14-4748-9625-65A456CC9078.jpeg
2 for the stern
A91DAB39-E91E-40A9-931B-A31958C44C48.jpegB1C8C843-7554-4CD1-8990-7FF80A3A6221.jpeg
And what was done with them in the next set of pictures
The bow was a real problem as the formers were so tight they didn’t need glue but I used some anyway as the fit was so tight I built the bow separate then attached it afterwards as trying to force those formers into place would have snapped of the bow if it had already been glued into place leaving a weak spot
Next came the stern which I had to do a bit of fettling for the 1st time to get the starboard stern former from part 10 to fit after that the rest of the parts were relativity easy and went together with no issues
As before used ca glue to attach the pieces together this works well but you have to be accurate as the glue bonds wood in seconds then go over the whole sections just assembled with pva wood glue as a final stick and clamp any joints that need persuading to co-operate
A07227B0-E463-42F8-84B2-CB35C3F12057.jpegC412B904-8045-4C33-9E9E-DFCBC77FC172.jpegD6AE4A75-DBD0-41F5-883D-6159E87F03BF.jpeg5A9A925F-8315-4EB9-9C90-94F3E3E1598F.jpeg3AED2722-E5D4-4AD9-9C46-1C35BAA089BB.jpegFDCB24A8-C0F3-4849-B1DA-2BD453818FD8.jpeg

Regards

Colin
 
Last edited:

adt70hk

I know its a bit sad but I like quickbuild kits!!!
SMF Supporter
Joined
Sep 4, 2019
Messages
9,480
Points
113
First Name
Andrew
Puts my 1/72 AFVs and planes into scale!!

Keep up the great work

Andrew
 

Bigfoot57

SMF Supporter
Joined
Jun 24, 2015
Messages
860
Points
93
First Name
Colin
HMS Hood 1/200 Hachette /Amati Wooden kit Build Part 11

Ok I’m doing something different here I will include the instruction sheets with each posting so you can see what exactly it should look like and afterwards will be my build photos
So here is part 11 along with the relevant spru
5D649F14-B90C-490B-A131-4C2E087F5F7B.jpeg64BF112E-887F-4747-B517-BA4A7AA59D53.jpegF4CF68A6-5887-4E82-8548-D04A7EBF4A2A.jpegC0EC525F-198F-49B7-8297-F9544E9EC899.jpeg
Next are my build photos I had a small amount of filing to do on the topmost stern piece as the supports were slightly too high for my liking after this I do the usual run through with pva glue and the took some photos of the completed stage
086C0D19-297D-461F-9E21-A0CD0831E7B4.jpegC2450371-BE0F-4927-9515-EAF7364127A7.jpeg885445C9-9606-42BF-B42C-D420D6434653.jpeg17AE0F5E-72FD-494F-9461-5C8062B1692B.jpegAD6E4BB4-AC70-416C-92FE-B3554190CAE2.jpegEE244A15-FC15-4824-A480-CB244509A030.jpegA3E19D05-2728-499C-87D9-40ED1A7F4AB0.jpeg

Regards

Colin
 

Bigfoot57

SMF Supporter
Joined
Jun 24, 2015
Messages
860
Points
93
First Name
Colin
HMS Hood 1/200 Hachette /Amati Wooden kit Build Parts 12-14
So here we go with the next 3 stages of this 140 part build
Not much to do just add a couple of foredeck panels and mode a couple of wedge shaped structures
3385D7A5-7998-45D9-B536-AB031ECF8805.jpegFCEA1AE6-8711-4C3E-AE5A-63F9452374E4.jpegE1475A4A-2271-482F-996E-BB1341B5C3B3.jpegBAE27654-3703-4EDC-9A56-32EB611D5345.jpeg5CFF068B-3619-4D17-9377-D6E9F7945DEA.jpeg3A26D490-8659-4283-9AC9-94488B848D5C.jpeg3E9DA1D4-474E-4D82-8432-B6B7340EA649.jpegDD6D0133-6787-4609-89F8-B4C2E35C21AE.jpegD582BB29-016E-4CCF-9339-18B9F909C65E.jpegDC9DBD85-AAD7-4C96-8117-A9A75B99342C.jpeg7D7F284F-B688-4EB1-AC21-17A3824C3F43.jpegEBDF02F6-FACF-45C5-AFFD-92B8CF5EC3B8.jpegD1D49314-DBE9-46F1-997B-FA051A644C98.jpegB6F12A7C-90B2-464C-921B-E2FAF4AA85CF.jpeg9789FA74-1EFA-4AFF-8834-242F145A42E8.jpeg121A05D9-28E9-4E54-8023-905FEE6C78B2.jpegC5C5C12A-F417-4561-B06F-67241EBA5304.jpeg06B4EE47-396B-45AC-AEC9-98B82C31EFC9.jpeg

Spot the cockup in the last picture chamfered the angle the wrong way hence the extra piece of wood attached and sanded down hopefully when the photo etch gets attached it will look the same as the other side what a dickhead

Regards

Colin
 

Attachments

  • 55973912-F93C-4E55-8C1D-5773C6E3761F.jpeg
    55973912-F93C-4E55-8C1D-5773C6E3761F.jpeg
    84.5 KB · Views: 3

Bigfoot57

SMF Supporter
Joined
Jun 24, 2015
Messages
860
Points
93
First Name
Colin
HMS Hood 1/200 Hachette /Amati Wooden kit Build Parts15 -16

So her we go again starting with stage 15 I hope providing I’ve got my picture sequence right
0DB259CE-60B8-4538-8BB2-21A918BF8B81.jpegB43DE236-1ECB-42A2-A62B-C2049FC89754.jpeg3C5B41E4-A1B0-4DCE-ADAC-2E51466713EE.jpeg459653D6-8D8D-4FC8-941B-D1BA57B0D41F.jpegD13B5685-D25C-4999-B36C-6095591DE182.jpeg
Not much to do here as you can see from the photos and I have no idea where my stage 15 photos are oh dear let’s move on to 16
5FD7EB41-332B-42B5-AC22-A44A6405AE30.jpegE9661096-2EC9-4967-A80D-F7F0160D31CF.jpeg9960B176-57CC-454F-ACF5-956FC0CA3EC6.jpeg2DEB355A-1CB3-4406-AB53-3544BCC2D538.jpeg7CE5AFB6-BAE3-4D85-9252-267C06A622C1.jpeg
This had even less to do than previous section just a couple of beams so I didn’t bother with any photos of this as you’ll see them in stage
17-20

Regards

Colin
 

Attachments

  • 8291BD23-9FC6-4CBB-9481-BA89AD6EA37F.jpeg
    8291BD23-9FC6-4CBB-9481-BA89AD6EA37F.jpeg
    145.8 KB · Views: 1
  • DCEF5D40-6587-45F2-804B-936B08CDAEDB.jpeg
    DCEF5D40-6587-45F2-804B-936B08CDAEDB.jpeg
    114.1 KB · Views: 2

Bigfoot57

SMF Supporter
Joined
Jun 24, 2015
Messages
860
Points
93
First Name
Colin
8E36DEB9-C605-47FF-B018-A922989BF58D.jpeg070C1DEA-C3DA-4662-A61A-7BEFB9C417C9.jpegC19EA8E3-3CEF-4B12-B870-3212BC6FE552.jpegHMS Hood 1/200 Hachette /Amati Wooden kit Build Part 17
Ok this is where it starts to get more like it we now start fitting some of the sub assemblies previously built so on with the pictures
D425EF59-5EFE-46A6-B8FE-CDFBC50AF082.jpeg2120B08E-6564-4784-B91A-D7A5D1EF321B.jpeg86214389-E958-4903-8B07-FE16841F1986.jpeg5C1B2ABD-1515-4B22-8FF6-7992395633A1.jpeg046F0E1F-88EA-43D8-BB10-BAA202E84C87.jpeg7C8F98D9-85F5-42F9-88C6-37EB43C50A1C.jpeg
As you can see I had to resort to various methods of clamping and holding parts in place overnight for the various adhesives to set and do their thing
88AAE9FB-A012-4568-A887-59D3A9D769C6.jpeg84D3967B-1AB2-4DDB-917E-2D9631E81006.jpeg3CC8674B-B753-4FBB-A4F6-24C7A4E90105.jpegCD03F389-B515-4D7A-B43D-26E9FFA77A5C.jpeg1A0EAB9B-0668-42FA-A29E-7F5C36AC4AA8.jpegB167D42F-E1DF-4EE9-A780-2FC6F9F416F3.jpegF7C34888-F96F-4B85-9D25-EEACE8A51626.jpeg83BDDA06-F017-4F37-BE28-A383FE38EA45.jpeg6A58917E-076C-4E5A-808E-8453219BACFB.jpeg

Regards

Colin
 

Attachments

  • 71900B6F-BE64-4553-84D2-5D79DC9CD7B2.jpeg
    71900B6F-BE64-4553-84D2-5D79DC9CD7B2.jpeg
    117.6 KB · Views: 1

Bigfoot57

SMF Supporter
Joined
Jun 24, 2015
Messages
860
Points
93
First Name
Colin
HMS Hood 1/200 Hachette /Amati Wooden kit Build Parts18-19
27C614DE-C736-440D-B94A-2F09D4945F67.jpeg26CD9067-1CA3-4217-806E-9790E3B54A1C.jpeg1562A4AD-E9F4-4429-B5EF-603621ED1A8B.jpeg72C1A5CA-D263-42B7-A5BC-E27FE0A5023A.jpeg
As you can some of the square structures are now rounded at the corners before being fitted this worked perfectly for my previous cockup as rounding the corner removed 90% of my mistake happy days
2193534F-51DD-440B-8F54-F951F36FDFEF.jpeg69CC363E-2380-47AE-AA98-607EB272046F.jpeg102BF999-E589-44AC-9B97-C74FE57C08C7.jpegB14EA727-F577-4408-92C6-BF2AD0EDE62D.jpegA702685C-0EF3-4385-B686-15931FE6214E.jpeg
Part 19
E7C72B97-C96F-404B-832B-453D01D342FA.jpeg5624FB0E-36E0-4CF1-B64C-FBF0C806DF07.jpeg2CE5505B-820F-4448-AAC3-F3E481E39CB0.jpeg8A5F320F-8F9B-429B-9FD5-893EBDC2146D.jpeg
Due to server constraints my build pictures for this will be attached to Part 20 which is fitting out the rear decking and I took some overall pictures of the build so far which has not needed any filler yet as the fit of the wooden parts is exceptional and the pva does the filling job admirably

Regards

Colin
 
Top