Been the same with me. Took about three weeks to get the exhaustion shifted…..still got the cough though…..sound like I’m on sixty a day!
You are using an out of date browser. It may not display this or other websites correctly.
You should upgrade or use an alternative browser.
You should upgrade or use an alternative browser.
Italeri 1/48 Douglas P70 by Andrea
- Thread starter Andy the Sheep
- Start date
- Joined
- Apr 28, 2018
- Messages
- 10,779
- Points
- 113
- First Name
- Jakko
Same. I had COVID in mid-January and I’m still coughing several times a day (just as I typed this, in fact) in the exact way that began when I got itstill got the cough though…..
 Not as severe anymore as two, three months ago, but it’s certainly not totally gone yet.
Andy the Sheep
SMF Supporter
After a month of slow progresses, a lot of masking and sanding and filling and sanding and filling and.... you all know better than me 
she got her wings and this is the state of the art
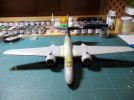
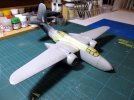
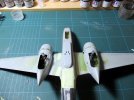
Unfortunately the engines lost the correct alignment within their nacelles while glue was curing and now it's too late unless drastic and possibly fatal surgery ... lesson learned for the future
Next few weeks outlook: more masking and filling and sanding and filling and sanding and, hopefully, primer.
Anyway, it's a lot of fun and that's what really matters.
Questions and comments are always welcome.
Andrea
she got her wings and this is the state of the art


Unfortunately the engines lost the correct alignment within their nacelles while glue was curing and now it's too late unless drastic and possibly fatal surgery
 ... lesson learned for the future
Next few weeks outlook: more masking and filling and sanding and filling and sanding and, hopefully, primer.
Anyway, it's a lot of fun and that's what really matters.

Questions and comments are always welcome.
Andrea
Andrea, that is a great project, just read all the posts.
Love the wires for engine lines.
Can you explain about engines shift?
How did you secure them?
I am afraid my nose cone on SU-27 will shift as well, keeping fingers crossed.
After I lined it up, I taped it over on the seams so let's hope it will stay.
I see canopies are masked and glued temporarily, I guess.
What is the purpose of it?
Sorry for a newbie question but you know... I am total newbie, hahahaha.
Love the wires for engine lines.

Can you explain about engines shift?

How did you secure them?
I am afraid my nose cone on SU-27 will shift as well, keeping fingers crossed.
After I lined it up, I taped it over on the seams so let's hope it will stay.
I see canopies are masked and glued temporarily, I guess.
What is the purpose of it?
Sorry for a newbie question but you know... I am total newbie, hahahaha.

Andy the Sheep
SMF Supporter
Andrzej, the engines moved within their nacelles because I was too impatient and moved them before the glue properly set; being the propeller's shaft protruding from the nacelles, when I left them on the bench they sat on their shafts and their own weight dislocated the engines from the correct position... Lesson Learned: never be hasty.
Here are two pics I took this morning that probably will explain better the problem:
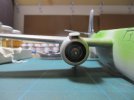
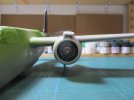
That "box" you see in the upper inner part of the engine (those looking like a sort of Maya pyramid) should be at 12 o'clock, not at 2 or 1 o'clock as here.
Canopies: they are already glued with Humbrol ClearFix after a painful masking process. Another Lesson Learned: buy pre-cut masks, if available, you'll live longer without awakening your bad words vocabulary.
Today I painted them in USAAF interior green before priming. Being transparent parts, this will be the colour that will be visible from inside, whatever the external colour will be. This is a lazy (or smart) way of avoiding painting the canopies from inside, thus halving the chances of messing things up with the most unforgiving parts of a kit.
Having unchained the hissing stick I also painted the props with Tamiya acrilic Flat Black over Tamiya white primer (yellow tips still masked in the pic below)
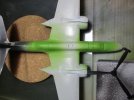
Next steps: sanding again then re-scribing and, hopefully, priming . The fuselage/wings junctions are still not as good as they should be and the engines area still needs some attentions.
Sukhoi nose cone: the nose of the P70 has been glued with a generous quantity of UHU plastic glue, reinforced by a light touch of TET after a couple of minutes while I was still keeping it in the right position with my left hand (wishing I had a third hand to properly manage the glue bottle... ). Then the fuselage was left in vertical position for 24 hrs. If your nose cone is weighted (to avoid having a so called "tail sitter") the weight itself could help keeping the cone in the right position if the fuselage is properly positioned.
Disclaimer: any suggestion that will lead anyone to disaster is because they misunderstood it.


Andrea
Here are two pics I took this morning that probably will explain better the problem:


That "box" you see in the upper inner part of the engine (those looking like a sort of Maya pyramid) should be at 12 o'clock, not at 2 or 1 o'clock as here.
Canopies: they are already glued with Humbrol ClearFix after a painful masking process. Another Lesson Learned: buy pre-cut masks, if available, you'll live longer without awakening your bad words vocabulary.
Today I painted them in USAAF interior green before priming. Being transparent parts, this will be the colour that will be visible from inside, whatever the external colour will be. This is a lazy (or smart) way of avoiding painting the canopies from inside, thus halving the chances of messing things up with the most unforgiving parts of a kit.
Having unchained the hissing stick I also painted the props with Tamiya acrilic Flat Black over Tamiya white primer (yellow tips still masked in the pic below)

Next steps: sanding again then re-scribing and, hopefully, priming . The fuselage/wings junctions are still not as good as they should be and the engines area still needs some attentions.
Sukhoi nose cone: the nose of the P70 has been glued with a generous quantity of UHU plastic glue, reinforced by a light touch of TET after a couple of minutes while I was still keeping it in the right position with my left hand (wishing I had a third hand to properly manage the glue bottle...
Disclaimer: any suggestion that will lead anyone to disaster is because they misunderstood it.


Andrea
Hi Andy,
I understand about engines, well, as you mentioned somewhere, we learn all the time.
You said: "Today I painted them in USAAF interior green before priming" I do not get it, shouldn't priming be the first one one?
"you'll live longer without awakening your bad words vocabulary." ....


"Having unchained the hissing stick I also......" I love the way you name things. Cracks me up.

Questions, you said to avoid painting canopy from inside, you will still see the paint being outside instead of on both sides, no?
I know nothing about it anyway.
Where should I look for precut masks for 1/32 SU-27 from Trumpeter? Any idea?
I have read the disclaimer and I take the associated risks.


I understand about engines, well, as you mentioned somewhere, we learn all the time.

You said: "Today I painted them in USAAF interior green before priming" I do not get it, shouldn't priming be the first one one?
"you'll live longer without awakening your bad words vocabulary." ....


"Having unchained the hissing stick I also......" I love the way you name things. Cracks me up.


Questions, you said to avoid painting canopy from inside, you will still see the paint being outside instead of on both sides, no?
I know nothing about it anyway.
Where should I look for precut masks for 1/32 SU-27 from Trumpeter? Any idea?
I have read the disclaimer and I take the associated risks.


- Joined
- Apr 28, 2018
- Messages
- 10,779
- Points
- 113
- First Name
- Jakko
On the real plane, the inside of the canopy frame was painted interior green. The simple way to do this on a kit is to mask the outside of the canopy and then paint it with the interior colour, and then later applying the plane’s outside colour over the top of it. This will save you having to mask both the inside and the outside, but still looks convincing, especially if it’s hard to see the inside because of the small windows. With a large-scale kit of a modern aircraft, with a big bubble canopy, painting both the inside and outside separately is going to be more convincing, but with a model like Andrea’s, painting the interior colour on the outside will look good enough.You said: "Today I painted them in USAAF interior green before priming" I do not get it, shouldn't priming be the first one one?
Last edited:
Airborne01
SMF Supporter
I totally agree - on all counts!Top work andrea , the engines look superb . Im in the same boat as yourself - cant seem to find the time to get to the bench . Keep the updates coming , cheers tony
Steve
Mark1
SMF Supporter
Looking good, don't think you'll really notice the engine issue when the props are on 

That is some clever technique. I am sure everybody knows about it but it was new to ME, the King of Newbies!On the real plane, the inside of the canopy frame was painted interior green. The simple way to do this on a kit is to mask the outside of the canopy and then paint it with the interior colour, and then later applying the plane’s outside colour over the top of it. This will save you having to mask both the inside and the outside, but still looks convincing, especially if it’s hard to see the inside because of the small windows. With a large-scale kit of a modern aircraft, with a big bubble canopy, painting both the inside and outside separately is going to be more convincing, but with a model like Andrea’s, painting the interior colour on the outside will look good enough.


WOW!!.... How on earth did i miss this until now?!! 
I love these planes.... bought a 1/72 one with am decals and other bits last year.
I`ve had a good old read up of your thread Andy,and must admit that i totally agree with the guys.... excellent work so far mate ,
,
I look forward to seeing your future posts
Andy

I love these planes.... bought a 1/72 one with am decals and other bits last year.
I`ve had a good old read up of your thread Andy,and must admit that i totally agree with the guys.... excellent work so far mate
 ,
,I look forward to seeing your future posts

Andy
Andy the Sheep
SMF Supporter
Andrzej, sorry for the late reply but sometimes I'm a too hasty reader...Where should I look for precut masks for 1/32 SU-27 from Trumpeter? Any idea?

I found this: Eduard masks. I hope you'll find it useful.
They also make very nice detailing sets and have a magazine, issued monthly and downloadable for free, which is very nice too.
About the way I name things: it's one of the nice things I'm learning on this forum.

Andrea
Andrzej, sorry for the late reply but sometimes I'm a too hasty reader...
I found this: Eduard masks. I hope you'll find it useful.
They also make very nice detailing sets and have a magazine, issued monthly and downloadable for free, which is very nice too.
About the way I name things: it's one of the nice things I'm learning on this forum.
Andrea
Hi Andy,
Not a problem, thank you for finding them, I did not know where to even look, now I will know one source.

I will browse through their products right after I finish typing this and these masks I will use as my testing bed.
I will also have questions....

I wish I could name things funny way you do, I will try when I remember. I like it a lot!
Cheers, AJ
Andy the Sheep
SMF Supporter
An update: after a last sanding session P70 received her multicolour underwear as well as two nice props:
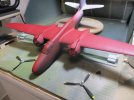
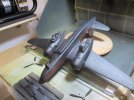
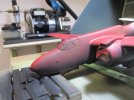
I used 3 different primers from rattle cans: white from Tamiya, red and black from Titans Hobby, which I think it's really fine.
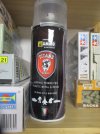
Why 3 different colours? I thought that the upper side of the aircraft would have been paler than her belly, being more exposed to the tropical sun of the Pacific TOA and the tail even more, assuming that the nose and the central fuselage would have been sheltered or protected during the day to save the radar devices from the high temperatures .
.
Considering the experimental aim of this build, my intent is to paint it all black but with different shades from the paler, the tail, to the darker, the bottom while trying to show the wearing of the paint in that challenging weather. That's why I had the idea of a three different primers layer.
Please, do not spray shaving foam over my face or kindle any matches between my toes while sedated, as Matron will surely have her needles at ready as soon as she reads this.

Next step, after the green light form the shrink , painting.
Andrea


I used 3 different primers from rattle cans: white from Tamiya, red and black from Titans Hobby, which I think it's really fine.


Why 3 different colours? I thought that the upper side of the aircraft would have been paler than her belly, being more exposed to the tropical sun of the Pacific TOA and the tail even more, assuming that the nose and the central fuselage would have been sheltered or protected during the day to save the radar devices from the high temperatures
 .
.Considering the experimental aim of this build, my intent is to paint it all black but with different shades from the paler, the tail, to the darker, the bottom while trying to show the wearing of the paint in that challenging weather. That's why I had the idea of a three different primers layer.

Please, do not spray shaving foam over my face or kindle any matches between my toes while sedated, as Matron will surely have her needles at ready as soon as she reads this.


Next step, after the green light form the shrink
 , painting.
Andrea
Hi Andy,
Fantastic update.
Very interesting idea about 3 primers!!!!
I know nothing about it but sounds like a great test.
Keep going and enjoy everything to the max!!!
Fantastic update.
Very interesting idea about 3 primers!!!!
I know nothing about it but sounds like a great test.

Keep going and enjoy everything to the max!!!
Andy the Sheep
SMF Supporter
Today it's warm (above 30 °C) but the cave is just 21°... so... painting day.
Everything went quite smoothly and these are the famous last words.
The tail is painted mainly in Tamiya Panzer Grey, the upper body in Tamiya Panzer grey darkned by Tamiya NATO black (2:1) while the lower parts are NATO Black with a dot of Black.
The problem came when I decided to block the results with a coat of Tamiya gloss...
Disaster: the airbrush or the paint had some problem and I ended up with a grainy shiny coat. The final effect was that of a night dress with paillettes. In the pics the defect is not so evident but, believe me, it was awful.
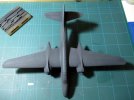
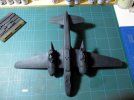
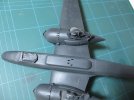
After some thinking I decided to try a radical solution: 0000 steel wool, some elbow grease followed by some unavoidable vacuum cleaning.
The results are not so bad but the P70 now needs another painting session as the blacks have turned into greys and the primer came to the surface here and there, but now it is smooth again.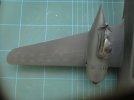
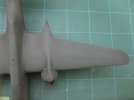
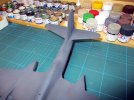
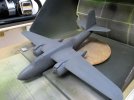
In the meantime, some good old hairy stick job on the wheels
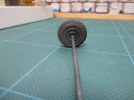
That's all, for the moment.
Andrea
Everything went quite smoothly and these are the famous last words.

The tail is painted mainly in Tamiya Panzer Grey, the upper body in Tamiya Panzer grey darkned by Tamiya NATO black (2:1) while the lower parts are NATO Black with a dot of Black.
The problem came when I decided to block the results with a coat of Tamiya gloss...
Disaster: the airbrush or the paint had some problem and I ended up with a grainy shiny coat. The final effect was that of a night dress with paillettes. In the pics the defect is not so evident but, believe me, it was awful.


After some thinking I decided to try a radical solution: 0000 steel wool, some elbow grease followed by some unavoidable vacuum cleaning.
The results are not so bad but the P70 now needs another painting session as the blacks have turned into greys and the primer came to the surface here and there, but now it is smooth again.


In the meantime, some good old hairy stick job on the wheels

That's all, for the moment.
Andrea
Andy the Sheep
SMF Supporter
Thank you for the compliments, Andrzej,Hi Andy,
Fantastic update.
Very interesting idea about 3 primers!!!!
I know nothing about it but sounds like a great test.
Keep going and enjoy everything to the max!!!
The 3 primers was an experiment and the result is partially satisfactory: where I used the white (the tail) the difference is visible while there is not a significant difference between the red primed and the black primed surfaces. Another difference is that Tamiya white primer finish is less smooth than the red and the black ones; I think I will use it for land vehicles in the future and not for aircrafts.
Andrea
