Italeri 1/72 MH-53E SeaDragon

Geoffers

SMF Supporter
Joined
Jan 26, 2017
Messages
989
Points
93
Location
Shropshire
First Name
Geoff
Hello all,

I’ve recently joined the forum and thought some of you may be interested in my current build.
I’ve already started it otherwise I’d have entered it into the helicopter GB.

So here we go

35CB7FD3-3033-4381-BE4F-6CBCB81B2B53.jpeg
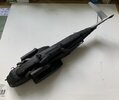
Box art, however this isn’t the scheme I’m going to finish it in.

I’m going to use the included Japanese Maritime Self Defence Force decals to recreate this aircraft.

1DF1754E-1D1D-49E2-93D2-F48F40146267.jpeg

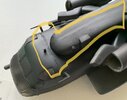
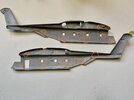
According to Scalemates this kit was first tooled 1993 then updated with new parts in 1996. I think it would be fair to say it is best described as a kit of its time. Not the best of fit, poor interior with lots of raised rivet detail.
So with filler and sanding sticks on standby it was on with the build


Thanks for looking

Geoff.
 
Last edited:

Geoffers

SMF Supporter
Joined
Jan 26, 2017
Messages
989
Points
93
Location
Shropshire
First Name
Geoff
Thanks Scottie, I’m not sure either, I’ll try and edit it so they can all be seen.

Geoff.
 

Geoffers

SMF Supporter
Joined
Jan 26, 2017
Messages
989
Points
93
Location
Shropshire
First Name
Geoff
Hell all,

I’ve been having a play with the pictures and think I’ve got a grip of it now

I’ve deleted the previous ones and will redo the thread later.

Geoff.
 

The Smythe Meister

Born to be WILD....... until about 9pm
SMF Supporter
Joined
Jan 30, 2019
Messages
5,697
Points
113
Location
Devon
First Name
Andy
Hi Geoff,
Well,I see what you mean about it already been started, however, it's a Helicopter,and the group build is "Helicopters",so,I for one, will follow your progress alongside watching the GB,even if it is a "separate" thread :smiling3:
That's one unusual, chunky, looking bird by anyone's standards,nice choice ;)
Andy
 

Geoffers

SMF Supporter
Joined
Jan 26, 2017
Messages
989
Points
93
Location
Shropshire
First Name
Geoff
As previously said I’ve already started this beast so he’s a quick resumé of progress so far.

First up was the cockpit/ interior.

The cockpit has some details but nothing up to today’s models standards.
This was duely built up

667AF68C-F71B-467C-A70C-F7E28BE382E0.jpeg

8D1E83ED-17BD-452B-823C-583EB2890B80.jpeg

At least the cyclic control is included, something that seems to get missed in other helicopter kits.

There are a lot of ejector pin marks on the interior, they probably won’t be seen when it’s all buttoned up but once I’d seen them I couldn’t just leave them so they were given a bit of Mr Surfacer 500 and later sanded smooth.

B117DAEE-CE43-4641-96C2-7F2F25459725.jpeg

There was also some sink marks near the tail to deal with, they got the same treatment.

553826AB-54A6-4984-9AFC-B3D650DA260F.jpeg

92E35865-038E-4773-B75D-78931FF41FB9.jpeg

The interior was then primed with black Mr Surfacer 1500 and left aside to dry properly before the proper painting began.

Once dried the cargo floor was painted with Vallejo Metal Color Aluminium followed by Vallejo Model Air NATO Black. Once dry the NATO Black was carefully scuffed up to replicate wear and tear. The rest of the interior was given a coat of Vallejo Model Air 71.114 which is their equivalent for the recommended FS.35327.
The details were then picked out in various colours by brush.
I’ve also made some rudimentary seat belts from good old Tamiya tape. They aren’t the best but will give a hint of a seat harness when the windows are in place.

B25F959C-6896-45E5-BEF5-BDA5BE2DC9BB.jpeg

E0648C03-25F1-4FE4-84FE-27A50F804575.jpeg1A1BD05D-3021-40E9-8BEE-0A2F55FED78B.jpeg

AEEC6FE5-F94D-4B45-9586-50650106FB39.jpeg

Weathering was just done with Tamiya brown panel liner.

The side door and windows fit was very poor. To get the windows to fit flush I hard to carefully carve around the individual window frames. Once this was done they were a much better fit.
The door frame was to big for the door. To solve this shims of plastic-card were cemented to the door edges and the carefully sanded back to size until the right fit was achieved and it was cemented into place.

So I think it’s fair to say this is no “shake and bake” kit but it is quite an enjoyable challenge so far.

That’s it for now guys, thanks for looking ;)

Geoff.
 

Attachments

  • B9B345FD-4115-4939-9A52-C637DD7ADA69.jpeg
    B9B345FD-4115-4939-9A52-C637DD7ADA69.jpeg
    206.6 KB · Views: 3

Geoffers

SMF Supporter
Joined
Jan 26, 2017
Messages
989
Points
93
Location
Shropshire
First Name
Geoff
Hello guys,

A bit more progress to report.

The engines/exhausts were cleaned up and put together but as with the rest of the build needed a lot of sanding/ filling before I was happy with them.

The exhausts were primed with Tamiya X-1 Gloss Black then once dry this was followed up with Vallejo Metal Color - Jet Exhaust.

The engines were then cemented into place on the fuselage sides.

44E64534-94EA-4A84-95A7-C9E87DB6B326.jpeg

Unfortunately this is just a butt joint which I didn’t think would last long so I drilled from the inside of the fuselage and inserted some brass rod pins to try and create a more robust joint.

Once the engines were sorted it was time to bring the fuselage together. Easier said than done as this section of the build involved trying to line up the fuselage floor pan while at the same time ensuring the best join across the top seam also while trying to keep the rear cargo doors in place
:confounded:.

After a fair bit of fettling and me uttering a lot of bad, bad words the beast finally started to take shape.

6AB683A7-CDD4-4379-9966-3B8B8E105977.jpeg

1F3850F7-7E51-4EE7-B2F9-DB92FF0BC1AD.jpeg568E4EBC-D9AD-482F-95EE-60FA4F683FC0.jpeg

Still a lot of filling/ sanding / rescribing to be done as some of the fit is really below par, eg

A7961EDB-D326-416F-81E1-4264D00F0C83.jpeg


The rotor head and rotors are all cleaned up ready for primer, I might need to add some sag to the rotor blades as they seem very straight, I will study some reference photos first.

F18A55FA-9B33-474D-8E85-7A4F417AE1F5.jpeg

So that’s it for now.

Another update soon, thanks for looking :thumb2:

Geoff.
 

Jakko

Way past the mad part
SMF Supporter
Joined
Apr 28, 2018
Messages
10,729
Points
113
First Name
Jakko
That is one poorly fitting part on the top of the fuselage there :smiling3:
 

Jim R

SMF Supporter
Joined
Apr 27, 2018
Messages
13,693
Points
113
Location
Shropshire
First Name
Jim
Hi Geoff
Well you're taming the beast but a load of work. That second to last photo - the part could be from a different kit! :rolling:
Jim
 

Geoffers

SMF Supporter
Joined
Jan 26, 2017
Messages
989
Points
93
Location
Shropshire
First Name
Geoff
Cheers guys

Yes it’s crazy I had to look at it and check the instructions a few time to check it was the right part.

I think a lot of the poor fitting parts may be due to the poor quality softish styrene.

Oh well I keep telling myself it will all help improve my modelling skill :tears-of-joy::tears-of-joy:

Geoff.
 

Geoffers

SMF Supporter
Joined
Jan 26, 2017
Messages
989
Points
93
Location
Shropshire
First Name
Geoff
A bit more progress

First up the side sponsons were added also the underside of the tail.

The sponsons fitted well, not so much the tail parts.

The clear front of the cabin has also been cemented into place, I bet it won’t be a surprise that this isn’t a particularly good fit either :rolling:

I’ve bodged a bit of filler around and have put it on one side now as it’s starting to drain my enthusiasm a tad

Anyway here’s the pictures.

DA613C87-059B-4BE4-8AB1-D7FE5AF88F04.jpeg
04015616-864E-457A-988F-249BB5ADCE82.jpeg3963D86A-D3BE-45E8-B455-4CFA0094EB5A.jpeg82EFA2B6-8E57-428A-80B9-F1D4395AAD60.jpegEA0D858A-2D98-49CF-BCB8-05D808DB51D5.jpeg

I’ll start the clean up once I’ve had a bit of a break from it and post another update then.

Thanks for looking

Geoff.
 

Mini Me

SMF Supporter
Joined
Jun 1, 2018
Messages
10,159
Points
113
First Name
Rick
Looks like you have your work cut out for you Geoff. I'm sure you will master it in the end and I might add that it is shaping up nicely. Keep up the good work. Rick H.
 

Geoffers

SMF Supporter
Joined
Jan 26, 2017
Messages
989
Points
93
Location
Shropshire
First Name
Geoff
Hello chaps,

Well after a bit of a rest I’ve started to push on with the build again.

I had a session cleaning up the worst seams then started the process of adding all the bits and bobs.

As with the previous part of the build it was very hit and miss.
Some parts fitted well while others needed a bit more persuasion.

Worst offender was the framing at the back of the cargo door but I finally got it looking reasonably ok.

1A1CAB7A-903C-4F2D-AD23-AD81E7E2979B.jpeg7E8B31BF-7A76-477A-BE6D-B6F3FF0B0CA7.jpeg3A51B52E-1AE0-460A-A2AF-368A2859724E.jpegD71ABBF7-E421-44BE-84E9-1E5170D887C8.jpeg
BF4C4747-3ABF-4054-AE38-FF2F504B98B0.jpeg
Once the majority of the parts were in place I decided to give it a coat of primer to give me a better idea of where I need to do a bit more work.

All the small parts not already in place plus the rotors were also primed.

I used black Mr Surfacer 1500 50/50 with self levelling thinner.

It revealed a bit more work needed on the seams but not as bad as I expected.
I deliberately missed the tail as I know for certain that a bit more sanding is required there.
1CCC365D-0A67-4F73-9E5B-1ADC1EFEF05C.jpeg

67EE90E3-A186-4E99-9C79-33AB1CA396AE.jpeg
309135F7-7229-481A-B768-760A7A9326A1.jpeg
EA698AE7-01DF-4087-AEC1-12B38FE507DA.jpeg

So a bit more work required but it’s slowly starting to take shape.

Thanks for looking, another update soon :thumb2:

Geoff.
 

Attachments

  • DE9228D8-9C9B-45B2-8422-11FE0D0A7462.jpeg
    DE9228D8-9C9B-45B2-8422-11FE0D0A7462.jpeg
    105.5 KB · Views: 0
  • 7C5B044D-9FE7-48A1-897F-052D9513CA8A.jpeg
    7C5B044D-9FE7-48A1-897F-052D9513CA8A.jpeg
    72.4 KB · Views: 0
  • B71BE7ED-A035-42F6-8855-D0739D8C0FB8.jpeg
    B71BE7ED-A035-42F6-8855-D0739D8C0FB8.jpeg
    74.4 KB · Views: 0

Geoffers

SMF Supporter
Joined
Jan 26, 2017
Messages
989
Points
93
Location
Shropshire
First Name
Geoff
Hello guys,

Well after another bout of filling and sanding followed by more sanding and filling I’m relatively satisfied with how it’s looking.
I still have a hint of a ghost seam but I’m going to live with it as there won’t be much plastic left if I do any more sanding :tears-of-joy:

9E57541E-5C20-4223-BAB8-4548BB62CA92.jpeg
539EF338-2396-473F-B852-BD6F7ABD2699.jpeg
180C740F-BE70-4145-9AF2-2E055BD19D5A.jpeg

I’ve got to reinstate a few of the lost panel lines and I have a set of raised rivet decals to play with so that’s the next job before I can finally get some paint on it.

Another update soon, thanks for looking :thumb2:

Geoff.
 

boatman

SMF Supporter
Joined
Nov 8, 2018
Messages
12,851
Points
113
Location
NORFOLK UK
First Name
christopher
HI Geoff well i think you have done a fab job of it as i have this kit but mine is the sea stallion i think as i was just goin to build it to put on my tigers flight deck as a visiting helo but now i dont think i will as not enough room for 4 seaking let alone a sea stallion but im following your build as i find it may help me with my seakings choppers
atb
chris b
 
Top