Jack's Tamiya 1/48 FW-190 D9 JV44

Jack L

SMF Supporter
Joined
Jul 25, 2018
Messages
1,003
Points
113
First Name
Jack
Morning all. So I know I don't post many of my own builds on here, but something generally goes wrong (usually due to a lack of patience) to an extent I am not happy with it...but here this goes.

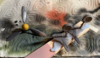
Before I add any pictures (it was a pretty simple build)...I am after some advice. This aircraft has a very unusual paint scheme...hence the attraction to build it:
Screen Shot 2020-01-21 at 08.07.06.png
Now I intend to mask off the white stripes, rather than use decals but, does anyone have any suggestions for pre-shading the panels? At the moment we are primed in light grey, ready for lining the panels in black. Do I then airbrush white, mask, then airbrush red, or will that obscure the black too much?

Or, Black panels, white, mask, black panels again, then red?

I did find a youtube video of someone's build, but the masking step doesn't seem to correspond with the video edit:
1. Black panels lined...no mask
Screen Shot 2020-01-21 at 08.00.06.png

Panels lined over masked stripes
Screen Shot 2020-01-21 at 08.00.33.png

White lines rather than grey?
Screen Shot 2020-01-21 at 08.01.03.png

Any thoughts, suggestions or opinions all very welcome.

Thanks in advance
 

Steven000

WWII and nuts.
SMF Supporter
Joined
Aug 29, 2018
Messages
1,945
Points
113
Location
Belgium
First Name
Steven
Hi, nice project, I like the cockpit :thumb2:

Can't really help you with the shading-question, I would spray a white primer and mix a dark-red for the panel-line-shading. But in the video the black seems to work fine too...
 

Jack L

SMF Supporter
Joined
Jul 25, 2018
Messages
1,003
Points
113
First Name
Jack
Thank you both...there is a slight gap on the left hand side which irritates me, but when enclosed you can't see much more than the seatbelts...but good practice adding the individual levers, handles and dials...again can't even see those in the picture, never mind the finished article.
 

AlanG

Moderator
Staff member
Moderator
SMF Supporter
Joined
Dec 2, 2008
Messages
7,484
Points
113
Location
Scotland
First Name
Alan
Ooooo a wurger D. I'm all over this like a rash. Great start.
 

Jack L

SMF Supporter
Joined
Jul 25, 2018
Messages
1,003
Points
113
First Name
Jack
The stage we are at:
IMG_1178.JPGIMG_4736.JPG

Initial grey primer coat on. A seam that needed more attention under the nose, and potentially one along the underside of the tail (not sure if there was one on the real thing?!) and it will get another primer coat.

As I said, it was a pretty simple build, so not really worth a step by step, but the painting should be more interesting. Additions include a brass pitot tube, machine guns and cannons. Although minor, do seem to add a bit extra to the model. No definition at all to the box parts.

Have to say, it was not quite what I have come to expect from Tamiya...took some aligning, needed some filler here and there, and attaching the wings to the fuselage took a bit of effort. Have some MRP RLM23 in the post...so once I have decided how to do the pre-shade, we can get cracking!
 

Jack L

SMF Supporter
Joined
Jul 25, 2018
Messages
1,003
Points
113
First Name
Jack
On hold with this, airbrush has broken, just put an order in for a new one with the shop here.
 

colin m

Moderator
Staff member
Moderator
SMF Supporter
Joined
Dec 26, 2008
Messages
8,595
Points
113
Location
Stafford, UK
First Name
Colin
Well AB issues aside, what you've done so far looks very nice.
 

Jack L

SMF Supporter
Joined
Jul 25, 2018
Messages
1,003
Points
113
First Name
Jack
Nice bit of progress the last couple of days: New airbrush has arrived courtesy of Scale Model Shop (thank you!), and my MRP colours as well:

Not the shading I wanted, but getting used to the new AB:
IMG_4224.JPG
Very light grey, masked off for the stripes and then a much better version of pre-shading for the red.
IMG_0330.JPG

My depiction is going to be "Red 13," so unlike Tamiya's guides, the stripes are not present along the underside of the fuselage, nor should they be particularly even in spacing or direction. Width shouldn't be uniform either, but I wasn't going to go to the lengths of a mm difference in masking tape." Several thinned layers of MRP RLM23 gave a very nice finish. My first experience using this paint and I am only disappointed I was not aware of it sooner!
IMG_5401.JPG

And then mask removed. A few areas to touch up, but overall very happy with the outcome. Biggest issues is around the wheels, no 'flight' option with the build, so don't fit quite flush for painting, hence a bit of spray seeping under the mask. I used @BarryW 's trick of misting with Mr Levelling Thinner after removing the mask, and it really did seem to add to the quality of the paint.

IMG_9069.JPG

No weighing up whether to re-purchase all my paints in MRP...

Comments and critique most welcome.
Jack
 
D

Deleted member 7181

Guest
Looking good Jack.

I keep hearing so many great things about MRP that I really must give it a try. If John stocked it I'd probably be using it already lol.

If you don't mind a tip - cutting the tape at the edge of the landing gear covers would have allowed it to lay flatter on the wings, meaning less touch up.
 

Jack L

SMF Supporter
Joined
Jul 25, 2018
Messages
1,003
Points
113
First Name
Jack
You've cracked it Jack. Great stuff.
Thank you Peter!
Jack,
That has turned out nicely.
Thanks Paul

Looking good Jack.

I keep hearing so many great things about MRP that I really must give it a try. If John stocked it I'd probably be using it already lol.

If you don't mind a tip - cutting the tape at the edge of the landing gear covers would have allowed it to lay flatter on the wings, meaning less touch up.
Thanks Andy, yeah I really would recommend it...as proven idiot proof paint!
I considered masking and painting the covers separately, when they are down you would never know if the stripes line up or not, but the pedantic side of me wanted them aligned. I didn't realise how much the spacing lifted the tape until I lifted it. But lesson learned, thanks!
 

Jack L

SMF Supporter
Joined
Jul 25, 2018
Messages
1,003
Points
113
First Name
Jack
Some updates (sorry for the poor lighting):

Sprayed the upper wing and fuselage camo, pretty much all freehand which I am pretty please with, but went a bit too heavy handed and the under-shadow doesn't really show through.Screen Shot 2020-01-30 at 17.15.42.pngScreen Shot 2020-01-30 at 17.16.03.png

Also sprayed the prop...unbelievably lucky to find something of the exact diameter:
IMG_5976.JPG
However although the undercarriage and covers sprayed fine, for some reason the paint on the propeller blades has separated...no clue, so will have to have another go.Screen Shot 2020-01-30 at 17.16.20.png
 

Attachments

  • Screen Shot 2020-01-30 at 17.16.20.png
    Screen Shot 2020-01-30 at 17.16.20.png
    1,004 KB · Views: 0

stillp

SMF Supporter
Joined
Nov 17, 2016
Messages
7,216
Points
113
Location
Rugby
First Name
Pete
Were the prop blades a bit greasy Jack? Shame about that, the rest is great.
Pete
 

Jack L

SMF Supporter
Joined
Jul 25, 2018
Messages
1,003
Points
113
First Name
Jack
Were the prop blades a bit greasy Jack? Shame about that, the rest is great.
Pete
Shouldn't have been, they have been in the same place as everything else which has been fine, and were washed and primed in light grey, so I would have thought some grease would have shown up. I will have a look when dry and see what we can do with them.

Very nice work Jack.
Thank you Peter, very kind.
 
Top