Johns 1/35 Zevzda StuG B for Bobs GB

JR

Member of the Rabble and Pyromania Consultant
SMF Supporter
Joined
May 26, 2015
Messages
17,275
Points
113
Location
lincs
First Name
John
A good morning to you all from a now sunny Lincs !

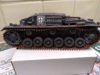
Tracks are on, slight mishap with one side as I had bent some of the tabs the wrong way , suddenly realising and then doing them the correct way. The tabs are so thin , too much pressure can result on a fracture, so trying to bend them the correct way would have resulted in multiple breaks, In the end I only had 3 . A dap of CA appears to have sorted it out.

Trying to fit those track guards after the tracks was a bad idea, of course the pins clashes with the height of the tracks , so sadly they had to be cut off and them just glued on. Model wise there does seem to be very little gap between the top of the track and the guard, in the photo there appears to be a much bigger gap.
All in all I'm please with the overall look, not as good as what I'm expecting to see from the rest of you.

2019_2a.jpg2019_2a.jpg
2019_3a.jpg

Next that coat of varnish , then the weathering.

Apologies to StuG fans.
Thanks for looking in.
 

Attachments

  • 2019_3.jpg
    2019_3.jpg
    91.1 KB · Views: 1

SimonT

Rest in Peace
Rest In Peace
Joined
Apr 27, 2018
Messages
2,448
Points
113
Location
Yorkshire
First Name
Simon
Blimey John, you’ve nearly finished already!

I’ve only managed to clean up the wheels and a couple of other bits

Thanks for the warning with the track guards - shall check location with the plans
 

JR

Member of the Rabble and Pyromania Consultant
SMF Supporter
Joined
May 26, 2015
Messages
17,275
Points
113
Location
lincs
First Name
John
Blimey John, you’ve nearly finished already!

I’ve only managed to clean up the wheels and a couple of other bits

Thanks for the warning with the track guards - shall check location with the plans
Well I can crack on while you have to go to work .
Can't see them being a prob for you Simon, but very annoying when there is so little gap .
John, to
Nicely done mate.
Thanks Paul.
Going to start the weathering tomorrow, figures are coming on. Then the best part the base !
 

Neil Merryweather

SMF Supporter
Joined
Dec 29, 2018
Messages
4,418
Points
113
Location
London
First Name
Neil
Just caught up with this John and it's looking superb. I've never tried the chipping myself although I've seen it used alot. I suppose if you don't build tanks there's not much call for it.
I think you are going to have to find another head for that third figure.
As for fitting heads it really depends on the collar situation of the body you use. If you have an open shirt you will need to drill because more of the neck is exposed. With a German or Russian style collar cutting and pinning is fine, but personally I would always drill small and open up gradually with a Dremel grinding bit. And I would probably still pin with wire so I could paint the head separately.
I think you got the boots on number 3 just right, by the way
Keep up the good work.
Neil
 

JR

Member of the Rabble and Pyromania Consultant
SMF Supporter
Joined
May 26, 2015
Messages
17,275
Points
113
Location
lincs
First Name
John
Just caught up with this John and it's looking superb. I've never tried the chipping myself although I've seen it used alot. I suppose if you don't build tanks there's not much call for it.
I think you are going to have to find another head for that third figure.
As for fitting heads it really depends on the collar situation of the body you use. If you have an open shirt you will need to drill because more of the neck is exposed. With a German or Russian style collar cutting and pinning is fine, but personally I would always drill small and open up gradually with a Dremel grinding bit. And I would probably still pin with wire so I could paint the head separately.
I think you got the boots on number 3 just right, by the way
Keep up the good work.
Neil
Thanks Neil, I was hoping you'd look in .
I've got a Dremel, so will look for a grinding bit.
Nice tip on the painting the head while on the wire before fitting Too late this time , but will try to remember.
John
 

Jakko

Way past the mad part
SMF Supporter
Joined
Apr 28, 2018
Messages
10,737
Points
113
First Name
Jakko
You can also carve out the neck with a modelling knife, especially after drilling a hole in it :smiling3:
 

JR

Member of the Rabble and Pyromania Consultant
SMF Supporter
Joined
May 26, 2015
Messages
17,275
Points
113
Location
lincs
First Name
John
Weathering today, now as the photos show the captured one covered in mud there was no point in doing much to those tracks and wheels.
2019_4.jpg

2019_9.jpg

2019_10.jpg

2019_5.jpg2019_9.jpg

I can see that there is one wheels that has come unstuck, brill, that can rest on uneven ground !
Pleased with the sag, matches the photo I'm copying , the number of links worked out.
Just realised I've not posted this Duh ! Until now
 

Attachments

  • 2019_6.jpg
    2019_6.jpg
    147.3 KB · Views: 12

JR

Member of the Rabble and Pyromania Consultant
SMF Supporter
Joined
May 26, 2015
Messages
17,275
Points
113
Location
lincs
First Name
John
Looking good John, like the wear and tear and good old sag!
Morning Bob, thank you. Will start on the figure painting this morning and then the base.
 

JR

Member of the Rabble and Pyromania Consultant
SMF Supporter
Joined
May 26, 2015
Messages
17,275
Points
113
Location
lincs
First Name
John
You are welcome John, building the easy tracks today, will see how they look!
You should find it ok Bob.
Morning John,
Ooo I like the muddy-ness:smiling4:
What are you using to make the mud?
Some Vallejo Russian Dark Mud Si .
1576504456681.png

Has wet look to it, might spray a tad mat varnish to dry it out ?

That looks properly dirty :smiling3:
Thanks Jakko , certainly hides any mistakes :smiling2::smiling2::smiling2:.

She's coming along a treat mate. Nice bit of sag and dirt around the lower hull. Good luck with the figures
Cheers Mate.
 
D

Deleted member 7181

Guest
I like 'em dirty, it suits it well, looks like they were made to be that way.

I keep forgetting to say, great job on the hand painted name on the side!
 

JR

Member of the Rabble and Pyromania Consultant
SMF Supporter
Joined
May 26, 2015
Messages
17,275
Points
113
Location
lincs
First Name
John
Looking good John :smiling3:.
Thanks Ralph.

I like 'em dirty, it suits it well, looks like they were made to be that way.

I keep forgetting to say, great job on the hand painted name on the side!
If you had heard the swearing Andy , I had it set out just right....... Then did one letter too thick. Wiped it off about half a dozen times before decided that was it ..

Looking great John
Cheers Lee .
 
Top