KV 1 meets a little Panzer.

JR

Member of the Rabble and Pyromania Consultant
SMF Supporter
Joined
May 26, 2015
Messages
17,275
Points
113
Location
lincs
First Name
John
First thing after finding a section of 18 mm was the gluing of the foam.
I've not used this foam before, It was a section of insulation that my son in law gave me has been under the work top for some time.
I used UHU POR to glue it down, moving the foam around to push any trapped air out, this gives a better grip then I left it over night with some weights on top.
The next morning, with the weights removed a good coating of a PVA bonding adhesive was applied.


330603

I used this at work so still had it in stock, waste not want not. :smiling3::smiling3:. Other makes are available
I gave the whole area a good coating and left it to dry for a couple of days.

330606

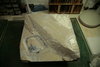
When fully dry I used the old Drywall adhesive, had it since the cave refurbishment , so its well over a year old, been kept under the worktop and has never be allowed to freeze.

330607
When dry it looked like this, now having placed the panzer in place before hand there was some digging to achieve the correct sunk into the water look .
330608
Too flat.... so .......

330609
Much chopping out and drilling, followed by even more sealing.
Once that was done several coats of cheap acrylic paints were used to make a start to the dio look .

330610
Now there will be ruts in that road, so some more filler will be applied, I used at the rear a mix of PVA, the same as the sealer coat but just added some wall filler to build that area up, will used the same on thew road.

Once the the tanks are ready, along with the figures they will be glued in position then the ice and snow can start. Oh happy days indeed.

Right off for some late tea.
comments welcome.
John.
 

Attachments

  • _MG_4486.JPG
    _MG_4486.JPG
    72.1 KB · Views: 8
  • _MG_4486.JPG
    _MG_4486.JPG
    72.1 KB · Views: 8

Mini Me

SMF Supporter
Joined
Jun 1, 2018
Messages
10,159
Points
113
First Name
Rick
JR, I see you are happily at it again with the ice and snow. Playing with all that cold stuff would make me want a cupper as well
Cheers Mate, Rick H.
 

JR

Member of the Rabble and Pyromania Consultant
SMF Supporter
Joined
May 26, 2015
Messages
17,275
Points
113
Location
lincs
First Name
John
Great work John. A really ambitious set up.
Morning Peter, thank you. I can see it in my mind, just have to not rush it !
JR, I see you are happily at it again with the ice and snow. Playing with all that cold stuff would make me want a cupper as well
Cheers Mate, Rick H.
Hi Rick, yes love it, bit different from fire , two poles apart .
Loads to do, will keep me busy for a good while yet .
Thanks for your comments.
John .
 

Jim R

SMF Supporter
Joined
Apr 27, 2018
Messages
13,716
Points
113
Location
Shropshire
First Name
Jim
Hi John
That looks very good. Well planned out. Good use of available material.
Jim
 

Lee Drennen

Box Stock Builder with a Twist/ Rabble Member
SMF Supporter
Joined
Apr 29, 2018
Messages
5,641
Points
113
Location
Wortham Mo
First Name
Lee
Nice work so for John! At least I don’t see and burn marks yet
 

grumpa

SMF Supporter
Joined
Jan 14, 2015
Messages
4,690
Points
113
First Name
Jim
Coming along nicely, a real landscaper you are.:thumb2:

Jim.
 

Steve Jones

Steve Jones Scale Modelling Site
Joined
Apr 27, 2018
Messages
6,698
Points
113
Location
Plymouth
First Name
Steve
Ah! The easy bit - building a base :smiling5:

Rather you than me mate. Looking forward to seeing how you tackle the broken ice. Good luck mate
 

Fernando N

Aviation fan and the Roadrunner, meep meep!
SMF Supporter
Joined
Apr 27, 2018
Messages
1,889
Points
113
Location
Almere, Netherlands
First Name
Fernando
Great start at the base John:thumb2:, this will be interesting with the ice and snow involved.:smiling:
 

JR

Member of the Rabble and Pyromania Consultant
SMF Supporter
Joined
May 26, 2015
Messages
17,275
Points
113
Location
lincs
First Name
John
Hi John
That looks very good. Well planned out. Good use of available material.
Jim
Thanks Jim.
Nice work so for John! At least I don’t see and burn marks yet
No Lee apart from Ice burn there won't be any.:smiling2::smiling2:

Coming along nicely, a real landscaper you are.:thumb2:

Jim.
Thank you Jim, a nice comment esp as the next is from Steve. :smiling3::smiling3::smiling3::nerd:.
Ah! The easy bit - building a base :smiling5:

Rather you than me mate. Looking forward to seeing how you tackle the broken ice. Good luck mate
:flushed::smiling::smiling3::smiling5::tongue-out3: as for the Ice I had a look this afternoon and put It straight back in its packaging:surprised::thinking:.
Great start at the base John:thumb2:, this will be interesting with the ice and snow involved.:smiling:

Thanks mate, feel I have to do the whole thing, like the grass in an winter setting before I tackle this ice part.
John,
Something tells me I am looking in on another great build.
Very kind of you to say Paul, I do feel that some care will be needed to get this just right.
John.
--------------------------------------------------------------------------------------------------------------

Having given the base several layers of filler, and paint, I decided to make up some soil as I had said earlier. I needed to blend the colours in and put the reeds in while I did this, so mixing some acrylic paints in with some thick PVA I set too .Drilling out the holes for the reed steams resulted in a lot of white areas around the holes, with the end of the reeds dipped in the thick brown gungue it soon looked right. Another thick coat of varnish from W/N was used to help seal the base.At this point I realised it was an oil based varnish so I hope it will be ok over the other acrylic coats. Once dried I may give it another thin coat of the satin acrylic, any pointers on this would be appreciated.

While this was settling I popped it some roots again using the thick coloured pva. I've put some autumn glass in , didn't use the magic grass thingy as can't find the grease proof paper to make the tuffs. Added some roots for the trees and put down some pva along with a scattering of 4mm autumn grasses. They would have been flattened by now so no worries with not having them all standing up.

331321331322331323331324

Pleased with this so far, had a look at the ice earlier and put it back in its packaging quickly, going to have a look look at their site before I attempt the ice part.


Thanks for following .
John.
 

spanner570

SALAD DODGER
SMF Supporter
Joined
May 26, 2009
Messages
12,981
Points
113
First Name
Ron
453 - Not bad, not bad at all........ :thumb2:

570
 

JR

Member of the Rabble and Pyromania Consultant
SMF Supporter
Joined
May 26, 2015
Messages
17,275
Points
113
Location
lincs
First Name
John
Looking very nice so far mate :thumb2:
Thanks Si.
Looking very good John. A very convincing bit of landscaping.
Hi Peter, nearly as much fun as gardening !

Great work John. Looks realistic.
Jim
Thanks Jim.
453 - Not bad, not bad at all........ :thumb2:

570
570 thank you .
John,
Looking very nice the ground work looks very good.
Cheers Paul .

Let's hope it looks as good tomorrow !
John .
 

Mini Me

SMF Supporter
Joined
Jun 1, 2018
Messages
10,159
Points
113
First Name
Rick
JR, What material did you use for the swimming hole? It gives the illusion of depth but does not look that deep. Great result.
Cheers, Rick H.
 
Top