M29C Water Weasel

Jim R

SMF Supporter
Joined
Apr 27, 2018
Messages
13,695
Points
113
Location
Shropshire
First Name
Jim
A good, and successful, idea to fit bogies to track rather than the other way round.
As for the rear pontoon. Would a couple of saw cuts take out the required 2mm? Sanding the sawn edges if needed to get to the 2mm.
 

Jakko

Way past the mad part
SMF Supporter
Joined
Apr 28, 2018
Messages
10,737
Points
113
First Name
Jakko
Sawing is what I’ve been leaning to as well, but it’s very tricky to do that neat and straight. That’s to say, I don’t really trust myself to do it right … I’ve got a mitre box, but the slot in it is far wider than my saw, so it’s bound to wobble.

Given that this is resin, I don’t want to sand a millimetre off on each side (with a belt sander, for example). The dust isn’t as dangerous as we were meant to believe 25 or so years ago, but it’s still a fine dust with the normal hazards of that, not to mention it’ll get everywhere.
 

Jim R

SMF Supporter
Joined
Apr 27, 2018
Messages
13,695
Points
113
Location
Shropshire
First Name
Jim
Maybe use a scriber to scribe a straight guide line which might help keep the saw straight. I can't see how you would get a perfect join so a little filling is inevitable.
This is a real exercise in problem solving. Still most of your builds fall into that category:smiling:
 

minitnkr

Rabble & escape committee member
SMF Supporter
Joined
Apr 27, 2018
Messages
6,705
Points
113
Location
Dayton, OH
First Name
Paul
Use a smaller kerf saw to make another slot.
 

Jakko

Way past the mad part
SMF Supporter
Joined
Apr 28, 2018
Messages
10,737
Points
113
First Name
Jakko
Elsewhere, someone suggested to use an electric chop saw, as those apparently have a 2 mm thick blade, so one cut down the middle and join the halves again. But I don’t have one of thosr, and don’t know who I know who might have one.
 

Ian M

Administrator
Staff member
Administrator
Moderator
SMF Supporter
Joined
Dec 14, 2008
Messages
19,691
Points
113
Location
Falster, Denmark
First Name
Ian
When I have to make a cut like that I start buy grabbing the P cutter and make a good scribe line. Then the saw. The part and the cut dictate which saw. For a cut like that, I would go for the fine exacto saw.
 

stillp

SMF Supporter
Joined
Nov 17, 2016
Messages
7,216
Points
113
Location
Rugby
First Name
Pete
Sawing is what I’ve been leaning to as well, but it’s very tricky to do that neat and straight. That’s to say, I don’t really trust myself to do it right … I’ve got a mitre box, but the slot in it is far wider than my saw, so it’s bound to wobble.

Given that this is resin, I don’t want to sand a millimetre off on each side (with a belt sander, for example). The dust isn’t as dangerous as we were meant to believe 25 or so years ago, but it’s still a fine dust with the normal hazards of that, not to mention it’ll get everywhere.
I've got an electric tile saw with a 2mm thick blade, which runs in water so there'd be no problem with dust. Do you know any local tilers?
Pete
 

Jakko

Way past the mad part
SMF Supporter
Joined
Apr 28, 2018
Messages
10,737
Points
113
First Name
Jakko
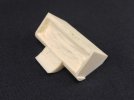
In the end, the problem was solved by my father, who said he could mill off the necessary amount using a router fitted to his lathe:

IMG_0331.jpeg

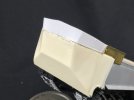
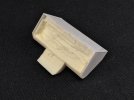
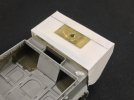
It couldn’t reach the bottom few millimetres, but that was easy enough to trim with a knife. After that, I cut back the thick part at the top and added 0.25 mm plastic card over the top and sides:

IMG_0333.jpeg

This I did by superglueing oversized pieces to it and then trimming and filing them to size once the glue had dried, as this is far easier than trying to cut them perfectly to size first. The reason for the plastic card is because on the real thing, the rear floatation cell overlaps the sides and overhangs the rear deck:

IMG_7948.jpeg

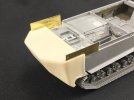
It needs a little more work doing to it before I can mount it to the model, though. In the mean time, I did install the cell at the front:

IMG_0332.jpeg

I first bent and then glued the etched parts to the floatation cell, so I could get it at the right height the easy way — glueing the cell to the hull first and then adding the etched parts would again be making your life difficult. I did have to deepen a little hollow in the front of the splash guard around the radiator hatch, because a little shaft protruding from the cell couldn’t go down far enough otherwise, preventing the etched parts from reaching the deck.
 

Jakko

Way past the mad part
SMF Supporter
Joined
Apr 28, 2018
Messages
10,737
Points
113
First Name
Jakko
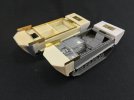
The hard part is still ahead, though — all of the etched bits for the skirt plates, mainly. For now, I added the stern cell to the hull:

IMG_0335.jpeg

It would have been hard to glue because the hollow in its front face, coupled to having narrowed the whole thing, left little area for glue. By mixing some two-part epoxy putty and pushing it into the lower part of the hollow, I could stick the cell to the hull, though. The lid on top is from the LZ kit.

And that puts this build at roughly the same point where the last one stalled:

IMG_0336.jpeg
 

Jim R

SMF Supporter
Joined
Apr 27, 2018
Messages
13,695
Points
113
Location
Shropshire
First Name
Jim
You're getting there Jakko. It makes you realise that every problem has a solution - hopefully.
 

The Smythe Meister

Born to be WILD....... until about 9pm
SMF Supporter
Joined
Jan 30, 2019
Messages
5,699
Points
113
Location
Devon
First Name
Andy
Wow Jakko,all that extra hard work that you've put into this sure has paid off :flushed::thumb2:,looks superb!!
 

Jakko

Way past the mad part
SMF Supporter
Joined
Apr 28, 2018
Messages
10,737
Points
113
First Name
Jakko
Thanks, but I’m not on the home straight yet … though getting to this point has definitely been easier with the Takom kit as a base than on the original attempt with the LZ kit. Of course, had I waited a bit longer for the Takom M29C kit to come out, it would probably have been a lot easier still ;)
 

Jakko

Way past the mad part
SMF Supporter
Joined
Apr 28, 2018
Messages
10,737
Points
113
First Name
Jakko
Not done much for a while, but I did some more work on the bow now.
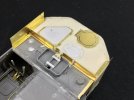
IMG_0343.jpeg

The etched hatch you get in the LZ kit has about the right size and shape, but its lid is noticeably too thin, so I added a bit of plastic card to raise it up a bit. LZ’s base for the capstan is far too large, though — it’s the etched part towards the front (and loose), with its plastic card and rod replacement in the correct position.

LZ also doesn’t give you any supports for the transverse etched piece, so I made them from some plastic strip. They were not placed symmetrically on the real M29C.

Then the surf guard:
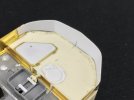
IMG_0344.jpegIMG_0345.jpeg

As I had already discovered on my last attempt, LZ’s etched part doesn’t fit, so I used the same method now as then to find the right shape: I taped a piece of paper to the bow and marked out its contours. After cutting it out from the paper and pasting it to 0.25 mm plastic card, I cut it out, bent it to shape, and superglued it to the bow.

Here’s my template on the etched part by how much the two differ:
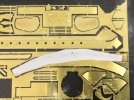
IMG_0346.jpeg

It’s not perfect (and, in fact, not quite symmetrical) but at least it fits reasonably well, unlike the etched part.
 

Jim R

SMF Supporter
Joined
Apr 27, 2018
Messages
13,695
Points
113
Location
Shropshire
First Name
Jim
Your usual well considered, neat progress. That LZ surf guard is not even close. Your version is much improved and fits!!
 

Jakko

Way past the mad part
SMF Supporter
Joined
Apr 28, 2018
Messages
10,737
Points
113
First Name
Jakko
Thanks :smiling3: My surf guard is a little uneven, but you only really see that from above, so I will claim it got dented, and that’s what I’m sticking to ;)
 
Top