Pete's Academy 1/72 Mustang

stillp

SMF Supporter
Joined
Nov 17, 2016
Messages
7,216
Points
113
Location
Rugby
First Name
Pete
My Warrior is just about finished, so while some touch-ups are drying I thought I'd start my thread for the Anti-Aircraft Gearbox Animal Antics Group Build. I've had enough of Operation Herrick for now, so will enter with this Mustang.
P1150333.JPG
As you can see, it wasn't expensive.
P1150334.JPGP1150335.JPG
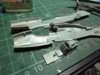
Only 28 parts, so even I can't get much wrong (famous last words).
Some nicely engraved detail, and nice interior.P1150336.JPG
Hospital appointment later - like many others on here, I'm falling apart - so hope to get this started this evening.
Thanks for looking,
Pete
 

Steve Jones

Steve Jones Scale Modelling Site
Joined
Apr 27, 2018
Messages
6,698
Points
113
Location
Plymouth
First Name
Steve
Glad your able to join the party old chap. Good luck with the wingy thing. Great to have you along for the ride
 

Si Benson

SMF Supporter
Joined
Apr 27, 2018
Messages
3,321
Points
113
First Name
Si
Hi Pete,
looks like a straight forward build. Are you going for a boxart metallic finish?
 

JR

Member of the Rabble and Pyromania Consultant
SMF Supporter
Joined
May 26, 2015
Messages
17,275
Points
113
Location
lincs
First Name
John
I shall sit at the back, is there any tea ?
 

stillp

SMF Supporter
Joined
Nov 17, 2016
Messages
7,216
Points
113
Location
Rugby
First Name
Pete
Certainly sir, English breakfast, Tetley's, or organic Japanese green tea? Still a few of the wife's sausage rolls left too.

Catering dealt with, I've put the cockpit tub together. There was a bit of flash on the seat:
P1150341.JPG
Easily removed with a pointy scalpel.

P1150340.JPG
As for the moulded seat belts... well, they tried. Here's a better view:
P1150339.JPG
Here's the tub so far, along with a better view of the detail on the sides:
P1150342.JPG
There are a couple of stupidly small pieces to add to the pit sides, but I'll get the Interior Greeen (chromate?) on first.
Fuselage halves fit together well, although the seam will need some sanding. The air intake will need a bit of work though:
P1150343.JPG
There's a big step top and bottom. Oh well, it wouldn't be modelling if there wasn't some work to do.
Thanks for watching
Pete
 

Attachments

  • P1150342.JPG
    P1150342.JPG
    131.4 KB · Views: 1

JR

Member of the Rabble and Pyromania Consultant
SMF Supporter
Joined
May 26, 2015
Messages
17,275
Points
113
Location
lincs
First Name
John
Full English please , and some of the good ladies sausage rolls.


Will you add am seat belts Peter, it's a shame those seats weren't moulded well.
 

Jim R

SMF Supporter
Joined
Apr 27, 2018
Messages
13,693
Points
113
Location
Shropshire
First Name
Jim
Hi Peter
Definitely a bargain. Straightforward to build but time will be needed to sort the annoying fit issues. Box art looks rather toy like although the bare metal finish is nice. Is that the only option the kit gives?
Jim
 

stillp

SMF Supporter
Joined
Nov 17, 2016
Messages
7,216
Points
113
Location
Rugby
First Name
Pete
Will you add am seat belts Peter, it's a shame those seats weren't moulded well.
No, it'll be OOB John. At least they tried to show the seat belts, when painted they should be OK. It's 1/72 after all.
Box art looks rather toy like although the bare metal finish is nice. Is that the only option the kit gives?
Yes Jim, it is a bit toy like, and that is the only scheme offered. Should be a fairly quick build - it says 14 years and up on the box, but I'm hoping to finish it quicker than that. :smiling5:
Pete
 

Mini Me

SMF Supporter
Joined
Jun 1, 2018
Messages
10,159
Points
113
First Name
Rick
Toy like?? my middle name, nothing like the gratification of turning a sow's ear into a silk purse. Speaking of pigs, I'm in for the sausage rolls and the Tetley's if you please. Taking my seat next to 453. Cheers, Rick H.
 

stillp

SMF Supporter
Joined
Nov 17, 2016
Messages
7,216
Points
113
Location
Rugby
First Name
Pete
A little progress on the cockpit:
P1150356.JPG
The Mustang had an unpainted plywood floor, but I think I need to dirty it a bit.
I usually use the IP decals, but I think this one must be intended for a different kit!
P1150357.JPG
OK, I'll paint that. How could they get that so wrong?
Pete
 

stillp

SMF Supporter
Joined
Nov 17, 2016
Messages
7,216
Points
113
Location
Rugby
First Name
Pete
I fitted those little cockpit details you can see just above the port fuselage half in the first photo just above. Lucky I used PVA as the throttle quadrant moved as the glue dried, and that pipe thing (pilot's oxygen?) stopped the seat tub from fitting into place. A drop of water softened the PVA enough that I could solve both those issues. The IP has had a coat of matt black and a few spots from a silver paint pen, also a spot of red to make a change! (I found an image showing some switches in red).
That done the fuselage can go together:
P1150367.JPG
Fit was pretty good, but the seam will need some serious sanding. Best get the win and canopy on before that though.
Thanks for watching
Pete
 

JR

Member of the Rabble and Pyromania Consultant
SMF Supporter
Joined
May 26, 2015
Messages
17,275
Points
113
Location
lincs
First Name
John
That photo with the paint bottles just shows how small it is Peter, I can why you aren't changing the belts :flushed:.
 
Top