B
You are using an out of date browser. It may not display this or other websites correctly.
You should upgrade or use an alternative browser.
You should upgrade or use an alternative browser.
Resin casting intro
- Thread starter MikeC
- Start date

- Joined
- Apr 27, 2018
- Messages
- 1,758
- Points
- 113
- First Name
- Michael
Ian, Many thanks for the help with sorting the posts out. Cheers, MikeC.This is a very helpful guide in the black art of casting. Although this is directly aimed at resin casting the principles are the same if you wish to cast white metal or tin. You can still buy high temp silicon for moulds. (I used to cast fishing lures with it).
I took the liberty of merging all the separate threads into one post, otherwise they will get mixed up and lost.
Thank you for sharing this
Hello,Michael ,
I,m won,t to make a hard mold,that I,can use green stuff,or the likes,in,
would it be much the same as you have shown ?
or do you use a different way of doing it,and help greatly appreciated,
cheers,Monica
I,m won,t to make a hard mold,that I,can use green stuff,or the likes,in,
would it be much the same as you have shown ?
or do you use a different way of doing it,and help greatly appreciated,
cheers,Monica
J
Jim Barry
Guest
Thanks much Mike. This and DIY photo etch are the two zones I feel I need to master.
- Joined
- Apr 27, 2018
- Messages
- 1,758
- Points
- 113
- First Name
- Michael
Hi monica,Hello,Michael ,
I,m won,t to make a hard mold,that I,can use green stuff,or the likes,in,
would it be much the same as you have shown ?
or do you use a different way of doing it,and help greatly appreciated,
cheers,Monica
I am not sure what you want to do with the green stuff.
Is this the Green Stuff filler you are going to use?
To make a solid mould, then your choice should be Plaster of Paris, but then you come to the problem of removing the item from the mold/mould, and Green Stuff once hard can become brittle, the inner part may not harden due to lack of air.
If you let me know what you are trying to cast, then I can point you in the right direction, and spend time helping you.
Please get back to me.
Cheers, MikeC.
Gary MacKenzie
SMF Supporter
I have used Oyumaru Reusable Modelling Compound , a weird material that you heat up in hot water and then can use as a pliable material you can embed an object in. when it cools remove object and you have a nice small mold for smaller items , or melt a few blocks together to get a bigger mold area.
Resurrecting an old thread but it has fantastic information on it.
I have a question though. I would love to give casting a go as i have an idea to make something that would save me a load of time scratch building. But i would like to know how i can ensure little plugs can be filled with the resin without having stubs to draw the resin through? The attached picture is for reference only and not the item i want to cast. I was just wondering how they did it without air bubbles/voids

I have a question though. I would love to give casting a go as i have an idea to make something that would save me a load of time scratch building. But i would like to know how i can ensure little plugs can be filled with the resin without having stubs to draw the resin through? The attached picture is for reference only and not the item i want to cast. I was just wondering how they did it without air bubbles/voids
- Joined
- Apr 28, 2018
- Messages
- 6,212
- Points
- 113
- First Name
- Bob
Excellent Mike
I have the kit and need to copy three different parts, two of them a few times. Will have a good read
Bob
I have the kit and need to copy three different parts, two of them a few times. Will have a good read
Bob
Gary MacKenzie
SMF Supporter
This works in my head, and I believe it might work if you rotated the master as per

Then create a master mold of piece at that angle
top part has the negative of the wording ''taurus models''
then cut a filler hole as per

Now turn mold so that the top half and the bottom half become left and the right half with pour point at the top.

The liquid should flow down to bottom , and start filling up the way and allow the air to escape as it fills each of the small bits as the level rises.
Then create a master mold of piece at that angle
top part has the negative of the wording ''taurus models''
then cut a filler hole as per
Now turn mold so that the top half and the bottom half become left and the right half with pour point at the top.
The liquid should flow down to bottom , and start filling up the way and allow the air to escape as it fills each of the small bits as the level rises.
Attachments
- Joined
- Sep 4, 2019
- Messages
- 9,486
- Points
- 113
- First Name
- Andrew
Mike
Seen this for the first time. Very informative and not half as scary as I thought it would be, and now I know how you're going to do my wheels!!!
Thanks for taking the time to put this up!
ATB
Andrew
Seen this for the first time. Very informative and not half as scary as I thought it would be, and now I know how you're going to do my wheels!!!
Thanks for taking the time to put this up!
ATB
Andrew
No offence to anyone but that is not the easiest way to cast something such as that Taurus sample block
Rather than go through all the palaver of making two part moulds with lego and clay and measuring with scales just make single sided moulds as used by a lot of the commercial makers (it is how that sample block was cast) and mix resin in a mixing cup with gradations marked on the side - I was told how to do this by Tom at Millicast years ago when I made some masters for him and had to prepare the parts correctly so they could be moulded
In that sample block you make the master exactly as it looks - the turned parts that you actually want, attached to a block which becomes the 'sprue' (it is actually a resin reservoir and the reason why you don't require an 'in' and an 'out')
Glue the block to a flat base with the parts pointing up
make a perimeter wall - I use plastic card as you get an excellent seal on all sides - around the master. It can be recycled afterwards for scratching more parts
mix and pour your rubber over the master slowly - depending on the shape of your master you may need to help the rubber into recesses and purge air out. A piece of stiff wire with an 'L' on one end can be pushed gently around the master to help ease the rubber into the detail and dislodge bubbles - after a little practice you soon get the hang of where air collects and needs dislodging
As you fill the mould flex the sides as this also helps bubbles escape - you will see bubbles rise to the surface of the rubber
Once set - I usually leave for a day to make sure - break open the wall and remove
Carefully pull the rubber off the master and turn open side up - the hole formed by the sprue block is now a reservoir for the resin
Use a mixing cup to put equal parts of resin and catalyst in - say 10ml of each or whatever is required to fill the mould, using the marked gradations on the side of the cup, and mix. Flat coffee stirrers are great for this
Again, the more castings you do the more you get to recognise how much resin will be required
For small amounts medicine cups can be bought cheaply off ebay
Now you have the resin mixed you don't have long before it will start to react
Squeeze the air out of the mould and fill the reservoir with resin - let go of the mould and resin will be sucked into the mould
Just make sure the reservoir doesn't empty or it will draw in air which you don't want
Working quickly before the resin starts to cure work a piece of wire around the inside of the mould to dislodge air bubbles - lightly squeeze and let go of the mould sides as well, just don't push all the resin out!
Sit the mould down and let it set
Once set, peel the resin casting from the rubber mould and you will have a piece that looks like the sample above
Since parts are cast as single pieces you do not get mould lines, however, as with commercial resin kits, it may be necessary to create some very thin areas of flash to keep the two halves of the mould separate
A shovel for example can be cast in one piece on its side but you need to fill in the gap between the reservoir block and the shovel so that it does not become totally encased in the rubber - this can be 5thou plastic card or, if the gap is small enough, a film of PVA glue


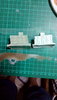
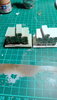
these are all examples of single sided mouldings


this is the BRDM-2 tyre master and the single sided mould - the castings are shown in the pictures above
Rather than go through all the palaver of making two part moulds with lego and clay and measuring with scales just make single sided moulds as used by a lot of the commercial makers (it is how that sample block was cast) and mix resin in a mixing cup with gradations marked on the side - I was told how to do this by Tom at Millicast years ago when I made some masters for him and had to prepare the parts correctly so they could be moulded
In that sample block you make the master exactly as it looks - the turned parts that you actually want, attached to a block which becomes the 'sprue' (it is actually a resin reservoir and the reason why you don't require an 'in' and an 'out')
Glue the block to a flat base with the parts pointing up
make a perimeter wall - I use plastic card as you get an excellent seal on all sides - around the master. It can be recycled afterwards for scratching more parts
mix and pour your rubber over the master slowly - depending on the shape of your master you may need to help the rubber into recesses and purge air out. A piece of stiff wire with an 'L' on one end can be pushed gently around the master to help ease the rubber into the detail and dislodge bubbles - after a little practice you soon get the hang of where air collects and needs dislodging
As you fill the mould flex the sides as this also helps bubbles escape - you will see bubbles rise to the surface of the rubber
Once set - I usually leave for a day to make sure - break open the wall and remove
Carefully pull the rubber off the master and turn open side up - the hole formed by the sprue block is now a reservoir for the resin
Use a mixing cup to put equal parts of resin and catalyst in - say 10ml of each or whatever is required to fill the mould, using the marked gradations on the side of the cup, and mix. Flat coffee stirrers are great for this
Again, the more castings you do the more you get to recognise how much resin will be required
For small amounts medicine cups can be bought cheaply off ebay
Now you have the resin mixed you don't have long before it will start to react
Squeeze the air out of the mould and fill the reservoir with resin - let go of the mould and resin will be sucked into the mould
Just make sure the reservoir doesn't empty or it will draw in air which you don't want
Working quickly before the resin starts to cure work a piece of wire around the inside of the mould to dislodge air bubbles - lightly squeeze and let go of the mould sides as well, just don't push all the resin out!
Sit the mould down and let it set
Once set, peel the resin casting from the rubber mould and you will have a piece that looks like the sample above
Since parts are cast as single pieces you do not get mould lines, however, as with commercial resin kits, it may be necessary to create some very thin areas of flash to keep the two halves of the mould separate
A shovel for example can be cast in one piece on its side but you need to fill in the gap between the reservoir block and the shovel so that it does not become totally encased in the rubber - this can be 5thou plastic card or, if the gap is small enough, a film of PVA glue
these are all examples of single sided mouldings
this is the BRDM-2 tyre master and the single sided mould - the castings are shown in the pictures above
Jim R
SMF Supporter
I have only ever made one piece moulds and with a bit of thought quite detailed things can be made that way. Simon introduced me to resin casting and I was surprised how flexible the rubber is which makes the finished item fairly easy to get out. The hardest part I find is figuring out where to put thin sheet to prevent the master being trapped in the rubber mould.
Jim
Jim
Last edited:
- Joined
- Apr 28, 2018
- Messages
- 6,212
- Points
- 113
- First Name
- Bob
Hi all
Excellent info!!
Will using the sylmaster kit copy these?
Gunners hatch x 1

I hope to copy a lot of these, spare wheel bracket

Dragon kits do not come with shell case bags, but i have the extra kit and again would like to copy a good few

Thanks bob
Excellent info!!
Will using the sylmaster kit copy these?
Gunners hatch x 1
I hope to copy a lot of these, spare wheel bracket
Dragon kits do not come with shell case bags, but i have the extra kit and again would like to copy a good few
Thanks bob
Bob - part 39, yes, nice easy shape. Stand vertically on one edge
spare wheel bracket - looks like a return roller - and the bag, bit more complicated shapes but should do. It all comes down to the prep
spare wheel bracket - looks like a return roller - and the bag, bit more complicated shapes but should do. It all comes down to the prep
- Joined
- Apr 28, 2018
- Messages
- 6,212
- Points
- 113
- First Name
- Bob
Thanks Simon, again!!!!