Rick’s Airfix Sea King HC4, 1/72, Operation Mikado, Falklands war

rickoshea52

SMF Supporter
Joined
Dec 20, 2011
Messages
3,965
Points
113
Location
North West
First Name
Rick
I’m building this for a GB at my local model club. It’s well under way already I just haven’t been taking photos of the build.
AA9EA2CC-A0D7-4E23-9642-FD3D07E01769.jpeg
Operation Mikado was a botched mission to insert special forces into mainland Argentina.
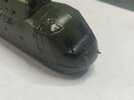
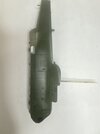
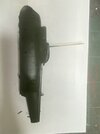
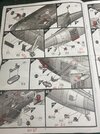
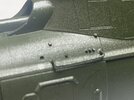
It’s mostly assembled and received a coat of green paint.
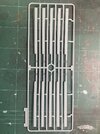
The kit needs a bit of back dating from the kit version. A lot of the lumps and bumps aren’t needed so some filing and smoothing is required. A large blister fairing behind the cargo door was found in the spares box.
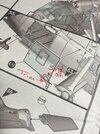
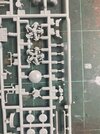
Some minor scribing was added to the engine cowlings.
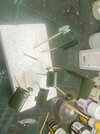
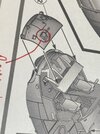
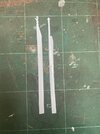
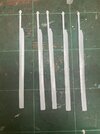
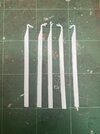
The tail fold bulkheads are barren so I added wire here for the electrical harnesses, two slices from plastic rod for the driveshaft DCC and a sliver of plasticard for the tail rotor pitch control link. Drilled lightening holes on the fuselage side bulkhead and trimmed on the tail pylon side.
Photos to illustrate.
42E23C03-973C-4441-AAF3-DAAF53155515.jpeg8256ACA4-C238-4CC1-9AB4-B5779C485715.jpegD6C80E8A-F856-4B0F-A1AB-C415F58588C7.jpeg8A88FC2B-A516-436F-8D59-5C6F4D231DFB.jpeg
 

Jon Heptonstall

SMF Supporter
Joined
Apr 30, 2018
Messages
1,194
Points
113
First Name
Jon
Great stuff.
Have you read Special Forces Pilot by Richard Hutchings? He was the guy who ended up flying into Argentina with his SAS passengers and e&eing to Chile.
Jon
 

rickoshea52

SMF Supporter
Joined
Dec 20, 2011
Messages
3,965
Points
113
Location
North West
First Name
Rick
Great stuff.
Have you read Special Forces Pilot by Richard Hutchings? He was the guy who ended up flying into Argentina with his SAS passengers and e&eing to Chile.
Jon

No, I haven’t read that book. Maybe I should have before I started because I’ve taken a bit of modellers licence with my build.
I’ve made the assumption that this cab would have been stripped of as much excess bits as possible to extend its range. That’s why I have avoided fitting the SACRU under slung load gear and rescue winch. I did consider not fitting the cabin troops sears but decided even tough guy SAS types need a seat for their hairy 4r$€$ so left them in.
I filled the fuselage holes for the winch and added tiny bits of plasticard to replicate the attachment points.
 

rickoshea52

SMF Supporter
Joined
Dec 20, 2011
Messages
3,965
Points
113
Location
North West
First Name
Rick
I’ve completed the painting and varnishing of the fuselage and attaching parts. Decals next.
 

Attachments

  • FB77D262-BF28-406B-A7AF-2B85EA0C64A7.jpeg
    FB77D262-BF28-406B-A7AF-2B85EA0C64A7.jpeg
    106.2 KB · Views: 8
  • C3B8A632-BCAC-411A-AF2F-8899472661BD.jpeg
    C3B8A632-BCAC-411A-AF2F-8899472661BD.jpeg
    85.1 KB · Views: 5
  • DA22636D-1055-43F1-87B8-3DBBCF7C89E0.jpeg
    DA22636D-1055-43F1-87B8-3DBBCF7C89E0.jpeg
    95.4 KB · Views: 4
  • 6689D3DA-F69A-4DEA-B3F1-150D78A23742.jpeg
    6689D3DA-F69A-4DEA-B3F1-150D78A23742.jpeg
    191.6 KB · Views: 7

rickoshea52

SMF Supporter
Joined
Dec 20, 2011
Messages
3,965
Points
113
Location
North West
First Name
Rick
Here’s some of the work I’ve done to back date the kit version to a 1982 cab. A lot of the modern defensive aids needed to be removed or omitted from the build.
 

Attachments

  • 306C2847-CA51-47B4-ABDA-98D712D15A89.jpeg
    306C2847-CA51-47B4-ABDA-98D712D15A89.jpeg
    232.7 KB · Views: 7
  • FD8E3782-55E2-4041-B640-410669F70435.jpeg
    FD8E3782-55E2-4041-B640-410669F70435.jpeg
    183.4 KB · Views: 7
  • 92314512-578A-4721-9542-483050AC030C.jpeg
    92314512-578A-4721-9542-483050AC030C.jpeg
    186.6 KB · Views: 7
  • E6CC40D6-A74D-4021-82E4-40D4F874BF1A.jpeg
    E6CC40D6-A74D-4021-82E4-40D4F874BF1A.jpeg
    234.6 KB · Views: 7

rickoshea52

SMF Supporter
Joined
Dec 20, 2011
Messages
3,965
Points
113
Location
North West
First Name
Rick
My next retrofit conundrum is the main rotors. Airfix’s kit provide the modern composite blades in either spread or folded configuration with some nice detail and realistic droop; these are no good for a Falklands cab.
In 1982 Sea Kings were fitted with metal blades which have a different shape. No problem - I have some spare blades from an old tool Airfix Sea King that are right shape.
After a close look maybe not. Plan B is to nick the rotors from a Cyber Hobby AEW kit. Much less clean up to do but still some faffing with assembling them in the folded position I want.
 

Attachments

  • 1B18268E-7469-4DA9-B889-6B20EAE167AC.jpeg
    1B18268E-7469-4DA9-B889-6B20EAE167AC.jpeg
    196.7 KB · Views: 5
  • 3C5FF413-6A57-45FE-8569-70939319A1ED.jpeg
    3C5FF413-6A57-45FE-8569-70939319A1ED.jpeg
    179.2 KB · Views: 7
  • 7544DDBC-C372-4A9D-9E1B-C7873EC527BE.jpeg
    7544DDBC-C372-4A9D-9E1B-C7873EC527BE.jpeg
    177.7 KB · Views: 8
  • 005B156C-40AF-4797-AA6A-4C19BE74CAED.jpeg
    005B156C-40AF-4797-AA6A-4C19BE74CAED.jpeg
    208.3 KB · Views: 7
  • B2989EDA-CD8C-408B-83C0-6B964B7BBCB9.jpeg
    B2989EDA-CD8C-408B-83C0-6B964B7BBCB9.jpeg
    219 KB · Views: 15

rickoshea52

SMF Supporter
Joined
Dec 20, 2011
Messages
3,965
Points
113
Location
North West
First Name
Rick
This photo shows the winch fittings made from plasticard for the frame attachment points, brass wire for the grab rail and blanked off hydraulic and electrical unions - Sea King winches are hydraulically powered.
 

Attachments

  • A11A5329-5CCB-4418-BD46-9A261ED2752E.jpeg
    A11A5329-5CCB-4418-BD46-9A261ED2752E.jpeg
    186.3 KB · Views: 16

rickoshea52

SMF Supporter
Joined
Dec 20, 2011
Messages
3,965
Points
113
Location
North West
First Name
Rick
Decals applied to the cab tonight. Getting the right stencils has proved to be a best guess exercise. The current Airfix decal sheet has more subdued black lettered stencils. My online research suggest early cabs had white stencils but I think these might have gone through a “field” paint job on the journey south like the Sea Harriers had their white undersides painted over.
I pinched a few stencils from various other decal sheets and kept them to a minimum in the end.
A038B420-A7AB-440B-8613-FFB4D86B9386.jpegD112FAC9-6DDC-41BE-A98B-7F71083B3F5B.jpeg

One of the issues with the Airfix decals for the exhaust and non slip paint on the fuselage sides is that one of them doesn’t match the window frame! While the left hand exhaust decal doesn’t conform to the bulge on the side of the fairing. I had to cut this and touch in with black paint.
865C74A2-0F3D-4B49-80A5-06A732013090.jpeg

A trick I use for the sponsons is to paint maskol into the recesses where the struts attach. This allows for the maskol to be removed after painting and a plastic to plastic join possible.
02935E23-1E95-4B3B-8F7F-C95062535EDE.jpegBDD04322-2605-410F-A8A8-DDA1CB416816.jpeg98DC7453-A04B-40B9-B339-CD1E0F7F19B4.jpeg
 

rickoshea52

SMF Supporter
Joined
Dec 20, 2011
Messages
3,965
Points
113
Location
North West
First Name
Rick
Time to deal with the main rotors. As mentioned before I need to back date this cab with early blades. The set I pinched from the Cyber Hobby (CH) can be modelled in the folded position but the blade sleeves are nothing like the real thing.
I struck on the idea to cut and shut the CH blade to the Airfix sleeve. The photo shows the idea can work.

EA02992F-4C34-4B44-BDBA-352D872240D5.jpeg

I’ll complete the rest later when time permits.
 

rickoshea52

SMF Supporter
Joined
Dec 20, 2011
Messages
3,965
Points
113
Location
North West
First Name
Rick
I took the plunge and had a go at replicating the pipe work for the automatic blade fold system on the main rotor head. Using a 0.5mm drill, superglue, tweezers and copper wire I knocked this up. Hopefully it will look better with a coat of paint.

2FC8478E-9A7B-4E19-B1B1-8EF8A1455D85.jpeg12615133-9C59-43E6-B1AE-BE293055366A.jpeg42A178A0-B1E3-452A-87D5-238116505A22.jpeg5C1DFBEA-578C-47EE-ABB6-EEE93AF38C86.jpeg

If anyone is wondering why I have only added one wire to a single blade this is because this blade does not fold, only four of five have the hydraulic pipe work. However, all five blades have a drag damper and blade sleeve which are fed with oil from reservoirs on the top of the rotor head.
 
Top