You are using an out of date browser. It may not display this or other websites correctly.
You should upgrade or use an alternative browser.
You should upgrade or use an alternative browser.
SAA T-72A "Labna" ca 2014
- Thread starter Steven
- Start date
Jim R
SMF Supporter
Hi Steven
I'll add my WOW to Rick's WOW. Very neat and very skilled work. Amazing detail.
Jim
I'll add my WOW to Rick's WOW. Very neat and very skilled work. Amazing detail.
Jim
Steven
SMF Supporter
- Joined
- May 6, 2018
- Messages
- 489
- Points
- 93
- Location
- Frederiksberg Copenhagen, Denmark
- First Name
- Steven
Thanks Gents
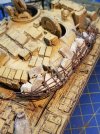
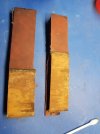
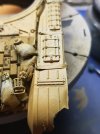
So I am working on the sidepannel the crews added - same principle as with the turret create some sort of pocket and fill it with tiles ,bricks etc. To offer stand off protection ( in theory).
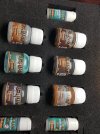
I am using Ammo's "U-rust "set and play around with acid, powders and portions to create purported "real" rust.
I plan to add chipping to the panels - let's see how that goes
So I am working on the sidepannel the crews added - same principle as with the turret create some sort of pocket and fill it with tiles ,bricks etc. To offer stand off protection ( in theory).
I am using Ammo's "U-rust "set and play around with acid, powders and portions to create purported "real" rust.
I plan to add chipping to the panels - let's see how that goes
Attachments
Steven
SMF Supporter
- Joined
- May 6, 2018
- Messages
- 489
- Points
- 93
- Location
- Frederiksberg Copenhagen, Denmark
- First Name
- Steven
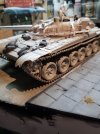
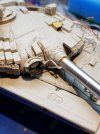
Finally got to test fit the tracks
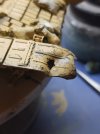
Crew has added sandbags around areas where ERA are spread thin or missing altogether
As can be seen head lights have suffered the wrath of rebel snipers similar fate has befallen the main IR searchlight
Crew has added sandbags around areas where ERA are spread thin or missing altogether
As can be seen head lights have suffered the wrath of rebel snipers similar fate has befallen the main IR searchlight
Attachments
scottie3158
SMF Supporter
Steven,
great progress.
great progress.
Excellent update.
Steven
SMF Supporter
- Joined
- May 6, 2018
- Messages
- 489
- Points
- 93
- Location
- Frederiksberg Copenhagen, Denmark
- First Name
- Steven
Jim R
SMF Supporter
Hi Steven
That rust stuff looks interesting. Looks to be very effective. The dio is coming on really well.
Jim
That rust stuff looks interesting. Looks to be very effective. The dio is coming on really well.
Jim
Steven
SMF Supporter
- Joined
- May 6, 2018
- Messages
- 489
- Points
- 93
- Location
- Frederiksberg Copenhagen, Denmark
- First Name
- Steven
Holds alot of possibilities but is tempremental and using the reactors (small bottles) I found it difficult to gauge results as the result is not instant and it depends on amount: application etc
Steve Brodie
SMF Supporter
that is going to be superb when all done
Steven
SMF Supporter
- Joined
- May 6, 2018
- Messages
- 489
- Points
- 93
- Location
- Frederiksberg Copenhagen, Denmark
- First Name
- Steven
Thanks for the response
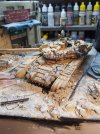
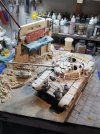
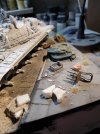
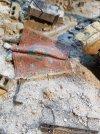
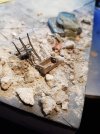
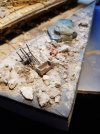
Concentrating on the empty space on the front sidewalk a considerable amount of time is spent trying to make everything look random white foam mark rubble piles the sidewalk will have a general covering of dust and rubble in most places
The empty 125mm crate ( rear) creates a tie in to the guys loading the beast chair and mattress connect the scene to a residential area and the small boxes and empty casings form debris of war
Attachments
Steven
SMF Supporter
- Joined
- May 6, 2018
- Messages
- 489
- Points
- 93
- Location
- Frederiksberg Copenhagen, Denmark
- First Name
- Steven
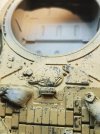
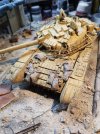
Finally got to the fun part: the weathering
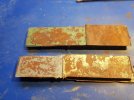
Primed light gray followed by a coat of russian green, topcoat to protect it followed by chipping medium coat of Syrian sand followed by maltreatment by various instruments to produce this (right hand fender left untouched on pic to show the effect)
By Syrian standards on MBTs in urban conflicts this a somewhat conservative chipping. regardless, it can be overdone but feel I have reached a balanced result
Attachments
Steven
SMF Supporter
- Joined
- May 6, 2018
- Messages
- 489
- Points
- 93
- Location
- Frederiksberg Copenhagen, Denmark
- First Name
- Steven
Thanks gents
Onwards and upwards
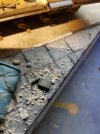
What was ment as a day focusing on the turret turned into a day focusing on base
I have fixed the chair rubble a switch box ammo box empty shells and as a spur of the moment driven decision...a carpet
The hull has received some washes you can see the difference it makes compared to the untreated turret
Onwards and upwards
What was ment as a day focusing on the turret turned into a day focusing on base
I have fixed the chair rubble a switch box ammo box empty shells and as a spur of the moment driven decision...a carpet
The hull has received some washes you can see the difference it makes compared to the untreated turret
Attachments
Mark1
SMF Supporter
Looking superb.
Steven
SMF Supporter
- Joined
- May 6, 2018
- Messages
- 489
- Points
- 93
- Location
- Frederiksberg Copenhagen, Denmark
- First Name
- Steven
Thanks Mark
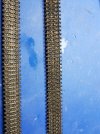
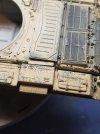
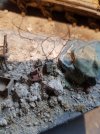
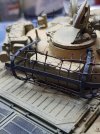
Working on the turret the rebar cage is getting some rust tones I was thinking about using the "U-RUST ' set here but I am afraid that it will ruin the texture of the rebar, as the chemical reaction leaves the surface slightly "crusty " (for lack of a better term ), negating the point of using twisted wire rather than plain plastic rods
weldseems question:
I have added weldseems to where the brackets join the turret- how do I enhance these - adding a slight metallic sheen perhaps? I was thinking about adding a very tiny amount of silver to the base colour
Attachments
Andy the Sheep
SMF Supporter
Steven, a really wonderful dio. I'm truly amazed by your technique and your general vision of the scene. 
The welding seams doubt: if I may suggest, it depends on how old are the weldings. If they are recent, there should be no paint, a prominent trace of the heat and some burnt steel colours would do the job. On the other hand, if the weldings are old, I think those would be areas prone to rusting even faster than the rest of the tank.
Andrea
Steven
SMF Supporter
- Joined
- May 6, 2018
- Messages
- 489
- Points
- 93
- Location
- Frederiksberg Copenhagen, Denmark
- First Name
- Steven
Thanks for the response
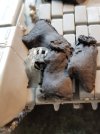
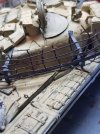
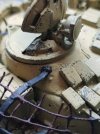
Not getting much work done but have managed to start filling the cages with bricks and rubble. started out with some that were hugely oversized but the current ones are better but I still do not like the look of it during bumpy rides I figure this whole thing would bounce and shift so I plan that the crew has added a few sandbags on top to keep things In place
All for now cheers