Stalins Organ

rtfoe

SMF Supporter
Joined
Apr 29, 2018
Messages
7,507
Points
113
Location
Malaysia
First Name
Richard
Hi, since I've been featuring mainly aircraft in my thread builds I thought I would show one that was built from an old Italeri kit, the Katyusha. The Katyusha multiple rocket launcher is a type of rocket artillery first built and fielded by the Soviet Union in World War II. The kit features parts typical of Italeri kits during the 70's which were better detailed then other offerings other than Tamiya.

Here I start off with the sub assemblies as I don't have the images of the sprue and box. What I can say is the plastic is brittle because of age and parts are thin and delicate. The rocket rack and rockets were the only ones affected with flash and slight mis-alignment of mold halves so lots of sanding ensured.

so1.jpg so2.jpg

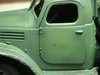
The fit went well with minor scraping with the blade near the front grill joint. The slight warpage to the rocket frame was delt with some delicate pressure bending and once the parts were glued wasn't too bad. I didn't bother too much with the interior of the cab except with some washes added to the seats.

so3.jpg so4.jpg

The rubber tyres and wheels were assembled and painted in situ. The molds suffered from slight melt being in contact with the rubber tyres supplied for I don't know what reason except for a chemical reaction. Later I found that I should have protected the plastic rims with acrylic paint before attaching the tyres. The rims have since melted and deformed. After much sanding and scraping the rocket racks looked quite nice.

so5.jpg so6.jpg

As I mentioned I didn't do much with the cab interior. The dash board detail was good enough for some drybrushing and washes to bring out the detail.

so7.jpg More to come later.

Cheers,
Richard
 

Dave Ward

Still Trying New Things
SMF Supporter
Joined
Apr 27, 2018
Messages
8,640
Points
113
Location
South Gloucestershire
First Name
David
The Italeri model has been around since 1976! It's been reboxed many times, including Revell, and Zvezda ( got one in my stash ). It's still a nice model, it must have been a real revelation when it first came out - under the Italaerei badge ( when did the spelling change? ). I seem to remember the boxes just aft of the spare wheel carriers were pretty poor mouldings..........
Eduard used to make a comprehensive PE set for this.
Good Luck!
Dave
 

rtfoe

SMF Supporter
Joined
Apr 29, 2018
Messages
7,507
Points
113
Location
Malaysia
First Name
Richard
Thanks Dave, kit was completed many years ago. Spelling wasn't changed...I just simplified it fornetically when I couldn't remember how it was spelt. :tongue-out2: I will need after market wheels to replace the melted ones. Even my Horsch wheels are affected. What was in those rubber tyre compounds?

Cheers,
Richard
 

Dave Ward

Still Trying New Things
SMF Supporter
Joined
Apr 27, 2018
Messages
8,640
Points
113
Location
South Gloucestershire
First Name
David
Richard - the original spelling was Italaerei - now, it's Italeri -it was changed somewhere between 1976 and now!
Dave
 

rtfoe

SMF Supporter
Joined
Apr 29, 2018
Messages
7,507
Points
113
Location
Malaysia
First Name
Richard
Hi,
The sub-assemblies were put together and glued at their locating points. Time was most spent on the rockets. I shaved off any locating points, lightly sanded the two halves and slapped them together making as best not to have too much of a step between joints. I used extra glue so they oozed out of the joints and when dry was shaved off.

so8.jpg so9.jpg

The edges of the molds were crisp and had to be roughened up especially the mud guard where I used a file to create dinks and then smoothen over with liquid cement and light sanding.

so10.jpg so11.jpg

The protruding sight was very vulnerable so care was taken when painting and weathering.

so12.jpg More later.

Cheers,
Richard
 

rtfoe

SMF Supporter
Joined
Apr 29, 2018
Messages
7,507
Points
113
Location
Malaysia
First Name
Richard
Richard - the original spelling was Italaerei - now, it's Italeri -it was changed somewhere between 1976 and now!
Dave

Really... wow, I didn't know that. You're right, I checked with some old 78/79 catalogues and they had the old name. The 85 catalogue is with the new name.

Cheers,
Richard
 

Jakko

Way past the mad part
SMF Supporter
Joined
Apr 28, 2018
Messages
10,782
Points
113
First Name
Jakko
The kit features parts typical of Italeri kits during the 70's which were better detailed then other offerings other than Tamiya.
I’d rate 1970s Italeri kit above 1970s Tamiya kits, TBH. The Tamiya kits would be easier to assemble, but Italeri had more detail.
 

rtfoe

SMF Supporter
Joined
Apr 29, 2018
Messages
7,507
Points
113
Location
Malaysia
First Name
Richard
I’d rate 1970s Italeri kit above 1970s Tamiya kits, TBH. The Tamiya kits would be easier to assemble, but Italeri had more detail.

You are right on that point, Jakko. At the time we thought they were over engineered until Dragon and AFV came along. :smiling6:

Cheers,
Richard
 

Si Benson

SMF Supporter
Joined
Apr 27, 2018
Messages
3,322
Points
113
First Name
Si
Nice work Richard...coming together nicely.
It just so happens I’m also building the Bm13-16.....only I’m doing the 1:72 ICM version. Interested to see more :thumb2:
 

Steve Jones

Steve Jones Scale Modelling Site
Joined
Apr 27, 2018
Messages
6,698
Points
113
Location
Plymouth
First Name
Steve
Found this one in a garage in Holland. Wish I had taken more photos

DSC05237.JPGDSC05238.JPGDSC05239.JPGDSC05240.JPGDSC05241.JPGDSC05242.JPGDSC05243.JPGDSC05244.JPGDSC05245.JPGDSC05246.JPGDSC05247.JPGDSC05248.JPGDSC05249.JPGDSC05250.JPGDSC05251.JPGDSC05252.JPG

Hope it helps and good luck with the build
 

rtfoe

SMF Supporter
Joined
Apr 29, 2018
Messages
7,507
Points
113
Location
Malaysia
First Name
Richard
Thanks Guys,

Si, good to have you back. Would like to see the Bm13-16 .

Steve, Wow! them are many pics. Great reference, much appreciated. There are some differences like the tyre stowage is a seat just behind the cabin. The petrol tank is not covered like the kits. Also it's missing the foldable deflecting blast shield. If only I had this reference six years ago.

Cheers,
Richard
 

rtfoe

SMF Supporter
Joined
Apr 29, 2018
Messages
7,507
Points
113
Location
Malaysia
First Name
Richard
There were no decals for the stripes on the rockets so I sprayed black first then masked with cut strips of tape then covered that with white.

so15.jpg so16.jpg

Meanwhile the truck and launcher got a base coat of Russian green of my own mix with a little white added. At the time I did post shading and this was done with the same shade of Russian green but with black added.

so13.jpg so14.jpg

More to come later.

Cheers,
Richard
 

geegad

Can't cheat fate..
Joined
Mar 7, 2010
Messages
2,477
Points
113
First Name
John
An old kit but a classic and your doing it complete justice with your build top marks
 

rtfoe

SMF Supporter
Joined
Apr 29, 2018
Messages
7,507
Points
113
Location
Malaysia
First Name
Richard
Hi John, thanks for your kind comment. The rockets turned out ok in the end...

so28.jpg

Cheers,
Richard
 

rtfoe

SMF Supporter
Joined
Apr 29, 2018
Messages
7,507
Points
113
Location
Malaysia
First Name
Richard
Hi, as this build was done before the new styles like modulation and what nots came about, you could say it's old school.

On top of the base coat I applied post shading with olivedrab and a drop of black. The mixture was sprayed at joints and corners. You can see the difference in the second picture of the cab interior and exterior of the truck.

so20.jpg so17.jpg

Homemade pigment dirt and rust scooped from the bottom of paint pots, tins or jars helped create the weathered mudguards and muddy tyres.

so18.jpg so19.jpg

Chipping was done with a stiff brush and Nato black stippled at strategic points of wear.

so23.jpg More to come later.

Cheers,
Richard
 

Attachments

  • so25.jpg
    so25.jpg
    37.8 KB · Views: 2
D

Deleted member 5819

Guest
Hi Richard just caught up with your build, great work as always very near and tidy :thumb2:
Pete.
 

rtfoe

SMF Supporter
Joined
Apr 29, 2018
Messages
7,507
Points
113
Location
Malaysia
First Name
Richard
Thanks Ian and Pete...behind the blue backing paper is a chaotic work table. :smiling6:

Cheers,
Richard
 

Jim R

SMF Supporter
Joined
Apr 27, 2018
Messages
13,718
Points
113
Location
Shropshire
First Name
Jim
Hi Richard
As always your work is neat and well thought out. As you say this is a nice kit despite it's age.
Jim
 

rtfoe

SMF Supporter
Joined
Apr 29, 2018
Messages
7,507
Points
113
Location
Malaysia
First Name
Richard
Thanks Jimbo, yep, nice to build if you can get your hands on one. Don't know if Italeri still carries it.

More progress shots. The supports were fiddly and required a level surface before installing. Rubbed steel over the top of the rocket rails...the rockets would be stacked up and under.

so21.jpg so22.jpg

I was planning to add stowage and tools left on the deck but since haven't done it.

so24.jpg More later...

Cheers,
Richard
 
Top