Sukhoi Su-27 Flanker B Trumpeter Scale 1:32

stillp

SMF Supporter
Joined
Nov 17, 2016
Messages
7,216
Points
113
Location
Rugby
First Name
Pete
In the end I bent them gently in a curve to create a slight gap and then gently used a scalpel blade to lift them off.
Same here, bend the backing sheet and the edges of the masks will appear.

For the canopy, I would try gluing it back together with Pledge or with a clear-setting PVA glue. If that doesn't work you can soak it in water to remove it and try something else - you have nothing to lose!
Pete
 
Joined
May 5, 2022
Messages
201
Points
63
Location
Lindenwold, New Jersey, USA
First Name
Andrzej
For curved lines and rivets I would use an engineers scriber.

I have a Tamiya panel line scriber, but don’t find it that useful for rescribing panel lines.
One for the future, I would also have cleaned out those areas with the scriber before the putty had set. It will still work now, it’s just easier when the putty is soft.
Not sure what the others would do.
Thank you, Tim. Will look for some more proper tools.
 
Joined
May 5, 2022
Messages
201
Points
63
Location
Lindenwold, New Jersey, USA
First Name
Andrzej
Hi Andrzej

Sorry can't help with the broken canopy but in terms of the masks I used them for the first time the other week and had the same issue.

In the end I bent them gently in a curve to create a slight gap and then gently used a scalpel blade to lift them off.

ATB.

Andrew

Thank you, Andrew. Great tip. Will give it a try.
 
Joined
May 5, 2022
Messages
201
Points
63
Location
Lindenwold, New Jersey, USA
First Name
Andrzej
Same here, bend the backing sheet and the edges of the masks will appear.

For the canopy, I would try gluing it back together with Pledge or with a clear-setting PVA glue. If that doesn't work you can soak it in water to remove it and try something else - you have nothing to lose!
Pete

Hi Pete, thanks!
Canopy unfortunately is already glued together.
What I am looking for is a solution on final finish, paint it opaque, paint is semi clear, sand so it looks like the matte glass or just polish and leave glued seams visible.
 

Tim Marlow

Little blokes aficionado
SMF Supporter
Joined
Apr 27, 2018
Messages
16,720
Points
113
Location
Somerset
First Name
Tim
Depends if you want to see inside it really Andrzej. Personally I’d go with polished first and see what it looks like. If you want to paint it, try something like this…..
Much more interesting than a single colour.
 
Joined
May 5, 2022
Messages
201
Points
63
Location
Lindenwold, New Jersey, USA
First Name
Andrzej
QUESTION:

I have re-scribed the panel lines and rivets but of course made panel lines too deep now. :sad-face:

I want to apply putty, but I do want to apply ONLY over these deep panel lines so I cannot use Tamiya one.
I need a putty that would be softer a bit than plastic and not "biting" into plastic like Tamiya one.

What would you recommend?
 

Jakko

Way past the mad part
SMF Supporter
Joined
Apr 28, 2018
Messages
10,729
Points
113
First Name
Jakko
You can thin putty from a tube using liquid cement, and then you can brush it on. This, of course, will ruin the brush so use an old one (which, TBH, I kind of doubt you have :smiling3:). You could clean the brush with more liquid cement, but you would probably use most of a bottle to do that, so if you can get hold of some of the chemicals that make up typical liquid cement then you could use that instead, both to thin the putty and to clean the brush.
Alternatively, there are very thin putties you can buy, designed for brush-painting, but I don’t remember any names right now …
 

stillp

SMF Supporter
Joined
Nov 17, 2016
Messages
7,216
Points
113
Location
Rugby
First Name
Pete
Can you get the Mr Hobby range over there? If so then you could use Mr Surfacer 500 or Mr Dissolved Putty, both of which are brushable. Perfect Plastic Putty by Deluxe Materials or Vallejo Plastic Putty can be thinned with water to make them brushable.
Pete
 

Tim Marlow

Little blokes aficionado
SMF Supporter
Joined
Apr 27, 2018
Messages
16,720
Points
113
Location
Somerset
First Name
Tim
Perfect plastic putty can be put on the panel line, then cleaned off with a damp cotton bud (Q tip to the cousins) leaving them nicely filled. It is soft enough, and doesn’t bite into the surrounding plastic. That makes it unsuitable for shallow dents or structural fills, but ideal for this because it can be rescribed without digging out excess plastic. Cellulose type fillers,, like Tamiya, bite too hard to be useful in this application.
 
Joined
May 5, 2022
Messages
201
Points
63
Location
Lindenwold, New Jersey, USA
First Name
Andrzej
Hello my friends. :smiling:
There is no shame to show your mistakes.
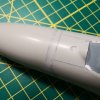
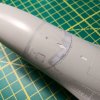
Below you see how bad it is now.
Let's see if I can make it better.

I will need to put more putty in certain spots as the step is still visible.

I have learned that when you do putty thing, you rather fill up where the step is rather than sanding the step, I ended up with the VERY thin wall in some places and it does tow BAD things.
A. Makes the joint weaker
B. makes the wall thin, some of my redrilled rivets went though

QUESTIONS:
1. What do I do with the rivet holes I made? I assume I need to re-putty them and redo but very lightly, so I do not poke thru the wall, correct?
2. For these rivet holes, do I use Tamiya putty (stronger but dissolves a bit of plastic) or lighter, sanding easier one?

Enjoy by BAD made rivets and HUGE panel lines. ;)

02.jpg01.jpg
 

Jakko

Way past the mad part
SMF Supporter
Joined
Apr 28, 2018
Messages
10,729
Points
113
First Name
Jakko
I think I would try to wash thinned putty into the holes, so they will be closed but still visible after the putty dries. The less aggressive type of putty sounds like it’ll be better for this, as it’s likely also easier to remove if you add too much, without damaging the plastic with more solvents.
 
Joined
May 5, 2022
Messages
201
Points
63
Location
Lindenwold, New Jersey, USA
First Name
Andrzej
I think I would try to wash thinned putty into the holes, so they will be closed but still visible after the putty dries. The less aggressive type of putty sounds like it’ll be better for this, as it’s likely also easier to remove if you add too much, without damaging the plastic with more solvents.
Thank you, Jakko! :smiling:
Since, I think, I gained some knowledge in that particular area, let's see what I can do.

Believe it or not, it is fascinating for me to think and figure out the steps I want to do to fix it. ;)

Ordered some tools, as well so it will help.
 

Jakko

Way past the mad part
SMF Supporter
Joined
Apr 28, 2018
Messages
10,729
Points
113
First Name
Jakko
Don’t forget that you can nearly always practice on scrap or leftover bits first. For example, drilling some rivet holes into a part of the kit’s sprue or even something like a drop tank you don’t intend to fit to the model, and then filling them with the putty you have in mind.
 
Joined
May 5, 2022
Messages
201
Points
63
Location
Lindenwold, New Jersey, USA
First Name
Andrzej
Don’t forget that you can nearly always practice on scrap or leftover bits first. For example, drilling some rivet holes into a part of the kit’s sprue or even something like a drop tank you don’t intend to fit to the model, and then filling them with the putty you have in mind.
Totally forgot about it. Great advice, Jakko!!!! Thanks. ;)
 
Joined
May 5, 2022
Messages
201
Points
63
Location
Lindenwold, New Jersey, USA
First Name
Andrzej
OK, as the time passed by.....
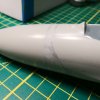
I managed to cover these ugly holes and panel lines I scribed.
Now, redoing rivets and panels line again.
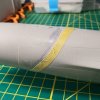
This bottom panel line is a challenge, a real one, the re-scrubbing tape does not want to curve that much, neither Tamiya narrow masking tape.
Have to try by hand very gently or figure something out. :smiling:

03.jpg02.jpg01.jpg
 
Joined
May 5, 2022
Messages
201
Points
63
Location
Lindenwold, New Jersey, USA
First Name
Andrzej
QUESTION: Before airbrushing, I was thinking to cover with tape and glue the canopy using MICRO LIQUITAPE.
Instructions say to apply it, wait till becomes clear and press parts together.
The parts that worry me is "clean with paint thinner if LIQUITAPE has dried.
I will need to remove that canopy later on, decide on what I want to do with it (broken and glued back with ugly visible cracks).
Question1: How do I remove that canopy later one? Just pry it out gently?
Question2: What paint thinner do I use to clen?
Question3: If I use paint thinner on the fuselage where the canopy was glued, it will dissolve acrylic underlying paint? (Vallejo)
Question4: So if I brush on LIQUITAPE only on canopy in areas to be temporarily glued, will the sticky part "transfer" to the fuselage part?
 
Top