Tamiya 1/16 RC Panther (resumed after a long hiatus)

tr1ckey66

SMF Supporter
Joined
Mar 6, 2009
Messages
3,686
Points
113
First Name
Paul
Hey everyone
Does anyone remember this? If you do you've got some memory!
I won't go into too much detail but the reason for the long pause in this build was mainly down to moving house and relocating to my native Yorkshire. Now I'm settled into my new house, with my new studio (a criteria for the house purchase was to give myself a dedicated model space!) I can, finally, get back to some model builds.

For those who are new to the forum, or those that don't remember where this left off I'm going to do a little recap with shots uploaded to this site (no photobucket deletions this time!) This will also jog my memory and help me to see how far I'd got with this big Panther build. I do have an update so new shots will come but until then here's a reminder of the journey so far...

First the kits and aftermarket stuff

1 16 Panther G RC Kit.jpg

Suspension arms, torsion bars and lower hull construction...


Torsion Bar Suspension.jpg
Suspension Swing Arms.jpg

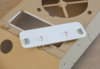
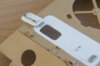
The photoetch stowage bins from Aber
These are a vast improvement on the kit parts, and the working latches (although extremely fiddly) are awesome...

LH Bin clamps 01.jpg
RH bin clamps 01.jpg

Then came the fenders...

Left Hand Fender 01.jpg
LH fender attachment.jpg
Skirts and fenders 01.jpg

To be continued...
I'll post this now as I'm aware this is a picture heavy thread and will resume in the next instalment.
I hope this is of interest. I have plans for my large scale armour projects and it will be good to share my journey with you guys.
As always any comments are very welcome.
Cheers
Paul
 
Last edited:

tr1ckey66

SMF Supporter
Joined
Mar 6, 2009
Messages
3,686
Points
113
First Name
Paul
Panther build Part 2
Those who remember this the first time around will note that I've skimmed on some of the build details. That said, If anyone has any questions on any aspect of the build so far I'd be happy to elaborate.

Front hatches
I'd decided early on that I wanted working hatches at the front:-
A. so that I could fit a driver figure in the future
B. So that I could relocate the on/off switch for the RC to the Radio Ops position (making it easier to turn the thing on and off).

I started with the Schumo aftermarket hatches but realised that the thickness of the hatches did not match that of the hull. I then tried making my own hatches with stock card that matched that of the hull but some research told me they were now too thick...

Reworked hatches 02.jpg

Panther Hatch thickness.jpg

Hatch thickness.jpg

I wasn't happy with this result and racked my brain for a solution. In the end I opted to remove the whole of the upper hull plate and scratch build the whole thing using laminates of plastic card. I've indicated the area for removal here...

(Note: this area is removable on the real tank and used for replacing transmissions)

Removable area.jpg

Getting the correct measurements on this mod were critical in both plan and thickness and took a lot of time to complete. Here's the result...

Hatches Complete 01.jpg

Hatches Complete 05.jpg


I reworked/scratch built the hatch internals and hinges using plastic card and parts from the Schumo set. Much happier with the result.

Now for some more photo etch!!!

Cheers
Paul
 

Attachments

  • Hatches Complete 03.jpg
    Hatches Complete 03.jpg
    73.9 KB · Views: 6
  • Hatches Complete 05.jpg
    Hatches Complete 05.jpg
    61 KB · Views: 7

tr1ckey66

SMF Supporter
Joined
Mar 6, 2009
Messages
3,686
Points
113
First Name
Paul
Panther build Part 3

What follows is an awful lot of soldering, fiddling with extremely tiny parts and a strain on my old peepers (thank God for magnifiers).
First up the gun cleaning rod case...
Tube09.jpg

This is simply leagues apart from the kit part...

Tube03.jpg

Again all the clasps work and it is possible to remove the cleaning rods from this photo etch item...

Tube04.jpg

Next the tool brackets. First up left hand side...

LH Tool Bracket 01.jpg

Eventually, I'll replace all the tool handles with real wood items (as I did on my RC Tiger).

Now the right hand side tool bracket...

RH Tool Bracket 01.jpg

Part of the bracket for the crow bar...

RH Tool Bracket 02.jpg

And finally the improved gun crutch with working chain. You really do need to be a masochist to put this together. Each link has 8 parts and the greatest of care is needed when soldering to ensure this still articulates at the end!!!

Gun Crutch 01 .jpg
Gun Crutch 02.jpg

That's enough of photo etch for a while time for some Zimmerit application...

Cheers
Paul
 

tr1ckey66

SMF Supporter
Joined
Mar 6, 2009
Messages
3,686
Points
113
First Name
Paul
Panther build Part 4

Before I go on I should talk a bit about the research into this project. From the very start I knew I wanted to build a Normandy Panther. This would mean back-dating the Tamiya Late Panther G to the earlier spec. This would also mean the obligatory application of Zimmerit. After doing A LOT OF RESEARCH on Normandy Panthers I've decided on tank no. 135, 12SS/HJ division. I did um and argh about doing Panther 306 which has an interesting past (battle damage and renumbering from Panther 126) but in the end settled on 135 as it had just the right amount of battle damage and (importantly) there's plenty of archive photos of it. Most armour modellers will know Panther 135 from Tamiya's 1/35 boxing of the Early Panther G. I'll go into Panther 135's history as this build progresses but because I want to get up to date with the build as soon as poss I'll leave that for another post.

Here's the Zimm application...

First marking out the position of the tools

Zimmerit Application 03.jpg

Next masking those areas with Dymo tape. The Dymo tape not only masks the area but gives a nice depth gauge for the application of the putty...

Zimmerit Application 04.jpg

Next applying the putty (in this case Mori Mori Putty)...

Zimmerit Application 05.jpg

I apply this in sections as you don't want the putty going off before the pattern is imprinted.

Then the pattern is made. I used an aftermarket stamp for the vertical pattern (I honestly can't remember who manufactures these stamps)

Zimmerit Application 06.jpg

And finally how it looks when dry with masking removed (the tool bracket is not fixed yet this is just to demonstrate the effect).

Zimmerit Application 07.jpg

It should be noted that since these pictures were taken I removed all of this Zimmerit and reapplied using Humbrol Putty. The reasons for this were that I forgot to score the pattern into squares but also the Mori Mori putty (although excellent and my preferred option) is like hen's teeth to buy now and stinks to high heaven!!!

Anyhoo, the process remains the same and I will demonstrate the results in the next post.

This brings this thread pretty much up to date now. I do have some new work to show and I hope to do that when I come to a convenient break in a day or so.

I do hope this is of interest to all you armour buffs. Till next time.
Cheers
Paul
 
Last edited:

boatman

SMF Supporter
Joined
Nov 8, 2018
Messages
12,853
Points
113
Location
NORFOLK UK
First Name
christopher
HI Paul wow what a build an its nice to see someone else doin a R/C model an now as im a fairly newbie an did not see the first edtion of your build is this model meant to be a R/C or are you makin it so ? an what make of R/C will you use an how many channel's ? an will it be like Im usein in my HMS TIGER build on here in the ship section 2.4 gig ? an how many motors will be in it ? an will the main gun be able to fire an recoile like ive seen on other R/C model tanks ? an sorry for all the questions but I love R/C models. An Will you I hope put a thread on here of your R/C TIGER as that would be the dogs doodars for me an I hope for the rest of the guys on here lookin forward to more of your build
chris
 

tr1ckey66

SMF Supporter
Joined
Mar 6, 2009
Messages
3,686
Points
113
First Name
Paul
HI Paul wow what a build an its nice to see someone else doin a R/C model an now as im a fairly newbie an did not see the first edtion of your build is this model meant to be a R/C or are you makin it so ? an what make of R/C will you use an how many channel's ? an will it be like Im usein in my HMS TIGER build on here in the ship section 2.4 gig ? an how many motors will be in it ? an will the main gun be able to fire an recoile like ive seen on other R/C model tanks ? an sorry for all the questions but I love R/C models. An Will you I hope put a thread on here of your R/C TIGER as that would be the dogs doodars for me an I hope for the rest of the guys on here lookin forward to more of your build
chris
HI Chris
The Panther is the full option Panther by Tamiya so it will have all the RC functions that kit has, which are:-
A. Full track mobility supplied by 2 motors running the transmission
B. Turret rotation and gun elevation
C. Main Gun firing, recoil and muzzle flash (not BB firing)
D. Bow machine gun works (Gun flash)
E. Sound effects supplied by the DMD control and internal speaker - engine, main gun and bow machine gun firing

The RC system is 4 channel although the receiver (I believe) is a 6 channel Futaba.

All these functions are standard with the full option Tamiya RC tank kits. All these functions went into my Tiger I too.
I'm sorry but I hadn't planned on opening up the Tiger I thread. As some people on this forum know, it took an age to build and the thread has been lost what with site changes and Photobucket restrictions.
Here's the finished thing though...

Tiger 212 01.jpg


and a few details...

Tiger 212 09.jpg

Tiger 212 13.jpgTiger 212 10.jpg

Tiger 212 15.jpg

This Tiger is based on the latest info on Micheal Wittman's mount during the attack at Villers Bocage. Again loads of mods went into this backdating the Tamiya Early Tiger 1 to the late version (most notably the steel wheels but many other mods went into it as well).

I'm glad you like the build so far and I will drop by your HMS Tiger build and take a look.
Cheers
Paul
 
Last edited:

boatman

SMF Supporter
Joined
Nov 8, 2018
Messages
12,853
Points
113
Location
NORFOLK UK
First Name
christopher
HI again Paul wow what a monster of a tank the tiger has always been my fav an I have built 2 tigers many moons ago but they were just remote control by a hand set then in about 1/35 scale as could not afford proper R/C then. But I had a lot of fun with them drivein them out in the garden over obstickles an such an it was fastanating to see the rd wheels go up an down when goin over things an what a pity that your tiger thread is lost I would love to have seen that as I very nearly bought this kit from my local model shop. But was stopped dead in my tracks when I see the price 800 quid my wife offered to to go halfs on it for me but had car probs then an that had to come first so no go.BUT IM REALLY LOOKIN FORWARD TO THIS BUILD so plenty pics an exsplanation's please great stuff
all best
chris
 

tr1ckey66

SMF Supporter
Joined
Mar 6, 2009
Messages
3,686
Points
113
First Name
Paul
HI again Paul wow what a monster of a tank the tiger has always been my fav an I have built 2 tigers many moons ago but they were just remote control by a hand set then in about 1/35 scale as could not afford proper R/C then. But I had a lot of fun with them drivein them out in the garden over obstickles an such an it was fastanating to see the rd wheels go up an down when goin over things an what a pity that your tiger thread is lost I would love to have seen that as I very nearly bought this kit from my local model shop. But was stopped dead in my tracks when I see the price 800 quid my wife offered to to go halfs on it for me but had car probs then an that had to come first so no go.BUT IM REALLY LOOKIN FORWARD TO THIS BUILD so plenty pics an exsplanation's please great stuff
all best
chris
Hi Chris
The Tiger is a very imposing tank. The very essence of a HEAVY tank. It's hard to believe that these things could be tossed in the air like toys from warship salvoes out at sea. Naval power such as HMS Tiger is truly devastating!
Cheers
Paul
PS. You could always pick up a second hand RC Tiger on Ebay and renovate. If I was to build another RC Tiger this would be the route I'd choose.
 

boatman

SMF Supporter
Joined
Nov 8, 2018
Messages
12,853
Points
113
Location
NORFOLK UK
First Name
christopher
YES Paul it would be an intresting option an I would love to build a 1/16th big tiger but im afraid the water bourne tiger is so far suppin up my dosh like wonoo for about the nxt few yrs build time an I also have two big 1/32 scale planes kits to build so no go for a few yrs in the least an time is my enemy as its runnin out fast
chris
 

tr1ckey66

SMF Supporter
Joined
Mar 6, 2009
Messages
3,686
Points
113
First Name
Paul
Panther build Part 5

A small update on the Panther. I've managed to Zimmerit most of the hull using the same method as described in part 4 except this time with Humbrol putty. I did remember this time to score the square pattern into the putty (school boy error first time round).

Zimmerit_Application01.jpg
Zimmerit_Application02.jpg

I had every intention on finishing the Zimm before posting again but I got round to the rear hull and realised I had to do some planning. Because I'm making modifications to the rear hull of my Early Panther G (I'm backdating Tamiya's late G), I needed to know exactly where these mods would sit on the rear hull before I could mask and apply the Zimmerit. This meant building the Early type exhausts, the jack and the mount for it. Out came the soldering iron again and I set about joining the exhaust halves together The brass exhaust pipes by Wecohe come in 2 halves and needed soldering together before they could be placed in the exhaust manifolds. I then completed the exhausts with wire threaded through the tops (a measure to stop hand grenades from being dropped down them!) With this done I then set about soldering the jack parts (it's missing the handle on the shot but I'm waiting till nearer completion to attach that). Here's the progress...

Rear_Hull_Planning.jpg

I'm still a way off finishing the detail on the rear hull as there's loads more to do:-
A. Fitting the exhaust manifold bolts
B. Finishing the mount for the jack
C. Scratch building the convoy light.
Interestingly Panther 135 has the old style box convoy light. This must be a field mod as I'm pretty sure all Panther Gs would have had the tube type depicted on Tamiya's model (albeit pretty crudely)
Here's the evidence though...
135R.jpg

I managed to source some real working tiny nuts and bolts for the exhaust brace which I tried to photograph but not nearly well enough, I really need another lens. They were a devil to tighten up I can tell ya!

Nut_Bolt Detail.jpg

And that's it for today. Next post I'm hoping to have the rear detail done and the Zimm on the whole tank (including turret).

Till then
Cheers
Paul
 
Last edited:

boatman

SMF Supporter
Joined
Nov 8, 2018
Messages
12,853
Points
113
Location
NORFOLK UK
First Name
christopher
HI Paul I found it in the end an its lookin good I can tell you that :thumb2: :thumb2: :thumb2: an how small are them tiny nuts you had a go at tightening up in mm please as I can just make them out they are on the saddle brackect are they not ? an this zimm is that the concrete they covered the tanks in for extra protection ?
chris
 

tr1ckey66

SMF Supporter
Joined
Mar 6, 2009
Messages
3,686
Points
113
First Name
Paul
Hey Chris
The bolt heads and nuts are about 1mm across - I tightened them with tweezers and I needed a magnifier to actually locate the nut on to the threads!
And yes you’re right they are located on the 2 saddle brackets. You’re also correct in saying that Zimmerit is the coating on the hull although it wasn’t concrete but a concoction of wood pulp, PVA and a lab full of awful chemicals resulting in a thick paste. This was usually applied to the hull with a grooved trowel but different manufacturers used varying methods of application and patterns. Zimmerit is not for extra protection it’s an anti magnetic coating designed to prevent magnetic charges being attached to the hull.

Glad you like the build I will keep you posted on updates. I trust you’ll do the same with Tiger! :tongue-out:
Cheers P
 
Last edited:

boatman

SMF Supporter
Joined
Nov 8, 2018
Messages
12,853
Points
113
Location
NORFOLK UK
First Name
christopher
Hey Chris
The bolt heads and nuts are about 1mm across - I tightened them with tweezers and I needed a magnifier to actually locate the nut on to the threads!
And yes you’re right they are located on the 2 saddle brackets. You’re also correct in saying that Zimmerit is the coating on the hull although it wasn’t concrete but a concoction of wood pulp, PVA and a lab full of awful chemicals resulting in a thick paste. This was usually applied to the hull with a grooved trowel but different manufacturers used varying methods of application and patterns. Zimmerit is not for extra protection it’s an anti magnetic coating designed to prevent magnetic charges being attached to the hull.

Glad you like the build I will keep you posted on updates. I trust you’ll do the same with Tiger! :tongue-out:
Cheers P
HI again Paul my god I thought I used small nuts an bolts they are 2mm but down to 1mm no wonder you needed a mag to see them you was lucky I think to get them to thread on you must have some good bloomin peppers mind you my eyesight is fair for my age an thanks for exsplaining about that zimmeritt ive heard Bob an most of the tanky guys talkin about it but I never thought to ask as I thought it was the concreate an yes we keep on updating each other as its easy to miss out on a whole thread unless you are on here all the while im logged in all the while but im not here all the time as if I log out its a devil of a job to get logged back in again as I live in a low megabyte area an my pc is very slow
chris
 

tr1ckey66

SMF Supporter
Joined
Mar 6, 2009
Messages
3,686
Points
113
First Name
Paul
Love the gun case, and all of the PE actually. Must make it a little easier in that scale. :smiling3:
Hi Bob
The PE is perhaps a little bit easier to handle. I think the main difference is that you can get away with super gluing small 1/35 brass (by and large) whereas in this scale there really is no option other than soldering. I like soldering and it makes a strong joint but it is undoubtably a longer process.
Glad you like it so far.
Cheers
Paul
 
Last edited:
Top