boatman
SMF Supporter
OK Paul will have a look
chris
chris


Hi Chris
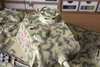
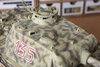
Here's the pics of the camo I promised. I only managed to get the markings painted on to the one side so there's still a little bit to do. Also the light for photography isn't ideal today.
View attachment 396561
View attachment 396562
It's easy to feel a little bit uneasy about the work at this point, as the paint job is at it's most garish. After some fading though I'm confident that everything will be 'tied together'.
About the camouflage...
There's not a lot of the camouflage that can be seen from period photographs. The only parts that are visible are parts of the schurtzen and some of the rear plate. I took those 2 areas as 'typical' and tried to expand that 'style' to the entire tank. What you see is the result.
I'm back at work now, so no more updates for a while, but hopefully next time I'll have both turret numbers and national crosses on and then I can move on to weathering and finishing up.
Thanks for looking
P
Thanks ChrisHI Paul fab work on the camo i really like it as it must have been hard to do AN TO ME ITS LOOKS REAL AN THE GERMAN CROSSES IS THAT REALLY WHERE THEY PUT THEM AS ALL THAT HULL AN THEY HAVE SQEZZED THEM ON THE FRONT REALLY WEIRD THAT TO ME BUT IF IT RIGHT THEN THATS IT BRILLIANT WORK MY FREIND
ALL BEST CHRIS PS SORRY ABOUT CAPS MY PC IS HAVIN A FUNNY TURN
I may be able to finish it tomorrow and upload pics on Friday, if all goes well.HI Paul whats hapenin on him now must be nr done now an'it it?
chris


For FULL Forum access you can upgrade your account here UPGRADE