davecov
SMF Supporter
I always intended this build to be a quick one and it has caught me by surprise a bit as it is close to being finished already, even though I only started it a week ago. However, I have taken plenty of photos so you can see what I have been playing about at!
The box artwork which is similar to how I will be painting it although I won't be giving it a red hull nor a red lifebelt:

Every part was been cleaned up and some parts glued together and PE fitted as appropriate. Here a lot of the major parts have been dry-fitted:

Painting is now underway. I sprayed the gunwhales with dull aluminium and these will be overpainted later with Olive Drab and sanded back to reveal the aluminium underneath:

The stand was painted with Alclad 2 Dull Aluminium and then out came the H66 Matt Olive Drab:

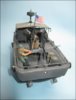
The "tub" for the forward twin .50 Cal M2HB machine guns:

Some of the other components including the aft single M2HB (the gun itself will be painted H53 Gunmetal later), ammo boxes, oil drums, canopy, bulkhead, mast:

The wheelhouse had some photo-etch added and was then painted:

Two M16 rifles were mounted on the dividing bulkhead. Slings were Eduard PE jobs:

Ammo boxes, drums and ammo boxes were Kleared and then decals. Most importantly, three bottles of beer were painted and labelled too:

The crew figures have been cleaned up and will be handpainted later:

I started glueing some of the stores around the boat. Here I have put the oil drums in place. They still need a coat of matt varnish but all varnishing will be left until later:

The navigation lights of the mast have been painted and the mast fitted in place as was the radar housing:

Pump-jets were glued in place:

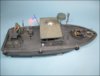
Ammo boxes, grenade launcher and various containers glued in place:

Hot/cold food and drink containers in place. Note the cassette player and a couple of beer bottles:

Forward gun tub. I can't fit the guns until the gunner has been glued inside. Just in shot are four cassettes that require painting:

Canopy has been dry-fitted. Anchor and rope has been glued:

Thread was tied around the six tyres:

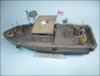
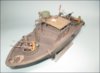
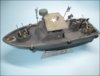
Tyres were tied in place and the whole build was sprayed with matt varnish. The "rope" was painted a very pale khaki:

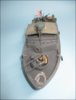
View from above:

That is all for now
Dave
The box artwork which is similar to how I will be painting it although I won't be giving it a red hull nor a red lifebelt:
Every part was been cleaned up and some parts glued together and PE fitted as appropriate. Here a lot of the major parts have been dry-fitted:
Painting is now underway. I sprayed the gunwhales with dull aluminium and these will be overpainted later with Olive Drab and sanded back to reveal the aluminium underneath:
The stand was painted with Alclad 2 Dull Aluminium and then out came the H66 Matt Olive Drab:
The "tub" for the forward twin .50 Cal M2HB machine guns:
Some of the other components including the aft single M2HB (the gun itself will be painted H53 Gunmetal later), ammo boxes, oil drums, canopy, bulkhead, mast:
The wheelhouse had some photo-etch added and was then painted:
Two M16 rifles were mounted on the dividing bulkhead. Slings were Eduard PE jobs:
Ammo boxes, drums and ammo boxes were Kleared and then decals. Most importantly, three bottles of beer were painted and labelled too:
The crew figures have been cleaned up and will be handpainted later:
I started glueing some of the stores around the boat. Here I have put the oil drums in place. They still need a coat of matt varnish but all varnishing will be left until later:
The navigation lights of the mast have been painted and the mast fitted in place as was the radar housing:
Pump-jets were glued in place:
Ammo boxes, grenade launcher and various containers glued in place:
Hot/cold food and drink containers in place. Note the cassette player and a couple of beer bottles:
Forward gun tub. I can't fit the guns until the gunner has been glued inside. Just in shot are four cassettes that require painting:
Canopy has been dry-fitted. Anchor and rope has been glued:
Thread was tied around the six tyres:
Tyres were tied in place and the whole build was sprayed with matt varnish. The "rope" was painted a very pale khaki:
View from above:
That is all for now
Dave