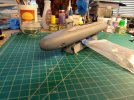
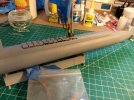
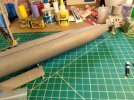
The one thing about models I don't like: Seams!

Joined
Apr 10, 2022
Messages
42
Points
18
Location
Cougar Trap, TEXAS
First Name
Neal
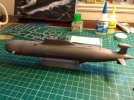
I hate seams, especially the long seams like the sections of hull where no seam should be. I've watched a ton of videos on how to eliminate seams. I've tried AK grey putty, Tamiya white putty, Tamiya Liquid Surface Primer, and adding super thin cement to flush the two surfaces. Still, after I add a coat of primer, there's the seam.

With the puttys, even when I add a tiny bead with a toothpick, when I try to sand and feather it out, it doesn't help, plus it's hard on the fine details.

How many hours should I spend on a model trying to putty and sand the seams?
 

Attachments

  • 2.jpg
    2.jpg
    183.3 KB · Views: 30
  • 3.jpg
    3.jpg
    179.4 KB · Views: 27
  • 4.jpg
    4.jpg
    179.2 KB · Views: 25

spanner570

SALAD DODGER
SMF Supporter
Joined
May 26, 2009
Messages
12,972
Points
113
First Name
Ron
To be honest Neil. I don't bother doing anything special with my ship/ boat seams. So my answer to your question would be virtually nothing extra, rather poor I realise, but that is my method of modelling. The easy life!

I always cut off the lower hull and sling it. Then once my stuff is 'afloat' and weathered, the seams are invisible. Well, near enough for me.

Of course the 'Zoom Merchants' would have a field day, but guess what?......

Ron
 

Jakko

Way past the mad part
SMF Supporter
Joined
Apr 28, 2018
Messages
10,737
Points
113
First Name
Jakko
I don’t build many boats (could leave the m out of that, really) but I normally fill seams with car body putty, and make sure that the filler is proud of the seam. Once that’s thoroughly dried, I sand it down with wet-and-dry sandpaper (used wet, that is) until I can’t feel the seam anymore with my fingertips and -nails. After that, it’s almost always invisible after painting; if not, then a little more sanding, some more filler and sanding again normally does get rid of it.

As you say, though, this can be difficult with details near the seam. My only advice here is to be careful, and realise that you can’t really avoid all damage, so accept that you may have to rescribe panel lines and/or rebuild details from scratch. It may help to carefully slice off raised detail if it’s big enough, then glue it back once the seam is filled to your satisfaction.
 

Dave Ward

Still Trying New Things
SMF Supporter
Joined
Apr 27, 2018
Messages
8,625
Points
113
Location
South Gloucestershire
First Name
David
Neal,
first thing I do when joining sub hulls is edge preparation! I scrape the sharp edge away from either side of the hull, removing the 'corner' of the jointing faces, using a scalpel blade - this reduces any ridge where the two parts meet. If there's a serious mismatch, I'll deal with it, by filler, or inserts of plastic card before attempting a joint. I run a thin bead of Contacta glue around each half of the hull, and allow to dry for 4-5 minutes, then press firmly together, using tape or clamps to maintain the pressure - the glue should have softened the plastic enough for a thin ridge of plastic to be pressed out of the join. You have to leave this for at least 24hrs to really go off. The extrusion can now be trimmed off with a new scalpel blade - if you do it right, no more treatment required, otherwise w&d paper used wet.
It is a long time since I did this, however - waterlining is my choice these days!
Dave
 

Ian M

Administrator
Staff member
Administrator
Moderator
SMF Supporter
Joined
Dec 14, 2008
Messages
19,691
Points
113
Location
Falster, Denmark
First Name
Ian
Large parts be it a hull or fuselage I find best to use a poly glue with a bit of body to it.
Plenty of it too! The resulting ouze of glue once dried and hard can be trimmed off and a gentle sanding should do the trick.
 

Jim R

SMF Supporter
Joined
Apr 27, 2018
Messages
13,695
Points
113
Location
Shropshire
First Name
Jim
Many long joins are along a curve, especially true for plane fuselages. I find it very easy to sand a 'flat' when trying to sand out the seam. I have one of those IPMS curve scrapers but even that has limitations.
Jim
 

Gern

'Stashitis' victim
SMF Supporter
Joined
May 17, 2009
Messages
9,669
Points
113
Location
Stourbridge
First Name
Dave
Make sure you've got plenty of glue/cement in the joint before fixing the parts together. If there's any part of the join which is not fixed together, you'll ALWAYS have a gap between the two pieces of plastic.
 
Joined
Apr 10, 2022
Messages
42
Points
18
Location
Cougar Trap, TEXAS
First Name
Neal
Lot of great suggestions. Here I was thinking Tamiya super thin was the greatest thing since sliced bread, being able to brush it on parts that are already placed together.

Large parts be it a hull or fuselage I find best to use a poly glue with a bit of body to it.
Plenty of it too! The resulting ouze of glue once dried and hard can be trimmed off and a gentle sanding should do the trick.


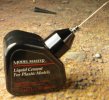
What poly glue do you recommend? In my last session of model building (the 2000s) I was quite excited to use MM with their awesomely precise needle. I looked for that but now it seems it is Testors and the metal needle is gone. :confounded:
 

Attachments

  • 344884-Glue, Model Master Liquid Cement.jpg
    344884-Glue, Model Master Liquid Cement.jpg
    55.1 KB · Views: 17
  • Like
Reactions: JR

Ian M

Administrator
Staff member
Administrator
Moderator
SMF Supporter
Joined
Dec 14, 2008
Messages
19,691
Points
113
Location
Falster, Denmark
First Name
Ian
Yes thats the type of stuff. I normally have either Humbrol or Revell as that is what I can get.
Also a big user of the thin glue. Normally Tamiya extra thin, but I am trying the MIG stuff.
 

Tim Marlow

Little blokes aficionado
SMF Supporter
Joined
Apr 27, 2018
Messages
16,726
Points
113
Location
Somerset
First Name
Tim
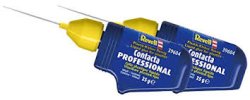
Revell Contacta professional will work well on those type of seams Neal. It has the metal needle applicator as well. Tamiya extra thin (or other liquid solvents, there are several) is great for other types of joint. It’s worth having more than one sort of poly glue for different applications.
 

Dave Ward

Still Trying New Things
SMF Supporter
Joined
Apr 27, 2018
Messages
8,625
Points
113
Location
South Gloucestershire
First Name
David
For delicate parts, TET is ideal, but for anything larger
contacta .jpg
You can get it in 12.5 or 25 g bottles I always have several in hand - it's my go to cement - I would say 75% of a model would be assembled using this. + it doesn't spill if you knock it over!
Dave
 
Joined
Apr 10, 2022
Messages
42
Points
18
Location
Cougar Trap, TEXAS
First Name
Neal
Revell Contacta professional will work well on those type of seams Neal. It has the metal needle applicator as well. Tamiya extra thin (or other liquid solvents, there are several) is great for other types of joint. It’s worth having more than one sort of poly glue for different applications.

Beautiful, thanks!
 

Jakko

Way past the mad part
SMF Supporter
Joined
Apr 28, 2018
Messages
10,737
Points
113
First Name
Jakko
Not sure if you can easily get that glue in the USA, though — it’s a Revell Germany product only, as far as I know. But I could be wrong :smiling3:
 

Tim Marlow

Little blokes aficionado
SMF Supporter
Joined
Apr 27, 2018
Messages
16,726
Points
113
Location
Somerset
First Name
Tim
Good point Jakko. Amazon.com has it, but it ain’t cheap…bit like trying to get Tamiya grey putty in the uk by the sound of it.
 

rtfoe

SMF Supporter
Joined
Apr 29, 2018
Messages
7,497
Points
113
Location
Malaysia
First Name
Richard
It "seams" many have an issue with joints. Lots of remedies suggested that will work. I usually use a light source, patience and light wet sanding to rid the awful depression.

Cheers,
Richard
 
Joined
Apr 10, 2022
Messages
42
Points
18
Location
Cougar Trap, TEXAS
First Name
Neal
Hah, wouldn't you know it. I put the Ohio aside and started an Akula, really worked on the hull seam of this model and was really happy with it after I primed it. Then I realized that the paint line between the red and black... runs along the seam, which means it would not have been a big deal to have a seam visible. Being the border between two colors would have hid it. :tears-of-joy:

And wouldn't you know it, after I masked off the top half to paint the red lower hull, the tape took off a bunch of primer.
 

Attachments

  • 1.jpg
    1.jpg
    187.3 KB · Views: 12

rtfoe

SMF Supporter
Joined
Apr 29, 2018
Messages
7,497
Points
113
Location
Malaysia
First Name
Richard
Oh dear, that normally doesn't happen to primer unless fine dust or finger oils remained on that section of priming. If the lifted layer isn't thick just lightly wet sand and repaint. These things happen...not the end of the world but only tests your patience. :smiling2:

Cheers,
Richard
 

zuludog

SMF Supporter
Joined
Mar 6, 2015
Messages
279
Points
43
Here's how I deal with joining large parts, and their seams -

Dry fit; if necessary, which in practice means almost always; sand the mating surfaces to remove any flash, remains of sprue gates, and to ensure good mating surfaces & edges

Glue the parts together with tube glue, hold them together with tape, clamps, or elastic bands.

If necessary reinforce the joint by flooding in liquid glue

A basic sand or clean up with sandpaper, file, or sanding stick

Apply tube filler putty as required. I'm still using Squadron Green Putty; not sure what I'll use when it runs out

Sand with file, sandpaper, or sanding sticks - actually manicure boards

Apply liquid filler - Mr Surfacer 500 or Mr Dissolved Putty, they both seem to do the same job

Sand again; obviously with any sanding, work down to fine grades; and follow curves & contours so there aren't any flat spots - easier said than done!

Paint with primer, usually just matt pale grey, then sand again
 
Top