The Road to Singapore: Malaya 1941-42

TIM FORSTER

SMF Supporter
Joined
Apr 28, 2018
Messages
227
Points
93
Location
London, UK
First Name
Tim
3293378_f6fff1833aebbe670afae7bd685bea02.jpg

Dear all,

After (finally) finishing my Liberation, Italy 1944 diorama this is going to be my next throw of the dice.

The Malayan Campaign began with the Japanese invasion of the Peninsular (now modern day Malaysia) on the eve of Pearl Harbour - 7th December 1941 - and ended with the surrender of Singapore (the island which lies at its tip) on 14 February 1942.

Like Italy, this is a relatively unsung corner of WW2 - but it is equally fascinating. I am certainly no expert, although I have been mugging up on various Youtube videos and other sources.

It was, of course, a disaster for the Allies - mostly British, Australian and Indian troops - who fought a desperate rearguard action throughout.

Meanwhile, it was a triumph for the Japanese, who copied German blitzkrieg tactics to advance at speed and out-manouvre their enemies - even though there were very few roads.

In terms of equipment, the battle was notable for the fact that, whilst the Japanese had mostly light tanks, the Allies had precisely none. One of the best known engagements - and a rare victory for the Allies - was between Japanese Type 95 Ha-Go tanks and Australian 2 Pounders near the Muar river (shown in the images above and below).

My inspiration comes from this duel: tanks and guns which seem almost laughably small compared to what came later in the war, but which were, nevertheless, potent adversaries in their time and place...

3293378_d8afe73e26e256f19e9422cd8a82b984.jpg
 
Last edited:

SimonT

Rest in Peace
Rest In Peace
Joined
Apr 27, 2018
Messages
2,448
Points
113
Location
Yorkshire
First Name
Simon
Hi Tim - whose 2pdr will you be using? Sovereign2000 do a nice looking one with crew and accessories
 

TIM FORSTER

SMF Supporter
Joined
Apr 28, 2018
Messages
227
Points
93
Location
London, UK
First Name
Tim
Hi Simon.

Sorry I have taken so long to reply.

Yes, I have the Sovereign2000 2 pounder. In fact I had almost finished it before I started this blog. However, fine though it is, I have discovered a few issues. I will discuss these in due course, but I have the Vulcan kit in reserve.
 

TIM FORSTER

SMF Supporter
Joined
Apr 28, 2018
Messages
227
Points
93
Location
London, UK
First Name
Tim
Obviously we are all going through strange times - and difficult times for many. However, 'lockdown' does have some advantages and I am glad that we can still share our experiences through this site.

So on with this project...

I am determined not to let this become as large and complex as my Italian dio. OK, so the basic idea is the 2 Pounder anti-tank gun versus a Japanese tank - in an appropriate 'jungle' setting. For better or for worse, for the tank I chose the FineMolds Imperial Japanese Army Light Tank Type 95 Ha-Go 'Malayan Campaign.

JzLTQ27.jpg

I picked this kit up when I was in Tokyo last summer. At the same time I also acquired the turned brass gun barrel and photo-etch fret which are available as extras.

1Cw6OEd.jpg
vJAD6n0.jpg

There are other kits available - and, for reasons that will soon become clear, it may be that I should have chosen one of the Dragon versions. But I am already wedded to the FineMolds kit...

Although the Muar River action is my inspiration, there are some challenges in modelling this event.

The most obvious issue is one of scale. You will note from the image at the top of this post that the gun is actually in quite close proximity to the knocked out Japanese tanks. Yet they are still such a distance away that, in 1/35 scale, this would make for a very large (or at least long) diorama.

I had already suspected that this was not the range at which they engaged and, having done some research, I believe I am right. There were at least two (and possibly three) firefights between the Japanese armour and the 2 pounders in the area and it seems that the anti-tank guns were moved up after the tanks had been knocked out. This may have been to prepare better positions for the (expected) next Japanese advance - or to provide a better shot for the photographers - or both. The latter may sound like a strange suggestion, but this was a rare (perhaps unique) opportunity for the Commonwealth troops in the Malayan campaign to show the people back home that they were actually standing up to the Japanese advance. We will return to this later.

So I am planning on using a bit of artistic licence to depict a stretch of road like the one shown in the images above with a suitable backdrop of trees and bushes and a juxtoposition between the colourful Ha-Go tank and the drab Aussie gun. I also plan to have at least one fallen tree, which helps to add a bit of drama and interest to the scene. Incidentally, it seems that the trees were actually felled after the action was over in order to deter any more Japanese tanks from advancing. Unsurprisingly, the Japanese decided to try other routes...
 
Last edited:

Steven000

WWII and nuts.
SMF Supporter
Joined
Aug 29, 2018
Messages
1,945
Points
113
Location
Belgium
First Name
Steven
I loved your Italian dio, so I'll be following this one too :thumb2: Looks all very intresting.
Steven
 

Steve Jones

Steve Jones Scale Modelling Site
Joined
Apr 27, 2018
Messages
6,698
Points
113
Location
Plymouth
First Name
Steve
Hi Tim

Great to see you posting and cracking on with this dio. If it's anything like your last one it will be epic. Good luck
 
  • Like
Reactions: JR

Greg_147

SMF Supporter
Joined
Feb 4, 2014
Messages
126
Points
63
First Name
Greg
Certainly an interesting scene, I'll be looking forward to seeing your depiction of it!
 

Neil Merryweather

SMF Supporter
Joined
Dec 29, 2018
Messages
4,418
Points
113
Location
London
First Name
Neil
I'm in, I loved the Italian diorama so I'm looking forward to this.
And glad to see another British(well, Commonwealth) subject.
 

The Smythe Meister

Born to be WILD....... until about 9pm
SMF Supporter
Joined
Jan 30, 2019
Messages
5,701
Points
113
Location
Devon
First Name
Andy
Yep,I`m in too Tim,
Always love a good Dio :thumb2:
I shall have a trawl around the site and try to find your Italian one the guys have mentioned.
Cheers,
Andy
 

TIM FORSTER

SMF Supporter
Joined
Apr 28, 2018
Messages
227
Points
93
Location
London, UK
First Name
Tim
Thanks guys.

I hope you find this one just as interesting. It's an even more obscure choice of theatre, I know, and (if I'm honest) one that had never really attracted me before. The last time I modelled anything Japanese was probably the Airfix bamboo Jungle Outpost when I was about 10!

Here is another powerful image of a knocked out Ha-Go tank from the Muar River action. These are all taken from the Australian War Memorial Site, although most are also on Wiki.

This is the lead tank in both images above.

E9PWZQJ.jpg

The elaborate camouflage on Japanese tanks has always fascinated me: surely influenced by the French, whose own tanks were painted in a very similar style?
 

Mini Me

SMF Supporter
Joined
Jun 1, 2018
Messages
10,159
Points
113
First Name
Rick
Tim, I know what you mean, They always reminded me of jigsaw puzzle parts. Pacific theater isn't modeled much for some reason.
Rick H.
 
  • Like
Reactions: JR

rtfoe

SMF Supporter
Joined
Apr 29, 2018
Messages
7,497
Points
113
Location
Malaysia
First Name
Richard
Hi Tim,
Great to see someone doing the famous Bakri ambush. The stretch of the ambush now is void of the rubber plantations and lined with shops and houses along the whole route from Bakri to Muar town. The trees that were feld are rubber trees. The main road would have been tarred with dirt slip on both sides with shallow ditches then saw grass and ferns on the embankment then the rows of rubber trees planted at right angles to the road. The dirt slip would have a red brown hue and would have stained the sides of the road.
If you need any coloured references on fauna and groundwork let me know. would be happy to take photos.

Cheers,
Richard
 
  • Like
Reactions: JR

TIM FORSTER

SMF Supporter
Joined
Apr 28, 2018
Messages
227
Points
93
Location
London, UK
First Name
Tim
Hi Richard.

Yes! Absolutely! The backdrop of trees and vegetation is going to be at least as important to this dio as the tank, gun and figures.

So what species of trees are those felled across the road? Are they rubber trees like these?

Rubber trees.jpg
 

rtfoe

SMF Supporter
Joined
Apr 29, 2018
Messages
7,497
Points
113
Location
Malaysia
First Name
Richard
Hi Richard.

Yes! Absolutely! The backdrop of trees and vegetation is going to be at least as important to this dio as the tank, gun and figures.

So what species of trees are those felled across the road? Are they rubber trees like these?

View attachment 378836

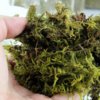
Yes Tim, exactly. Those are rubber trees alright. Sphagnum moss can look like the ferns on the embankment. I used that to line beneath the billboard in my dio.

rr0026.jpg Sphagnum Moss.jpg

Cheers,
Richard
 

TIM FORSTER

SMF Supporter
Joined
Apr 28, 2018
Messages
227
Points
93
Location
London, UK
First Name
Tim
Thanks Richard - very useful pics. Have you posted this dio somewhere on the site?
 

rtfoe

SMF Supporter
Joined
Apr 29, 2018
Messages
7,497
Points
113
Location
Malaysia
First Name
Richard
Come to think of it I haven't posted the WIP of it except maybe a finished shot in my overall list of finished builds at the beginning when I joined. It was however in the past forum which is now gone forever. I still have the WIP images and will post on a thread of its own. Anyway it's on the 3rd and 4th batch of images on this thread.

Cheers,
Richard
 

TIM FORSTER

SMF Supporter
Joined
Apr 28, 2018
Messages
227
Points
93
Location
London, UK
First Name
Tim
As I said above, the Fine Molds Ha-Go comes with almost nothing in the way of interior detail - unlike the Dragon kit. But with the turret hatches open there's actually quite a lot to see. This was a small tank and hence rather cramped - even for the one-man turret.

TcrL3kU.jpg

So I have been doing some research. I get the impression that if I had started this build even 5 years ago, there would have been very little to find on line. Fortunately, the last few years have seen at least two major Ha-Go restoration projects, including one that is now a runner and appeared at the 2019 Bovington Tanfest.

The main armament was the Type 94 37 mm tank gun. This had a shoulder mount very much like that in the British Matilda, which meant that elevation - and some limited traverse - could all be controlled by the commander resting the gun (suitably weighted and sprung) on his shoulder.

Sadly noone makes any sort of aftermarket kit for the gun, so using images that I found on the internet (including some of the Dragon sprues) I cobbled together an approximation from anything I could lay my hands on.

This is not 100% accurate - in fact it may not be even 75% accurate - but I am counting on the fact that most people looking inside my turret won't know that!

GJtlMtt.jpg
bwcsGkK.jpg

In fact, I have to admit that I rather enjoyed all of this - even if it has been quite time consuming. It's satisfying to start with a more or less empty space and fill it with detail from the spares box, metal rod and all sorts of odds and ends and create something which - at least to my eyes - looks like a gun!

Aside from the traverse handwheel and gears, the other most prominent features of the turret are the ammo racks and 3/4 rear MG mount.

The latter is still work in progress, but for the racks I started by acquiring some 37mm brass rounds for a German flak gun. These are actually a little too long compared with the Japanese, but they do fit.

There are three ready racks around the turret sides and these were made with a combination of thin plasticard, some brass rests from a German grenade box and home-made clips made from wrapping thin brass strip around the rounds themselves. The idea is to allow me to leave the shells out until after I have finished painting the interior.

MkHLdmw.jpg

[Question: what is the correct paint shade for IJA tank interiors? From what I have seen on preserved examples, it seems to be some sort of metallic finish...]

Here they are installed. As you can see gthe interior is certainly starting to look busy!

8FMVMml.jpg
ebTpGiQ.jpg
VyltzpZ.jpg

More to come soon...
 
Top