They didn't expect this - Marines at Peleliu

rtfoe

SMF Supporter
Joined
Apr 29, 2018
Messages
7,507
Points
113
Location
Malaysia
First Name
Richard
That's nice Richard, I love this small detail, always takes time, but for the viewer so important.
Thanks John, much more enjoyable at this pace...no stress. My friends over another forum say they look like mini tanks from above with huge muzzle brakes. :smiling6:...too much Sci Fi I guess in that forum.

I've started on the coconuts with a base colour...

LO234.jpg

Cheers,
Richard
 

Tim Marlow

Little blokes aficionado
SMF Supporter
Joined
Apr 27, 2018
Messages
16,772
Points
113
Location
Somerset
First Name
Tim
Developing nicely Richard. Love seeing your ideas come together….
 

JR

Member of the Rabble and Pyromania Consultant
SMF Supporter
Joined
May 26, 2015
Messages
17,275
Points
113
Location
lincs
First Name
John
Thanks John, much more enjoyable at this pace...no stress. My friends over another forum say they look like mini tanks from above with huge muzzle brakes. :smiling6:...too much Sci Fi I guess in that forum.

I've started on the coconuts with a base colour...

View attachment 435860

Cheers,
Richard
:smiling2::smiling2::smiling2::smiling2: Can see the reason.
 

rtfoe

SMF Supporter
Joined
Apr 29, 2018
Messages
7,507
Points
113
Location
Malaysia
First Name
Richard
Hi guys, this saturday I decided to do the damaged Japanese machine gun in the bunker. Instead of using the Nambu, I thought of saving that and build a heavy Type92 from scratch. Since it's damaged from the internal explosion it doesn't have to look too perfect. This is what it looks like pristine...

Type92MMG.png

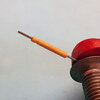
The difficult part is to to do the cooling vanes along the barrel but in 1/35 I thought I'd get away with just using wrapped wire and painting. I first dug out a hypodermic needle 21 Gauge in the green packet. The pink ones are 18 Gauge suitable for 50 cals.

Wanted to use the cut off end but the resin glue was tough so the pliers mangled it a bit. I made sure I cut off the sharp end before the procedure.

E133.jpg

Holding the needle in a clamp vice I then wrapped three different widths of masking tape over it securing the ends with CA.
E134.jpg

I heated some copperwire with my flamethrower just to soften and make it easier to wrap round the tape. Meanwhile I added the gas recuperator tube underneath with some spacers. After wrapping the copper wire I tacked it down with CA.

E135.jpg

The sights looked flimsy so I made those from copper sheet. Cut the shape and bent it in three places with the help of needle nose pliers.

E136.jpg

Secured the sight with CA. Contemplated drilling the holes on the sight guards but I don't thing anyone will notice it in the diorama.

E137.jpg

I then added the gas recuperator tube along the base with a short length of copper wire. The reference picture above somehow doesn't show it but others have.

E138.jpg

Looks like a pneumatic drill. :smiling6: The next thing I'll be doing is the tripod cradle and maybe part of the main rear body that should be partly hidden in the bunker.

Trying to find time to build is precious...even as I was typing this I was called to rescue a fallen pot of plant and make new wire holders to hang it from. The plastic ones don't hold heavy plants well. Hope tonight there's free time to do the rest or maybe tinker with the trees in the Malayan Emergency dio.

Cheers,
Richard
 

rtfoe

SMF Supporter
Joined
Apr 29, 2018
Messages
7,507
Points
113
Location
Malaysia
First Name
Richard
Hi guys, after dinner worked a little more on the Jap heavy machine gun rear portion.

E139.jpg

If you'll notice I did some extra detailing to the front section with a little nut for the recuperator and disc rivet at the base of the barrel.

E140.jpg

Hope to get more done tomorrow.

Cheers,
Richard
 

rtfoe

SMF Supporter
Joined
Apr 29, 2018
Messages
7,507
Points
113
Location
Malaysia
First Name
Richard
Hi Richard
Brilliant. I wouldn't know where to start.
Jim
Thanks Jim, it took me a while to start it because of the cooling vanes. Just plodded along and within these few hours I got me a gun. Don't know how accurate it will be when painted. Perhaps a bit burnt but being a heavy machine gun I don't think there would be much damage.

Cheers,
Richard
 
  • Like
Reactions: JR

rtfoe

SMF Supporter
Joined
Apr 29, 2018
Messages
7,507
Points
113
Location
Malaysia
First Name
Richard
Couldn't have imagined Sunday being a busy day. Had to erect a canopy shade over the cats aviary or play area. But I managed a bit of detailing to the gun...

E141.jpg

My goodness the close-up looks 'blardy' awful and needs tidying up. Used my new chisel to cut the grooves on the body without the magnifiers. I have flattened the cooling vanes near the end as per the actual gun to accommodate the cradle arms.

E142.jpg

That's all for now. Thanks for looking in.

Cheers,
Richard
 

rtfoe

SMF Supporter
Joined
Apr 29, 2018
Messages
7,507
Points
113
Location
Malaysia
First Name
Richard
You did already a fantastic job but if you want a real cool jap mg...check this out https://www.super-hobby.co.uk/products/Japan-heavy-machine-gun-Type-92.html
:smiling6: :smiling6:
Thanks Greg, yeh I saw Plus Models have it but it'll cost RM80 not inclusive of shipping. Mine just comes under a fiver and I can cast copies if I want more but all I need for now is just one beat up destroyed gun.

Outstanding! Luv the Tamiya tape idea.
Thank you Steve, have been using that process to make different sized diameters along a single pole for some time now...first time was for the scratched Honda Cub.

Nice to have you guys drop in. I was beginning to wonder if this old school technique wasn't interesting anymore or the subject of Japanese weapons either. Once I've got the little individual extras done up then I will place them into the dio and finally complete it and concentrate on the other dios that are long overdue.

Cheers,
Richard
 
  • Like
Reactions: JR

adt70hk

I know its a bit sad but I like quickbuild kits!!!
SMF Supporter
Joined
Sep 4, 2019
Messages
9,497
Points
113
First Name
Andrew
O U S T A N D I N G!!!!

Brilliant work on the mg...... Truly outstanding.....

ATB.

Andrew
 

grumpa

SMF Supporter
Joined
Jan 14, 2015
Messages
4,690
Points
113
First Name
Jim
Wonderful work on this Richard, I may not comment much, but know I do check in on your work often.
Jim.
 

rtfoe

SMF Supporter
Joined
Apr 29, 2018
Messages
7,507
Points
113
Location
Malaysia
First Name
Richard
O U S T A N D I N G!!!!

Brilliant work on the mg...... Truly outstanding.....

ATB.

Andrew
Loud and clear Sir. Thank you Andrew for that comment.:smiling2:

Hi Richard
Looks great. It is easy to forget how small it is.
Jim
Thanks Jim, I keep forgetting to put a comparison for size next to it. It's about one and a quarter inch in length.

Wonderful work on this Richard, I may not comment much, but know I do check in on your work often.
Jim.
No worries Jim, there's been quite a substantial amount of good work in the forum lately and it's hard to keep track. Thanks for the check ins.

I've done the other side of the breach and a bit on the cradle mount. I won't be making the legs as that won't be visible in the bunker or blown off when the bunker was taken with tnt satchels.

E143.jpg

I will be softening the sharp ends of the base of the arm and bend it at the base.

E144.jpg

Cheers,
Richard
 

JR

Member of the Rabble and Pyromania Consultant
SMF Supporter
Joined
May 26, 2015
Messages
17,275
Points
113
Location
lincs
First Name
John
Blo*** Nora Richard that's both cleaver and superb bit of modelling. Like the fact as you say you can mould from it.:thumb2::thumb2::thumb2:
 
Top