Trying to get paint onto an Atlas

Flip

SMF Supporter
Joined
Jul 21, 2022
Messages
196
Points
43
Location
Speyside
First Name
John
Hello to all the more experienced sprayers.

I am currently building the Revell 1:72 A400M Atlas and I am experiencing airbrushing issues (big time). I have had little problem with smaller parts and smaller kits but this is my first large kit and I don't know if some of that is related to it.

I posted before (general chit-chat, I think) and was steered to spraying closer to avoid a powdery finish. Part of the previous problem was also that the ambient temp was too high.
So, I bought some VMS enamel retarder from John's shop, added 10% to the Revell Color Mix and then made up a 1:1 with this combo and Revell No.57 Enamel.

First step was to lay some of it on a spoon and see how it came out...Spoon Test.JPG
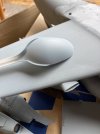
There did not seem to be any issues.

Next step - put it on the aircraft...IMG_3613.JPG
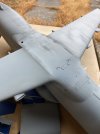
Can I cry now? It just looks terrible.

I paid close attention to my distance from the model - only about 2 inches away (desperately trying to avoid powder)
The ambient is only 18.6C
I noticed the other day that the powder forms around the edge of the cone of deposition so, today, I dialled my pressure down to 10psi to stop it being blasted.

I am out of ideas regarding how to stop this.

Any further suggestions guys from those who have gone through the pain barrier ahead of me?

Yours tearfully,
John :disappointed:
 

langy71

SMF Supporter
Joined
Apr 27, 2018
Messages
1,559
Points
113
Location
Nottingham
First Name
Chris
maybe add a little more thinner, to me it looks like its 'going on dry' which is causing the powdery effect..
Even though most paints will spray perfectly at a cheeky 50/50 mix, sometimes you might need to up the ratio of thinners to get it to work better, say maybe a even cheekier 60/40 ratio, which will help give you a slightly wetter finish..
 

Jim R

SMF Supporter
Joined
Apr 27, 2018
Messages
13,729
Points
113
Location
Shropshire
First Name
Jim
It's very hard John to decide where the problem lies. The only things I can think of is firstly the dilution of the paint. Because the viscosity of paint varies so much it is impossible to give a standard thinning ratio. An old tin of paint will be thicker and require much more thinning than a newly opened tin. So maybe you 1:1 ratio was out. You should aim for paint to be 'like milk' - that would be slightly thicker than water. I mix my paint in a plastic shot glass with a coffee stirrer. Apart from visually checking the dilution I drag some up the side of the glass and it should run quickly back down leaving just a thin, transparent patch.
When spraying you should aim to get a just wet finish. Spray an area, say a wing, until the surface is wet. Not so wet that it runs though, and then move on to the next area. Your spoon was a small area whereas your model is much larger so maybe you laid down a wet coat on the spoon but on the larger area of the model you were moving before you had put on enough paint to be wet.
I know it is b****y frustrating but stick with it. We have all had similar issues.
Jim
 

Ian M

Administrator
Staff member
Administrator
Moderator
SMF Supporter
Joined
Dec 14, 2008
Messages
19,721
Points
113
Location
Falster, Denmark
First Name
Ian
I mix enamel paints after the old "same thickness as milk" trick. regardless of how thick or thin the un thinned paint is always have a 'taget' thickness, or thinness in this case.
The size of the subject could be could be factor. I would as Jim suggests break it into sections. I would go as far as even suggesting paint a few panels at a time. say ten or so at the front then some at the back and carry one until you meet up in the middle.
 

Flip

SMF Supporter
Joined
Jul 21, 2022
Messages
196
Points
43
Location
Speyside
First Name
John
Thanks chaps for the input. I am always very nervous about over-thinning but it would appear that I am may not be near that point yet.
I have no option but to let it completely dry overnight.
I'll try to buff it out a bit in the morning and re-visit it with the airbrush.

BTW: I have a H&S Evolution CR Plus airbrush, currently with the 0.4mm needle fitted. Can I safely assume that, once I have gone up the learning curve, this AB will handle a model of that size? Or am I pushing it too far?

Regards,
John
 

Jim R

SMF Supporter
Joined
Apr 27, 2018
Messages
13,729
Points
113
Location
Shropshire
First Name
Jim
Your airbrush is fine, It will do anything you need it to do. Many people will tell you that for very fine work a 0.2mm nozzle/needle is best. However I personally think that the skill you get by practice, practice, practice is more important than the nozzle size. A very skilled person with a 0.2mm nozzle will do amazing work but most of us will simple get more tip drying and clogging. I have a H&S and I have a 0.2mm and 0.4mm nozzles/ needles for it - I can't remember the last time I used the 0.2mm.
 

Flip

SMF Supporter
Joined
Jul 21, 2022
Messages
196
Points
43
Location
Speyside
First Name
John
Your airbrush is fine, It will do anything you need it to do. Many people will tell you that for very fine work a 0.2mm nozzle/needle is best. However I personally think that the skill you get by practice, practice, practice is more important than the nozzle size. A very skilled person with a 0.2mm nozzle will do amazing work but most of us will simple get more tip drying and clogging. I have a H&S and I have a 0.2mm and 0.4mm nozzles/ needles for it - I can't remember the last time I used the 0.2mm.
Thanks Jim.
That simplifies the equation - the only thing that needs sorting is me :tears-of-joy:
Try again tomorrow when it's dry.
I really appreciate the input.
Regards,
John
 
Top