Back to the Eighties with a Sherman (or two)

Jim R

SMF Supporter
Joined
Apr 27, 2018
Messages
13,770
Points
113
Location
Shropshire
First Name
Jim
Looking fine Jakko. Interesting to rework the Verlinden Way. Enamels are in many ways very useful, versatile paints. Just fallen out of fashion.
 

Jakko

Way past the mad part
SMF Supporter
Joined
Apr 28, 2018
Messages
10,861
Points
113
First Name
Jakko
They’re much better for drybrushing than Tamiya acrylics, that’s for sure :smiling3: Though other acrylics with a lot of pigment, like Vallejo, work well too, I don’t think I know any that are as good for drybrushing with as these old Humbrols. Even the newer Humbrol “Super Enamels” aren’t as good, IMHO.
 

Jakko

Way past the mad part
SMF Supporter
Joined
Apr 28, 2018
Messages
10,861
Points
113
First Name
Jakko
Slowly making progress …

I found it interesting that Verlinden essentially recommends what today is known as a pin wash a few decades before (AFAIK) that name had been thought up, using thinned raw umber to simulate the build-up of dirt around detail. I do have raw umber oil paint (a tube I bought probably thirty years ago, and it’s still almost completely full), so I followed this step too. However, it didn’t come out that well, probably due to again my darker base colour and lack of experience with the technique.
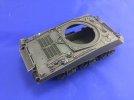
IMG_0430.jpeg

I also painted the tools, again using Verlinden’s method: matt black (Tamiya XF-1) followed by drybrushing with a mixture of raw umber and silver (Humbrol 11 from a tin I bought new myself, long ago) in a few shades. He says to paint the wooden parts with burned sienna oil paint, but as mentioned, I don’t have any. However, burned sienna is a deep red-brown colour, so I just substituted Tamiya XF-64 :smiling3: Though he doesn’t say, I then drybrushed the wood with Humbrol 62 Leather to highlight it.

While I had the matt black out, I also painted the rubber tyres and the spare track links, but these still need to be drybrushed grey.

You may also noticed the white bit on the left engine deck. I had added this earlier, but it apparently broke off without me noticing, and I couldn’t find it anywhere anymore, so after painting the tow cable, I just made a new one. It’s not been painted yet because I also want to paint some of the stowage in olive drab, so I might as well do all of it at the same time.

Talking of stowage:
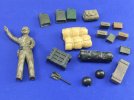
IMG_0431.jpeg

The figure is Italeri, minus his feet because I couldn’t find them and he won’t need them anyway standing in the commander’s hatch. The stowage comes from trawling through some of my spares boxes for “period-correct” bits. The resin bedrolls are Verlinden, the big wooden box and the ammo cans are Tamiya, and everything else is Italeri — all of this would have been available in the mid–late 80s. The Tamiya box is from the M4A3 kit, the green bedroll from Italeri’s M4A1, so you would be likely to see one or both of them on a 1:35 Sherman model at the time :smiling3:
 
Last edited:

Scratchbuilder

SMF Supporter
Joined
Jul 2, 2022
Messages
1,962
Points
113
Location
Luton
First Name
Mike
Looking really good Jakko.
Those old Humbrol paints used to be all that was available except for some from the USA (Testors etc). And yes, I still have a couple of draws of them.
 

Jakko

Way past the mad part
SMF Supporter
Joined
Apr 28, 2018
Messages
10,861
Points
113
First Name
Jakko
When I started building models (age about 7 or 8), Humbrol was also all I had, it being the only paint sold in the shop in the village that also had a modest selection of kits. Once I went to secondary school in the nearest town, I discovered a model shop there, and that also stocked Tamiya so I started using that a lot as well. He sold Revell tins of enamels too, but that was about it, so mostly I used Humbrol and Tamiya by the late 80s (not liking Revell much because it was a bit lesser quality than Humbrol, and as they cost about the same, why would I buy it except for a colour Humbrol didn’t have? :smiling3: ). That’s also why I’m pretty much restricting myself to those for this model: I’m trying to build it as I might have done in the 1980s had my skills been better/had I followed Verlinden’s methods more closely.
 

Jakko

Way past the mad part
SMF Supporter
Joined
Apr 28, 2018
Messages
10,861
Points
113
First Name
Jakko
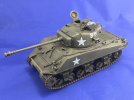
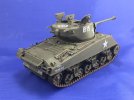
After sticking on the decals, I also installed the tracks:

IMG_0433.jpegIMG_0434.jpeg

The markings are all from the Italeri Sherman, ones I picked pretty much at random from the sheet and applied where they made sense.

I painted the metal bits of the tracks first, with Tamiya XF-64 red brown followed by drybrushing with more of Verlinden’s metal mixture. Once that had dried I painted the rubber parts matt black and drybrushed them with grey.

You can clearly see the worst part of the Italeri Sherman here: the unbending nature of the tracks (and these are even from a 1990s kit when they were in metal grey plastic that was less stiff than the black ones from the 80s).
 
Last edited:

Jim R

SMF Supporter
Joined
Apr 27, 2018
Messages
13,770
Points
113
Location
Shropshire
First Name
Jim
That looks very nice indeed Jakko. The tracks don't look bad, certainly don't detract from the build.
You said "back to the eighties". A nostalgic trip to your youth.
 

Jakko

Way past the mad part
SMF Supporter
Joined
Apr 28, 2018
Messages
10,861
Points
113
First Name
Jakko
Definitely, though better painted than I could have done 30+ years ago :smiling3:

The tracks look OK, but they are very much too stiff to sit well around the wheels, especially the drive sprocket. You can’t see it in the photos above because of the angle, but they also lift up off the return rollers and skids in a way no real track ever would. If I had had a set of the old Tamiya Sherman tracks I would have used those instead, they were much softer and fit far better.
 
Top