Churchill Mk. IV AVRE with Small Box Girder Assault Bridge Mk. II

Richard48

SMF Supporter
Joined
Apr 27, 2018
Messages
1,430
Points
113
Location
Clacton on sea
First Name
Richard
Hi Jakko.
Thought id pop by.I went to our local.Ipms meeting last night and one of the guys brought in the same model you are doing.I told him to check your build out.Lack of mojo has stopped me dead in my tracks.I just watch you guys creating for now.
Keep going dude.
Richard
 

Jakko

Way past the mad part
SMF Supporter
Joined
Apr 28, 2018
Messages
11,035
Points
113
First Name
Jakko
I went to our local.Ipms meeting last night and one of the guys brought in the same model you are doing.I told him to check your build out.
Nice, it’ll be interesting (for you, anyway, I suppose :smiling3: ) to see the difference in how the two come out. And thanks for pointing people to my efforts :smiling3:

Lack of mojo has stopped me dead in my tracks.
Happens to all of us, you’ll get past it and be eager to build things again soon :smiling3:

I just watch you guys creating for now.
Keep going dude.
I certainly intend to — I have an LCA I want to build, that I won’t let myself start until this one is done …
 

Jack L

SMF Supporter
Joined
Jul 25, 2018
Messages
1,013
Points
113
First Name
Jack
Looking good @Jakko. Just building the fascine version…your tips along the way, especially the running gear have been a massive help.
 

Jakko

Way past the mad part
SMF Supporter
Joined
Apr 28, 2018
Messages
11,035
Points
113
First Name
Jakko
Just building the fascine version…
I also want to build that one at some point, as two were sent to Walcheren too. Only one made it ashore, though, and then promptly got stuck when trying to maneuvre off the side of an SBG bridge:

AVRE G42 met man.jpg

Not the bridge from the tank I’m modelling, BTW — that was to the left of this photo. The winch frame of the tank that carried the bridge that this tank got stuck on, is visible at the lower right of the photo. The man is standing on its track guard.

This particular fascine-carrying AVRE is interesting (for a given value of …) in that it not only has the later type of track, which only two AVREs in the operation appear to have had, but one track is on backwards at that.

your tips along the way, especially the running gear have been a massive help.
Cool :smiling3: I always hope somebody finds it useful when I explain things, so glad it helped :smiling3:

More superb work Jakko your attention to detail is inspirational
Thanks :smiling3:
 

Jakko

Way past the mad part
SMF Supporter
Joined
Apr 28, 2018
Messages
11,035
Points
113
First Name
Jakko
The turret is now largely, or possibly entirely, done:

IMG_9781.jpeg

The bin on the rear has been fitted, with waterproofing tape along all its edges as per the manual (which makes me wonder how waterproof the bin was in general, if the crew was supposed to tape up every edge …) as well as acrylic texture gel around the aerial bases and the periscope on the front roof. I also added a bracket on the left rear from a bit of photoetched fret, because one can be seen there in a photo of the real tank, even though I don’t have a clue what it was for.

On the rear mudguards, I added four bolts on each side:

IMG_9779.jpegIMG_9780.jpeg

These are hexagonal punchings glued to the mudguards, and when dry, I drilled an 0.5 mm hole in them and glued in a piece of rod, and then another hexagonal bit on top to represent the nut that was on the end of most of these bolts.

These make me suspect that this particular tank used to carry spare bogies here at some point in its career, as modellers like to fit but which I haven’t seen in many photos of real AVREs. 
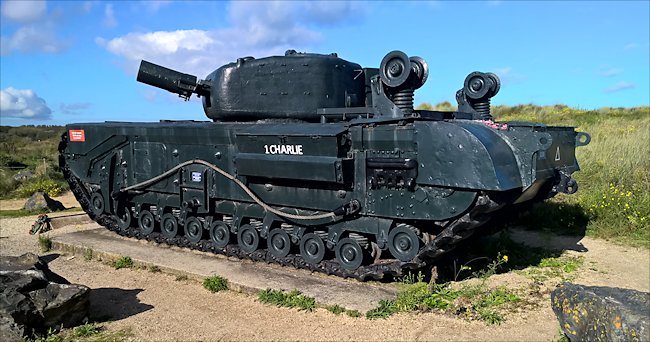
The monument tank in Graye-sur-Mer has them, though:

graye-sur-mer-churchill-avre-tank.jpg


The cable system for the bridge includes a quick-release mechanism that AFV Club supplies, of course, but it’s obvious it can be improved if you compare it to a photo of the real thing:

IMG_9775.jpeg

This is from The Funnies by Geoffrey W. Futter, and I put the kit part on the photo to show how it differs. I also found this illustration in De Tank issue 211 (August 2011) for which Maarten Weers wrote an article about building the Resicast SBG conversion set:

IMG_9776.jpeg

This differs from the photo, though, and I ended up detailing the release gear mostly per the photo:

IMG_9778.jpeg

That is, I cut away the curved bar and replaced it with a curved strip, and also removed the thing inside the opening and replaced it by one on the side. There is also a bolt head on that, but you can’t see it in the photo because it’s a little overexposed.
 
Last edited:

Jakko

Way past the mad part
SMF Supporter
Joined
Apr 28, 2018
Messages
11,035
Points
113
First Name
Jakko
Thanks — unlike some other endeavours, photo interpretation gets easier with practice :smiling3: The difficult bit is finding photos that show what you want to know, and my experience is that Google is very often not your friend for that. Good books on the subject are usually much better sources, but you then have the problem of remembering what is (or might be) in them and finding it again. Which is why I reorganised my library a few years ago so the books are sorted by country and then by subject :smiling3:
 

Jakko

Way past the mad part
SMF Supporter
Joined
Apr 28, 2018
Messages
11,035
Points
113
First Name
Jakko
The tank itself is now mostly done:

IMG_9782.jpegIMG_9783.jpeg

Still loose are the turret, the winch cage and the exhaust pipes, to make it easier to paint everything. I also still need to add the plates over the horizontal parts of the exhausts for the same reason, as well as the tie rods that hold the wading ducts onto the tank, as those would very much get in the way for all the rest of this. The rods for the rear duct even go through the winch cage …

IMG_9784.jpeg

On the outsides of the side ducts, I had to add six pairs of tabs from plastic strip. The kit parts have them, but they all broke off due to handling the model. My advice is to leave the air intakes (step 25 of the instructions) off until the rest of the hull is far enough complete that you feel you can fit the ducts right away as well.

The tow cables use the kit’s eyes, but the cables themselves are from nylon cord, about 0.7 mm in diameter. The kit supplies black thread, but I think it’s too thin and it also doesn’t have much of a steel cable texture. Also, the instructions say to use 110 mm, but if you do that they will be far too taut (see Ian’s recent Mk. III), so I used 115 mm instead.
 

Jakko

Way past the mad part
SMF Supporter
Joined
Apr 28, 2018
Messages
11,035
Points
113
First Name
Jakko
The wading ducts are held on by tie rods, turnbuckles and hooks, all of which you get in the kit. However, most are a bit thick, fragile, bendy and/or hard to clean up, so I decided to replace all but the turnbuckles by 0.5 mm brass rod. Since the rods for the side (inlet) trunks are Y-shaped, I soldered them from two pieces. The hooks were very hard to bend from brass, so I used 0.5 mm copper wire instead after a few attempts. Next, I drilled out the ends of the turnbuckles and glued the hooks into them; the rods won’t be until after painting the model, when I can actually fit everything.

I then primed them with Mr. Surfacer, but forgot to take a photo of them unpainted:

IMG_9786.jpeg

The tie rods for the rear (exhaust) duct aren’t there because they’ll be simple, straight rods that I didn’t make yet. The outer ends of the Y-rods haven’t been primed because I made them much longer than necessary so I can cut them to length later, and also, this gave me something to hold onto when painting :smiling3:

I also sprayed the ducts and the winch cage SCC 2 brown with AK paint (the water-based acrylics, not the lacquer ones):

IMG_9788.jpeg

I will spray the rest of the tank SCC 15 olive drab, as there are colour photos of Churchills before the Normandy landings in OD with brown ducts, so I decided to do that here too. There’s no way of knowing which colour the real tank was, but this makes for a nice contrast.
 

Jakko

Way past the mad part
SMF Supporter
Joined
Apr 28, 2018
Messages
11,035
Points
113
First Name
Jakko
After having sprayed the ducts on Friday, I wanted to paint the rest of the model on Saturday. A heatwave had different ideas, though — after putting masking tape on the ducts on Saturday afternoon, I had had enough of the heat so left the model like this:

IMG_9810.jpeg

Today, I decided to be smarter and air the attic (and thus, my modelling room) for most of the day so it wouldn’t get too hot, which seems to have worked: around 20:00, it was bearable there. Not cold or even cool by any means, but at least it wasn’t hot anymore :smiling3: So I persevered and sprayed the rest of the model olive drab:

IMG_9811.jpeg

For this I used Mike Starmer’s mixture for SCC 15 (British olive drab) of five parts Tamiya XF-81 RAF dark green, one part XF-58 olive green and one part XF-71 cockpit green. I had mixed this up for my Grant Canal Defence Light and still had plenty left. However, as I felt it was too pale on the CDL, I mixed in some XF-1 flat black.

I also sprayed the tracks with a random mixture of X-9 brown and XF-1 flat black, but didn’t photograph them.
 
Last edited:

Jakko

Way past the mad part
SMF Supporter
Joined
Apr 28, 2018
Messages
11,035
Points
113
First Name
Jakko
Now it’s less hot in my hobby room, I sprayed the tank some more:

IMG_9866.jpeg

First Mig SCC 2 in blotches over the wading ducts, because it’s lighter and more mustard-brown than the AK SCC 2 I used for the base colour, which is more a milk-chocolate brown. On the SCC 15 olive drab, I added highlights with Mig IDF Green, which is a kind of pale OD.
 

Jakko

Way past the mad part
SMF Supporter
Joined
Apr 28, 2018
Messages
11,035
Points
113
First Name
Jakko
After drybrushing the whole model with Revell light olive, I applied an all-over wash from Army Painter Strong Tone, thinned very roughly 1:1 with water — as in, using my brush to add water to the drop of paint on the palette until it looks right :smiling3: This is a comparison shot to try and show the effect:

IMG_9869.jpeg

The left mudguard and wading duct (at the top) have not had the wash applied, the rest of the model has. The effect is fairly subtle, more so once it has dried (as here) than when the wash is still wet, but you can see it by comparing the round recesses on the front mudguards and the strength of the shadows around raised detail.
 

Tim Marlow

Little blokes aficionado
SMF Supporter
Joined
Apr 27, 2018
Messages
16,971
Points
113
Location
Somerset
First Name
Tim
Coming together nicely Jakko. The strong tone wash has worked well. You use strong tone the same way I use Vallejo model wash black. I find it too strong undiluted so go fifty fifty with a drop or two of flow aid. After all, you can always add another layer if you want more shading.
 

Jim R

SMF Supporter
Joined
Apr 27, 2018
Messages
13,937
Points
113
Location
Shropshire
First Name
Jim
Looking very good Jakko. The wash has worked well and it nicely toned down.
 
Top