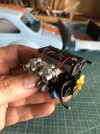
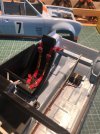
1/12 Ford Escort Mk1

Jabba

SMF Supporter
Joined
Feb 7, 2023
Messages
40
Points
33
Location
Saint-Yrieix-la-Perche (87500)
First Name
Peter
Hello all, I have recently purchased a Kit of a Mk1 Ford Escort in 1/12 scale.
This is not from any of the major manufacturers (they've missed their chance there...) but is from a guy in Germany who 3D prints them.
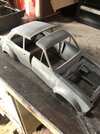
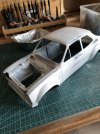
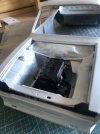
Its the first time I've had any kit like this. It has no instructions (it really doesn't need any) and a lot of the sub-assemblies come in one piece, e.g. the whole back axle has the springs and dampers attached. Its going to be quite a challenge as the surface of all the parts is quite heavily ridged and the main body is split down the middle (I presume due to the size of his printer) and distorted at the point it joins together (have a look at the pictures)
I would value your advice if you have worked with similar things before e.g what the best glue to use? I'm not even sure what its made of, certainly not the normal styrene. Do they use some form of resin?
I think it will take me the rest of the year and through the winter just to get the body right! But I'm looking forward to the end result as I have plans for the paint job.
Any advice appreciated.
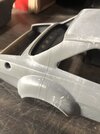
IMG_5845.JPGIMG_5846.JPGIMG_5844.JPG
 

Dave Ward

Still Trying New Things
SMF Supporter
Joined
Apr 27, 2018
Messages
8,654
Points
113
Location
South Gloucestershire
First Name
David
Hello all, I have recently purchased a Kit of a Mk1 Ford Escort in 1/12 scale.
This is not from any of the major manufacturers (they've missed their chance there...) but is from a guy in Germany who 3D prints them.
Its the first time I've had any kit like this. It has no instructions (it really doesn't need any) and a lot of the sub-assemblies come in one piece, e.g. the whole back axle has the springs and dampers attached. Its going to be quite a challenge as the surface of all the parts is quite heavily ridged and the main body is split down the middle (I presume due to the size of his printer) and distorted at the point it joins together (have a look at the pictures)
I would value your advice if you have worked with similar things before e.g what the best glue to use? I'm not even sure what its made of, certainly not the normal styrene. Do they use some form of resin?
I think it will take me the rest of the year and through the winter just to get the body right! But I'm looking forward to the end result as I have plans for the paint job.
Any advice appreciated.
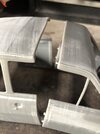
View attachment 489525View attachment 489524View attachment 489523
Peter,
3D printed & it looks like it may be FDM printed, in which case it's probably PLA ( polylactic acid ), but may be resin printed. Either way, you can stick it with superglue ( CA ), but for major joints - like those across the bodywork - I'd be inclined to use Araldite, or equivalent 2-part epoxy glue. This would give you a little 'wiggle' time to ensure alignment before the glue irretrievably sets!
Minor distortions can be treated with a hot air gun, or hot water, but a little at a time & with caution.
PLA has a melting point around 210C, so don't use any power tools for sanding - use wet & dry paper by hand. wet! I've useed AK white putty to fill holes - although I've never a joint across a car, which will need a lot of careful finishing - I do use cutter bits in my rotary tool, but with care, just to remove excessive chunks of material.
Painting & finishing, I just use my normal acrylic primers & topcoat by airbrush, although my 3D printed models are usually 1/35 military models & a superfine finish isn't really appropriate!
What material are the windows made of? I'd be curious to know, as I've a few trucks that could be improved by glazing.
I'd be very interested in your progress with this model, I can see it'll need a lotof work!
Dave
 

Jabba

SMF Supporter
Joined
Feb 7, 2023
Messages
40
Points
33
Location
Saint-Yrieix-la-Perche (87500)
First Name
Peter
Thanks Dave, That's a comprehensive answer which helps a lot. I'll be going gently with it and will probably fix a whole sheet of styrene to the roof underside with a very strong glue to ensure the filler and paint don't crack. I did have a go at straightening the roof with a heat gun, but with limited success.
The windows are ; front and back - vacuum formed, sides - a sheet of thin clear plastic that you have to cut to size yourself. (this is going to be the nearest to scratch building you can get)
Thanks again
Peter
 

Dave Ward

Still Trying New Things
SMF Supporter
Joined
Apr 27, 2018
Messages
8,654
Points
113
Location
South Gloucestershire
First Name
David
Thanks Dave, That's a comprehensive answer which helps a lot. I'll be going gently with it and will probably fix a whole sheet of styrene to the roof underside with a very strong glue to ensure the filler and paint don't crack. I did have a go at straightening the roof with a heat gun, but with limited success.
The windows are ; front and back - vacuum formed, sides - a sheet of thin clear plastic that you have to cut to size yourself. (this is going to be the nearest to scratch building you can get)
Thanks again
Peter
Peter,
for the side windows, cut a card, or paper template for best fit, before transferring onto the flat plastic - saves a lot of grief!
Dave
 

stillp

SMF Supporter
Joined
Nov 17, 2016
Messages
7,224
Points
113
Location
Rugby
First Name
Pete
Peter,
for the side windows, cut a card, or paper template for best fit, before transferring onto the flat plastic - saves a lot of grief!
Dave
I wish I'd thought of that before I made the windscreen for my M35 truck - I scrapped 4 clear plastic ones before i decided one was near enough.
Pete
 

Jabba

SMF Supporter
Joined
Feb 7, 2023
Messages
40
Points
33
Location
Saint-Yrieix-la-Perche (87500)
First Name
Peter
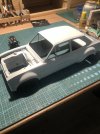
Well, Heres a progress report. I bit the bullet and glued the two halves together, but , as I mentioned before, I stuck a sheet of plastic card to the underside of the roof to give it some rigidity. I've lost count of how many times I filled/sanded/primered the body to lose all the gaps and rough surfaces, but actually the stuff its made of is quite soft and responds well to wet sanding, so it could have been worse. You can see some of the stages in the pics below. I've decided to do it in Gulf racing colours (even though such a car never existed) and got the correct shades from Spot Model in Spain, so I'm itching to get some colour on it , but I still have some prep to do on the interior.
.IMG_5964.JPG
IMG_5970.JPG
Engine mock-up
IMG_5973.JPG
 

Jabba

SMF Supporter
Joined
Feb 7, 2023
Messages
40
Points
33
Location
Saint-Yrieix-la-Perche (87500)
First Name
Peter
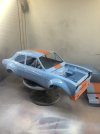
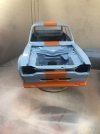
Update time! So I've finally got some colour on it. These pics are after 3 umpteen coats of primer, 3 coats of Blue, 3 coats on the orange stripe and two coats of 2K clearcoat. Now to let it dry and properly cure before the
decals.IMG_5983.JPGIMG_5984.JPG
I know its not perfect. I had tow big instances of paint bleeding under the (Tamiya) masking tape which I had to re-do, but overall I'm fairly pleased as its the first thing in such a large scale I've done with an airbrush. Still a lot to learn.
 

Andy T

SMF Supporter
Joined
Apr 26, 2021
Messages
1,964
Points
113
Location
Sheffield
First Name
Andy
Looking good Peter, love that colour scheme.

I'm working on a full sized one at the moment but it's all boring white...
 

Jabba

SMF Supporter
Joined
Feb 7, 2023
Messages
40
Points
33
Location
Saint-Yrieix-la-Perche (87500)
First Name
Peter
Wow! If you've got a real one you must be a millionaire, the prices for those are sky high! (If only I'd kept all the cars I had in my 20's....:disappointed2::confounded:)
 

tr1ckey66

SMF Supporter
Joined
Mar 6, 2009
Messages
3,686
Points
113
First Name
Paul
Hi Peter
This looks like a challenging build. The seam down the middle of the 2 body halves looks a real tester but you’ve come through it with flying colours. Talking of which, the Gulf paint job look great.
Cheers
Paul
 

Andy T

SMF Supporter
Joined
Apr 26, 2021
Messages
1,964
Points
113
Location
Sheffield
First Name
Andy
Wow! If you've got a real one you must be a millionaire, the prices for those are sky high! (If only I'd kept all the cars I had in my 20's....:disappointed2::confounded:)
I wish!

It's a customers with a twin cam conversion. And yes, he is :smiling3:
 

adt70hk

I know its a bit sad but I like quickbuild kits!!!
SMF Supporter
Joined
Sep 4, 2019
Messages
9,501
Points
113
First Name
Andrew
That's coming on very nicely indeed!!
 

Jabba

SMF Supporter
Joined
Feb 7, 2023
Messages
40
Points
33
Location
Saint-Yrieix-la-Perche (87500)
First Name
Peter
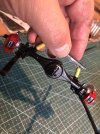
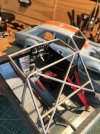
A bit more progress, but its fighting me all the way. Had to get the belts, wiring etc from other sources. the front and rear axles and suspension come as one part, but they are very brittle and so I've ended up having to make replacments for some parts . IMG_5995.JPGIMG_6005.JPGIMG_5994.JPGIMG_6004.JPG
But slowly getting there...
 

Stefee

SMF Supporter
Joined
Feb 12, 2023
Messages
204
Points
93
Location
HemelHempstead
First Name
Stefan
Fantastic detailing and scratching, Going to try something similar on my current job - a Tamiya 1/24 Lotus 7.
 
Top