1/32 Revell BAE Red Arrows Hawk

HAWKERHUNTER

SMF Supporter
Joined
Feb 29, 2012
Messages
699
Points
93
First Name
Steve
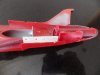
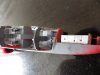
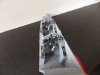
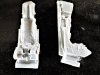
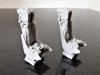
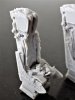
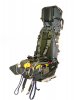
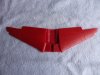
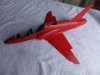
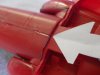
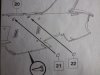
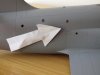
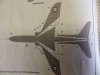
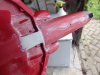
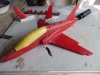
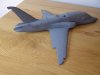
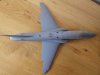
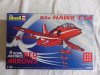
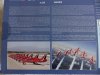
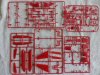
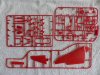
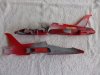
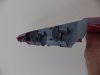
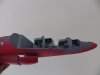
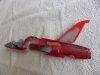
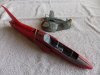
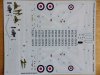
Hi. Hope you are all well at this difficult time. Just started work on my 1/32 Red Arrow Hawk. My last 3 offerings were in 1/72 scale so its really great to be back working on a larger scale kit. At least I can see the parts. So first impressions of this kit. Think I paid under £20 for this kit which I dont think is a bad price for a large model. Kit contains 155 parts which are moulded using red plastic which seems a little strange to work with at first but you soon get used to it. The parts are fairly detailed but do seem a little thin. One of the wing halves had quite a nasty warp in it but it shouldn't be a problem to sort out. Some really nice design work by Revell on the air intake and exhaust pipe work which all fits together really well inside the fuselage. Instructions are clear and the decals seem up to Revells usual high standard. Only thing I wont be using are the stock kit ejector seats and decal printed seat harnesses. As this aircraft has a large cockpit area on view I have ordered 2 Martin Baker Mk10 Quickboost resin ejector seats which are far more detailed than the ones provided in the kit. I will probably be looking for some guidance from the painting experts among you in order to get that pristine Red Arrow gloss finish, something that I have never tried on a model before. So here are a few of the sprue shots but as you can see work has already started.

Steve
 

Attachments

  • IMGP0108.JPG
    IMGP0108.JPG
    183 KB · Views: 25
  • IMGP0109.JPG
    IMGP0109.JPG
    189 KB · Views: 22
  • IMGP0110.JPG
    IMGP0110.JPG
    233.4 KB · Views: 18
  • IMGP0111.JPG
    IMGP0111.JPG
    272.2 KB · Views: 14
  • IMGP0112.JPG
    IMGP0112.JPG
    273.6 KB · Views: 16
  • IMGP0114.JPG
    IMGP0114.JPG
    237.6 KB · Views: 19
  • IMGP0115.JPG
    IMGP0115.JPG
    65 KB · Views: 22
  • IMGP0116.JPG
    IMGP0116.JPG
    52.3 KB · Views: 23
  • IMGP0117.JPG
    IMGP0117.JPG
    168.1 KB · Views: 25
  • IMGP0118.JPG
    IMGP0118.JPG
    195.3 KB · Views: 25
  • IMGP0122.JPG
    IMGP0122.JPG
    121.6 KB · Views: 22
  • IMGP0123.JPG
    IMGP0123.JPG
    88.1 KB · Views: 19
Last edited:

Jack L

SMF Supporter
Joined
Jul 25, 2018
Messages
1,009
Points
113
First Name
Jack
I have been thinking about something like this. Will watch with interest.
 

colin m

Moderator
Staff member
Moderator
SMF Supporter
Joined
Dec 26, 2008
Messages
8,608
Points
113
Location
Stafford, UK
First Name
Colin
Very nice. I wouldn't mind one of these myself one day. A word of warning with a gloss finish, sometimes it can be a bit to much in a scale model. It's just my opinion, but often, a satin finish can look better.
 

langy71

SMF Supporter
Joined
Apr 27, 2018
Messages
1,566
Points
113
Location
Nottingham
First Name
Chris
Nice start to it Steve, i'll be following along on this..(if i can squeeze a chair in amongst the regulars), i've got the 'black' re-box of this in the stash, so i'll be watching your every post carefully in the hope it will stir up the need to break mine out...
 

HAWKERHUNTER

SMF Supporter
Joined
Feb 29, 2012
Messages
699
Points
93
First Name
Steve
Very nice. I wouldn't mind one of these myself one day. A word of warning with a gloss finish, sometimes it can be a bit to much in a scale model. It's just my opinion, but often, a satin finish can look better.
Thanks for logging in everyone. I get what your saying Colin. Ive always used a satin finish in the past but was hoping to get that polished look. I will be spraying up a spare wing from a previous build to practice on but if all else fails it will get the satin finish.
 

HAWKERHUNTER

SMF Supporter
Joined
Feb 29, 2012
Messages
699
Points
93
First Name
Steve
Morning all. So just bringing you up to speed on my Red Arrow Hawk progress

Photo 1 and 2... I noticed that when joining the two halves together there were a couple of areas where I had to apply a little more pressure than I would have liked to close the gap. Ive never been one for gluing and clamping just in case the seam comes apart later in the build, usually after its all painted so I spent some time filing down some internal parts just to take the pressure off the join. Reasonably happy with the fit now but just to be on the safe side I have added some plastic card reinforcement on two areas of the seam that I know will need a bit of filler. These will ensure a strong bond which I find really helps on these larger builds. The fuzz halves are now ready to join up.

Photo 3 I have removed all the control dial impressions and flattened the control panel surfaces. They have now been primed, painted, glossed and the control panel decals added. I have always had a lot of luck with Revell decals and I think they have done a good job with these. Happy with the result.

Photo 4,5 and 6. The Quickboost Ejection seats have arrived. Early indications are that will fit perfectly once they have been prepped. Massive improvement on the stock kit ones and lots of fine detail to work with.

Photo 7. This is what I need to try and replicate when I paint the resin seats up.

Main work today will be finishing some detail in the cockpit, making up the wings so I can test fit into the fuzz and then joining the fuzz halves together. Will need to do that in stages.

Steve
 

Attachments

  • IMGP0126.JPG
    IMGP0126.JPG
    82 KB · Views: 16
  • IMGP0127.JPG
    IMGP0127.JPG
    103.6 KB · Views: 16
  • IMGP0125.JPG
    IMGP0125.JPG
    80.4 KB · Views: 16
  • IMGP0129 (2).JPG
    IMGP0129 (2).JPG
    105.5 KB · Views: 16
  • IMGP0131 (2).JPG
    IMGP0131 (2).JPG
    92.4 KB · Views: 16
  • IMGP0132 (2).JPG
    IMGP0132 (2).JPG
    89.2 KB · Views: 18
  • mk10-1.jpg
    mk10-1.jpg
    24.7 KB · Views: 18
Last edited:

HAWKERHUNTER

SMF Supporter
Joined
Feb 29, 2012
Messages
699
Points
93
First Name
Steve
Morning All. Progress to date.
Picture 1. The two fuzz sides have been joined. No major dramas there. I did it in stages using a combination of epoxy and standard plastic glue. Some work to do on the seams but nothing major.
Picture 2. The undercarriage bay internals were fitted and the wings joined.
Picture 3. After doing some preliminary filing of the seams on the fuzz the wings and fuzz were joined. Slight bit of filing needed on the wings to get a good fit into the fuzz.
Picture 4. Slight ridge where front of the wings join fuzz. First bit of a bad fit that I have come across so far with this kit. No way to avoid this ridge without causing misalignment in other areas of the wing fit so it will just have to be sorted with some filler.

So apart from that now begins the slow process of flatting the seams and some re scribing where required.
 

Attachments

  • IMGP0135.JPG
    IMGP0135.JPG
    168.1 KB · Views: 12
  • IMGP0136.JPG
    IMGP0136.JPG
    181.1 KB · Views: 12
  • IMGP0139.JPG
    IMGP0139.JPG
    164.8 KB · Views: 14
  • IMGP0138.JPG
    IMGP0138.JPG
    72.9 KB · Views: 15

HAWKERHUNTER

SMF Supporter
Joined
Feb 29, 2012
Messages
699
Points
93
First Name
Steve
Morning All. Before I bring you up to speed on progress just wanted to mention a couple of building points for anyone planning on building one of these that may save some heart ache in your build. Please don't think I'm trying to teach anyone to suck eggs its just that I do suffer from go fever sometimes and go charging in making stupid mistakes and I just want to give you the heads up to avoid anyone making the same.

Photo 1 and 2 show the plans where you are asked to fit several small round clear parts into the fuselage. These could cause more trouble than their worth when it comes to masking them off for painting of the fuzz later so I have left mine out. I intend to make them up using Micro Kristal Klear after the fuzz is painted and varnished.

Photo 2 and 3. Again the plans would have you install 6 under wing hard points early in the build. However one look at the decals clearly show that if fitted these will interfere with the decals that go on the underside of the wing. So to make the decal process less problematic I have left these off and will fix them after the decals have been applied.

Also because the tail plane of the Hawk is all moving and doesn't need any filling where it joins the fuzz these can be added at the conclusion of the build and make handling of the model easier during the finishing process. Another thing that I am pondering over is when to add the ailerons and rudder. The hinges for these are very fragile and I just know in my clumsy hands they will get broken if fitted too soon .

The final 4 pictures show the model after some filling, sanding and the first coat of Humbrol primer. Fairly pleased with the result and think I have managed to sort the seams out on the first attempt. Bit of re scribing to complete then it will be time to think about the distinctive top coat of red.

Have a great day everyone.
 

Attachments

  • IMGP0148.JPG
    IMGP0148.JPG
    168.5 KB · Views: 14
  • IMGP0149.JPG
    IMGP0149.JPG
    81.5 KB · Views: 13
  • IMGP0142.JPG
    IMGP0142.JPG
    137.2 KB · Views: 14
  • IMGP0143.JPG
    IMGP0143.JPG
    95.1 KB · Views: 16
  • IMGP0146.JPG
    IMGP0146.JPG
    110.4 KB · Views: 14
  • IMGP0147.JPG
    IMGP0147.JPG
    111.3 KB · Views: 13
  • IMGP0150.JPG
    IMGP0150.JPG
    97.6 KB · Views: 14
  • IMGP0151.JPG
    IMGP0151.JPG
    104 KB · Views: 15
Last edited:

HAWKERHUNTER

SMF Supporter
Joined
Feb 29, 2012
Messages
699
Points
93
First Name
Steve
As my mojo is in overdrive and before I start any more new builds I have made myself dig out two half completed builds. The first one is this BAE 1/32 Hawk. For the life of me I dont know why I stalled with this one as its a gorgeous kit and wasn't causing me any problems. So here we go, second attempt at completion.

You can see that the model is in a filthy state having been home to various garage creatures like Spiders etc. So today I will be cleaning it up, going through the plans and cracking on where I left off. The interesting part for me will be getting that super Red gloss finish that we associate with the red arrows and also tackling the super detailed resin ejector seats. I haven't got a clue where to start with painting those but here goes.

IMGP0059.JPGIMGP0060.JPGIMGP0061.JPGIMGP0062.JPG
 

Ian M

Administrator
Staff member
Administrator
Moderator
SMF Supporter
Joined
Dec 14, 2008
Messages
19,807
Points
113
Location
Falster, Denmark
First Name
Ian
Now when you said you had dug this one up again I didn't think you ment literally. lol.
A nice looking birk the Hawk and look great in a nice glossy paint job. Mine's black.
 

HAWKERHUNTER

SMF Supporter
Joined
Feb 29, 2012
Messages
699
Points
93
First Name
Steve
Now when you said you had dug this one up again I didn't think you ment literally. lol.
A nice looking birk the Hawk and look great in a nice glossy paint job. Mine's black.
No. Wasn't joking Ian. Been sat in my stash cabinete at the back of the garage, (which is my man shed where all the modeling goes on), for 4 years. First job was washing the thing down and refreshing my memory as to where I had got too. progress has been made and it is now clean and No1 on the runway/workbench.
 

Miko

SMF Supporter
Joined
Feb 10, 2024
Messages
334
Points
93
Location
Lincolnshire
First Name
Miko
No. Wasn't joking Ian. Been sat in my stash cabinete at the back of the garage, (which is my man shed where all the modeling goes on), for 4 years. First job was washing the thing down and refreshing my memory as to where I had got too. progress has been made and it is now clean and No1 on the runway/workbench.

Nothing ruins the aesthetic of a well presented model like spider pooh!! Ha!

Always good to see a stalled project resurrected

Miko (sadly no space for 1/32)
 
Top