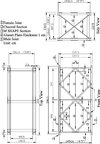
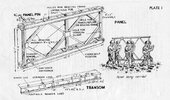
Bailey Bridge part dimensions?

Dave Ward

Still Trying New Things
SMF Supporter
Joined
Apr 27, 2018
Messages
8,644
Points
113
Location
South Gloucestershire
First Name
David
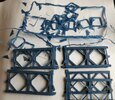
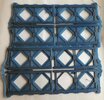
I've been looking for parts for a Bailey bridge - for 3D printing, & found one on Thingiverse by user 'WindhamGraves' which looks very good, BUT, for some reason there's no scale quoted. It consists of the individual pieces like the top bracing frame
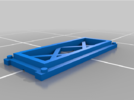
bracing_frame.png
If I can find actual dimensions for the full size parts, I can work out what scale the model is in ( I suspect 1/50 ), and work from there - I was looking at 1/35.
All this may come to nothing, I haven't looked closely at the files, and it could be that the parts may only be printable in resin, not FDM PLA - but the built up model looks pretty good
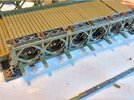
1016220736a_HDR.jpg
If it is possible, it will take a long time -- there are a lot of parts!
Dave
 

Neil Merryweather

SMF Supporter
Joined
Dec 29, 2018
Messages
4,424
Points
113
Location
London
First Name
Neil
Should be ok for fdm Dave, as long as the parts are suitable for printing flat. If a piece has detail both sides and you want to avoid supports, you can always print it in two halves by sinking it halfway into the build plate in your slicing software.
 
  • Wow
Reactions: JR

minitnkr

Rabble & escape committee member
SMF Supporter
Joined
Apr 27, 2018
Messages
6,717
Points
113
Location
Dayton, OH
First Name
Paul
web.mst.edu/~rodgersda/umcourses/ge342/Bailey%20Bridge-revised.pdf should get you all you need.
 

Dave Ward

Still Trying New Things
SMF Supporter
Joined
Apr 27, 2018
Messages
8,644
Points
113
Location
South Gloucestershire
First Name
David
web.mst.edu/~rodgersda/umcourses/ge342/Bailey%20Bridge-revised.pdf should get you all you need.
`Paul,
WOW, thanks, that's exactly the info I needed. I've just analysed the models & the they are actually 1/96 , so I can scale the models up by 2.74, which will give 1/35. - Had a few moments of dithering, there - I had to remember about feet & inches! It's not the most intuitive of measures, when you think about it................
Dave
 

minitnkr

Rabble & escape committee member
SMF Supporter
Joined
Apr 27, 2018
Messages
6,717
Points
113
Location
Dayton, OH
First Name
Paul
Unless you have feet & thumbs & have no need to be precise. Kinda like my deed in Cambridge Ohio that measured my plot, "...more or less...":smiling:
 

Dave Ward

Still Trying New Things
SMF Supporter
Joined
Apr 27, 2018
Messages
8,644
Points
113
Location
South Gloucestershire
First Name
David
The printer is muttering away to itself - the parts are very much in the style of 'limited run kits' they need a bit of cleaning up, but the shape is there - I'll have to prime them before I can really tell how it's going - a job for tomorrow
Dave
 

Dave Ward

Still Trying New Things
SMF Supporter
Joined
Apr 27, 2018
Messages
8,644
Points
113
Location
South Gloucestershire
First Name
David
Thanks to everybody for the references - I've managed to find a copy of TM5-277, the US technical manual for Bailey Bridges - very much overkill - but at least it does provide pictures with names of some of the more obscure parts!
I've printed out quite a few bridge parts & have just primed them - I'll put some pictures up tomorrow.
Dave
 

Jakko

Way past the mad part
SMF Supporter
Joined
Apr 28, 2018
Messages
10,796
Points
113
First Name
Jakko
Oh, but careful: then you’ll be making American-sized parts, they won’t be interchangeable with British ones :smiling3: (This was an issue IRL. If you want to paint the bridge, use SCC 2 brown for British, but olive drab for American: the British parts were kept that way throughout the war so engineers could tell at a glance which was which.)
 

Dave Ward

Still Trying New Things
SMF Supporter
Joined
Apr 27, 2018
Messages
8,644
Points
113
Location
South Gloucestershire
First Name
David
Oh, but careful: then you’ll be making American-sized parts, they won’t be interchangeable with British ones :smiling3: (This was an issue IRL. If you want to paint the bridge, use SCC 2 brown for British, but olive drab for American: the British parts were kept that way throughout the war so engineers could tell at a glance which was which.)
It's American at the moment - I've only got Olive Drab primer! Some of the parts look OK, but others won't stand close inspection - I've just looked at the Bronco Bailey Bridge - I reckon I print one for less than £5 - although the number of printer hours would run into days! I'm tempted to make up a couple of sections, to see how they fit before deciding on whether to a complete bridge - because it's modular, it could be pretty long..............
Dave
 

Dave Ward

Still Trying New Things
SMF Supporter
Joined
Apr 27, 2018
Messages
8,644
Points
113
Location
South Gloucestershire
First Name
David
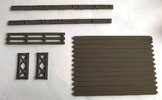
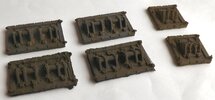
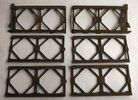
These are parts that I've printed so far - I've just given them a rough clean up & primed:
DSCF4179.JPGDSCF4180.JPGDSCF4181.JPG
All these are scaled to 1/35 ( nominally ), but I've used the same scaling factor for all parts, so they will be the correct size relatively.............
I've had difficulty in printing one part - the riband or curb ( road edging ), only a simple shape, but It just wouldn't stick - I've had to resort to printing it on a raft & using a glue pen - and now it seems to be printing happily. There are number of cross braces, the walkway & its' supports that I haven't printed yet, but these are smaller, simpler parts.
There a number of YouTube videos on the Bailey Bridge - the animated cartoons are the best for seeing what goes where!
Dave
 

minitnkr

Rabble & escape committee member
SMF Supporter
Joined
Apr 27, 2018
Messages
6,717
Points
113
Location
Dayton, OH
First Name
Paul
I have it in 1/87. It takes a lot of components to go a short span w/any capy. Your pcs. look good in the pics.
 

stillp

SMF Supporter
Joined
Nov 17, 2016
Messages
7,220
Points
113
Location
Rugby
First Name
Pete
Oh, but careful: then you’ll be making American-sized parts, they won’t be interchangeable with British ones :smiling3: (This was an issue IRL. If you want to paint the bridge, use SCC 2 brown for British, but olive drab for American: the British parts were kept that way throughout the war so engineers could tell at a glance which was which.)
What was the difference? We hadn't gone metric then.
Pete
 
  • Like
Reactions: JR

adt70hk

I know its a bit sad but I like quickbuild kits!!!
SMF Supporter
Joined
Sep 4, 2019
Messages
9,496
Points
113
First Name
Andrew
Looking good so far Dave!
 

Jakko

Way past the mad part
SMF Supporter
Joined
Apr 28, 2018
Messages
10,796
Points
113
First Name
Jakko
What was the difference? We hadn't gone metric then.
Not sure off the top of my head, but IIRC it had to do with the differences in engineering standards.
 

Dave Ward

Still Trying New Things
SMF Supporter
Joined
Apr 27, 2018
Messages
8,644
Points
113
Location
South Gloucestershire
First Name
David
Not sure off the top of my head, but IIRC it had to do with the differences in engineering standards.
Major differences were in threads - UK used BSW & BSF ( Whitworth & Fine ), US used UNC & UNF - Unified National Coarse & Fine. That's is why spares for a Packard Merlin, wouldn't fit a Rolls-Royce Merlin. There were other differences, mainly in tolerancing & drawing conventions................
Dave
 

Dave Ward

Still Trying New Things
SMF Supporter
Joined
Apr 27, 2018
Messages
8,644
Points
113
Location
South Gloucestershire
First Name
David
Wasn't at all sure this was going to print, it is just about the maximum the build plate can hold. The slightest error in levelling could mean the print not sticking, or generally failing!
DSCF4182.JPG
It could also be affected by the build plate temperature varying at the corners. It looks like the bottom right quadrant is either a bit cooler, or a tad lower. Either way it worked & 10 minutes later
DSCF4183.JPG
The excess plastic just pulls away mostly, it needs going over with a scalpel to cut away any hairy bits & then a sanding stick to remove the rough edges
Dave
 

Neil Merryweather

SMF Supporter
Joined
Dec 29, 2018
Messages
4,424
Points
113
Location
London
First Name
Neil
Now you're cooking ,Dave!
An observation- you might be able to eliminate the texture on the top surfaces if you have an 'ironing' option in your slicing software.
It's supposed to smooth out the build lines on the top surfaces. sometimes its good, sometimes not, but worth checking.
 
Top