Steven
SMF Supporter
- Joined
- May 6, 2018
- Messages
- 489
- Points
- 93
- Location
- Frederiksberg Copenhagen, Denmark
- First Name
- Steven
Not going to do a complete build log as there are plenty out there on the Trumpeteer kit rather I wil focus on aspects of the building where i use aftermsrket parts or do mods
Quarter master's list:
Fruil tracks - I just can't stand vinyl
Panzer art roadwheels - details on the kit vers are indisticnt
Miniarm bmp 2 correct set for commander's cupola - crispier details on ir lights etc.
Et models PE - details
SARAB 2 active protection systems from AGV models ( if i completely mess up building one myself ) becoming more prevalent on MBT, AFVs and even Technicals around the period the dio takes place.
Scratched impro armor on sides. same as above but will prob have been added a a first go - to solution for the crew to give some (mostly moral) support aginst the growing threat of ATGMs from the rebs.
Using Miniarm replacement parts
The miniarm replacement parts (very light gray and pinkish resin and PE) mostly in place:


Try as I might, I could not get the Miniarm PE Bracket to fit properly and To get it to link the light up with the gun barrel would not be feasible so I thinned out the kit part and used that, So Miniarm light and trumpeteer bracket.

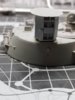
After a bit of fiddling the wiring and bracket is finally in on the commander's cupola

good crisp details on the gun mantlet and the brass barrel is fine on the Miniarm set

Quarter master's list:
Fruil tracks - I just can't stand vinyl
Panzer art roadwheels - details on the kit vers are indisticnt
Miniarm bmp 2 correct set for commander's cupola - crispier details on ir lights etc.
Et models PE - details
SARAB 2 active protection systems from AGV models ( if i completely mess up building one myself ) becoming more prevalent on MBT, AFVs and even Technicals around the period the dio takes place.
Scratched impro armor on sides. same as above but will prob have been added a a first go - to solution for the crew to give some (mostly moral) support aginst the growing threat of ATGMs from the rebs.
Using Miniarm replacement parts
The miniarm replacement parts (very light gray and pinkish resin and PE) mostly in place:
Try as I might, I could not get the Miniarm PE Bracket to fit properly and To get it to link the light up with the gun barrel would not be feasible so I thinned out the kit part and used that, So Miniarm light and trumpeteer bracket.
After a bit of fiddling the wiring and bracket is finally in on the commander's cupola
good crisp details on the gun mantlet and the brass barrel is fine on the Miniarm set
Last edited: