Brave Borderer ships badge

I

IainM

Guest
Hi folks,

I am scratch building a 1:35 Brave and would like to make up a display board for her to match others I have made.

My problem is that, although I have a B&W pikky of the badge (cropped from an old ships postcard) I have no idea of the colours used. Also it would be nice to have a better quality image to play with.

BraveBordererbadge.jpg


Can anyone help please?

Here are a few pikkies of the current state of build:

sternview1.jpg


sidelaunchersred.jpg


portview2.jpg


portview1.jpg


Iain
 
Last edited:
B

Bunkerbarge

Guest
That's not an easy kit to take on as a scratch build and you have made a superb job of it.

Is it R/C or static?
 
I

IainM

Guest
Thanks for your kind comment Richard :smiling:

It's not that hard to build once you get your head around compound curves but there is a surprising lack of meaningful detail available and I have made much use of photographs with a degree of interpretation.

It is R/C and has working lights both navigation and signaling controlled by home made RC switchers, working radar based on a modified SD200 servo and, when I have the dosh, a sound set up from JJC.

I decided early on to go for the simple drive option with a single home made ball raced shaft and tooth belt drive that would give me the ability to tune the performance. The Motor is an MFA Torpedo 500 but I have made room to go up in size if necessary. It currently runs on 12 volt NiCad or NiMHs with a separate 3 volt pack for lighting.

The hull (GRP) dates from the early '80's and was surprisingly good vis a vis thickness and freedom from warping, all of which made life a bit easier. This pretty much set the scale at 1:35 which was fortunate since there are many plastic figure packs in that range that can be modified to add a bit more realism.

Initial 'sea' trials proved promising and she popped up on the plane no trouble at all after some modification to the transom flap to reduce the gap between the flap and the knuckle of the transom (bit like flap fairings on aircraft). However we'll have to see how that changes when all the top hamper is installed!

I have a complete set of build photographs but hesitate to post them 'cause my rate of progress is disgustingly slow these days !! I have been trying to promote some interest on the SFMBC web site with an 'under construction' article but perhaps the ether is already saturated with stuff about Perkasas.

Iain
 
Last edited:
I

IainM

Guest
Thanks for those badges Richard and for the link.

As you say I may have to exercise a bit of artistic license

That model by Peter Stern is really quite something :bravo:

Really gives me something to aspire to - I can see that my planned finish date has just extended :darn:

Thanks again.

Iain
 
R

rjwood_uk

Guest
no problem.

something i read on another modeling forum:

"Don't try to be as good as the people here. Try to be as good as YOU can, and use the folks here for inspiration. I've learned more from seeing the things that bob, bob, another bob and many others are capable of, than I would ever have considered possible before. There are some real magicians with stuff here, and lots of the little bits of tips and ideas have made my models better by leaps and bounds."

nice little piece of advice!

hope all goes well. keep us updated!

Richard
 
I

IainM

Guest
Sea Trials and tweaking

Recently the build process has been concentrating on manufacture of the detail bits and on trying to get the right motor/battery setup.

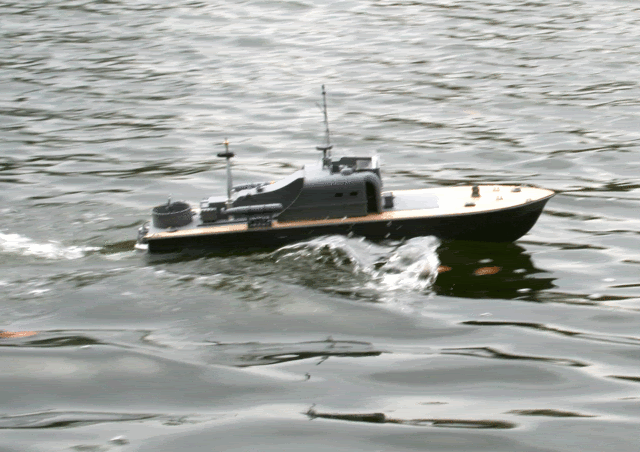
I gave it a test run with a big Johnson motor and a 12 volt NiCad pack. I have no idea of the motor size 'cause the numbers on it don't appear in the mfg web site listings. However it is a brute of a thing with two flux bands and its heavy as well. This went OK but in truth it was really a bit fast, especially on the turns and she sat a bit low at the stern.

I changed for a one size down Johnson (a single flux band) and left the battery at 12 volts. This draws around 1.5 amp free running.

A pond test proved interesting, with a slight improvement in performance but just not getting up on the plane at all (see below).

IMG_2266.gif


I then checked the transom flap setting (approx 1.5deg down) and twiddled the bottle screws to give around 3 degrees up.

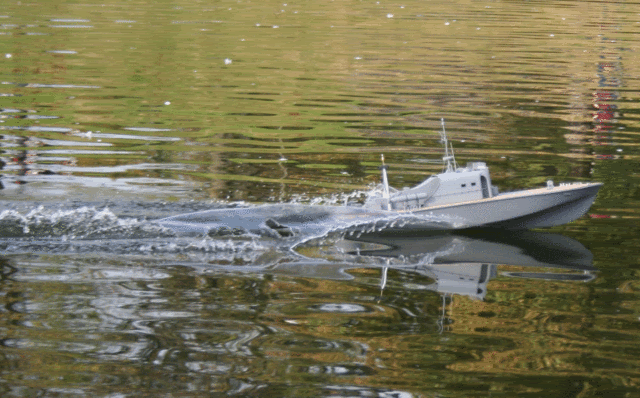
The difference in performance was remarkable! She no longer seemed to be struggling, the break of the bow wave had moved back to around level with the main mast and the forefoot was well clear of the water.

Whoopee ........:music_too

IMG_2281.gif


At this setting the motor was drawing around 3 to 3.25 amps.

Further adjustment of the flap position didn't seem to improve things so it stays at 3deg up at least for the time being.

With the change of trim at high speed I'm getting water into the hull, apparently through the rudder tube. This is one of the plastic moulded ones and the rudder stock is a bit of a loose fit. Clearly a liberal application of silicon grease is not enough to make the seal given how the stern tucks in at high speed. So the next wee project will have to be a tailor made one of brass and if ingenuity makes an appearance, I'll also fit a wee stuffing box on the top end. I'll also increase the tube length a bit (3 to 4 mm) so that the rudder linkage just clears the deck beams.

The next step will be making up a new NiMH battery pack with subC cells to give me greater amperage - probably 3.9amp if I can manage it. Much will depend on the weight though.

I plan a 'saddle tank' design with the pack distributed across the hull bottom. This will give me greater scope to correct the trim by moving the pack backards or furrat.

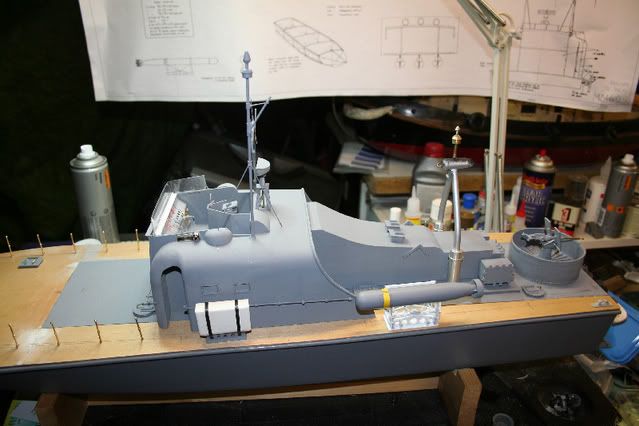
When I get all this done, I'll start fitting the detail stuff; deliberately left off up to now for fear of damage during all the poking about in the bowels :smiling5:

Coming on not bad although I say so myself........

Iain
 
Z

zoedog1

Guest
Iain,

Your model looks great, luv the pic's. I'm also building the Brave Borderer but to 1/16th scale. I posted a thread in june 2007 asking for information on BB as I only had the Model Maker plans which showed very little detail. In the meantime, using these plans I started contruction of the hull using marine ply and had no end of trouble in getting the chine line correct as per the plans.

Well I gave up and the Mark 1 hull now lives high on a shelf in my workshop. I have now started the Mark2 version - the reason being is that I managed to get hold of photocopies of the original Vospers Ltd drawings including hull lines which clearly showed that the Model Maker hull lines were incorrect by a long shot. I figure that if I am going to the trouble of making a model of this size, I want it to be as true to scale as I can get it.

The original BB had its Transom flap set to 3 degrees and was found to be the optimum setting.

Keep up the good work, there are too few modellers that build BB but many Perkasa builders. keep me posted

Martin from down under (Aussie)
 
I

IainM

Guest
Thanks Martin - your kind comments are much appreciated :smiling:

I am slowly progressing with all the detail bits now, having more or less sorted the motor battery stuff for now. Mind you I was talking with a bunch of model shop guys the other day and they fielded a suggestion that I am tempted by i.e. why not use a brushless motor, given the tremendous improvement in power to weight ratio. They were suggesting a 40 size equivalent- direct drive with a 30 or 35mm racing prop. Ho hum. I shall investigate when I'm a bit more flush with cash I think.

In the meantime I have posted a more complete set of pikkies on the SFMBC.net site in Gallery 16 which I'll keep topping up.

I envy you your drawings!! For detail I have been working from photographs with a dint of scaling and some heavy interpretation. Not really sure I've got it right, but ......

Did your drawings give any indication of deck coloration? From my one colour photo it looks like a darker grey than the hull.

I can well appreciate your problems with the chine line. Some considerable time ago I built a 1/16th scale Vosper Admirals Barge and eventually went for double diagonal plank on frame (as per original) using 0.5mm marine ply for the planking, cut over wide. That was not easy and its a simpler hull form too. Mind you it resulted in a very light but tremendously strong hull.

Thanks again and the very best of luck with your build.

Iain
 
Last edited:
Z

zoedog1

Guest
No problems Iain,

I have no colour photo's of BB but I suggest you to contact "John Lambert" - you may be surprised with what John can supply including your requirements on crest colours.

The drawings I have include general arrangement for interior and exterior as when the boat was first laid down

My Mk1 version of BB ended up quite heavy and it was suggested that on the Mk2 version I plank the hull with 3mm balsa then resin with 2 layers fibre glass. Any suggestion from yourself or forum members are quite welcome.

Also, not living in the uk, what is SFMBC abbreviated for

thanks

Martin from Down Under
 
I

IainM

Guest
Sorry Martin! Sometimes forget that many folk do not know ... SFMBC is short for Scottish Federation of Model Boat Clubs. We have the web site SFMBC.NET and use it to try to keep in touch with the widely spread clubs (wide by Scottish standards that is!)

I know that weight can be a problem on larger hulls and that's why I tend to use the double diagonal planking using thin marine ply. It is no heavier than 3mm balsa but is much less prone to damage and stronger. Generally one thin coat of epoxy is all I need (inside & outside) to seal it, followed up by the appropriate colour coat in enamel and a final outside coat of yacht varnish. It's much easier to accommodate the compound curves around the flare at the bow since the plank width can be reduced in those areas.

The BB hull was rubbed down with 600 wet and dry, cleaned with cellulose thinners and then sprayed (2 coats) with Automotive Plastic grey undercoat/primer and then given a couple of coats of acrylic satin finish varnish (automotive again!). Gives a great finish - not too shiny and sheds dirt very well.

I used the plastic primer 'cause its intended for use on rigid plastic components on vehicles, so seems to stick like sh*t to a blanket!!

Thanks for the suggestion of talking with John L; somehow I'd never thought of that!!

Iain
 
A

andi4x4

Guest
H Iain,

I have just started building the BB myself from the same MM plans you are using and a fibreglass hull that was supplied with them. I first purchased this kit about 15 years ago and began building, then lost interest. Over the years the hull has been re-used a number of times on "pleasure craft" build that I have done, but, now I am building the BB proper as I have just recently moved to the Isle of Man and dicovered that the model boat club here meet on a pond within walking distance of my house !

But, getting back to the point -

I was wondering if you could let me have some of the photos you have done of yours - particularly the transom flap and exhaust flap details - I would like to incorporate working exhaust flaps and transom flap into my model. I am not building a fully true scale model - I have neither the skills nor time ( or patience ! ) to spend months working on a project - if it looks the part ten feet out on the pond I will be happy !

The hull I am using is 35 inches x 9 1/2 inches - ( 1/32 or 1/35 scale ? ) so I am also looking for some Bofors for it. I have seen the Italeri kits in 1/35 scale - they seem like good value ( and appear to include the gunner and co, too ) but i have also seen some 1/32 scale guns on a website - which do you think would be the best size for the boat I am building ?

All the best

Andi
 
M

Madmuffer

Guest
Hi Guys

I'm new here and hoping to be allowed to jump on the Brave Borderer bandwagon.

How I got a 'Brave' hull, plans and pictures is a long story (and I've had 'em a long time), but suffice to say I've decided to convert the large lump of glass-fibre sitting on my garage shelf into a living, breathing vessel.

As it's been a while since I last built a boat (Aesop was a mere slip of a lad) I thought I'd start by having a nose around on the internet - saw Pete Stern's absolutely superb BB model and nearly decided not to bother getting my tools out!

Then I came across this site, where the natives seem to be exceeding friendly and, like me, maybe in need of a bit of help, encouragement and support whilst striving to achieve Pete's level of excellence. So here I am, bearing gifts from the darkest recesses of Cornwall.

It seems you have a need for detail information on the Borderer, and I just happen to have some photos available that could help out. They are original Vosper Thorneycroft (Porchester Works) plates of the BB, black & white photos about 10" X 8". Not being sure of the correct protocol in forums such as this, and not wishing to incur the wrath of the webmaster by filling his server with huge files, I've scanned the pictures at 10cm X 8 @ 90 dpi and uploaded the images to my gallery page - please feel free to have a look.

I'm happy to scan and e-mail the pictures to you, or anyone else, if interested (presumably it's okay to make contact outside of this forum?). At full size and 300 DPI it is possible to read many of the labels on the instruments (in the bridge picture), but the file is nearly 2.5 Mb - so it's probably best sent outside of the site if that's permitted. Alternatively I can scan a smaller area at higher resolution (up to about 1200 dpi) if required.

Back to my own attempt to build a Borderer - the hull and plans are from Kingston Mouldings at 1:32 scale, and the plan seems to be very accurate when compared to the photos There are still 101 things that are not clear, and I'm sure I'll be back with a thousand and one questions to you and the other members.

In the meantime, the very best of luck with your own model, please get in touch if you want the photos.
 
M

Madmuffer

Guest
Hi Andi

I'm working on a Kingston Mouldings hull and plan. The hull is 35" long (without the exhaust platform and plane) and is quoted on the plan as being 1:32 scale - 3/8" to the foot.

Like you I've been looking for suitable Bofors kits (although it'll be a long time before I actually need it!), but can't see any that are the same version as that fitted to BB. I assume you've come across Pete Stern's model on the web? His representations of the gun are incredibly accurate to the original (see my galery), but all the kits I've seen have a couple of seats for the gun operators, which I can't see on the original.

Do you think the guns could have had some form of automatic control system?

All the best

Pete
 
A

adross

Guest
1/32 Bofors Gun And Vosper Fittings

Hi Guys,

Just thought that you may be interested to know that Nautical Marine Models latest products include some 1:32 parts for BB and the export-market versions (Perkasa, Soloven, etc), which includes a superb 1:32 Bofors gun - Nautical Marine Models - model boat manufacturer - There are also mushroom vents, box vents, various lockers, hatches, etc.

Note, Thanks for the full-size BB photos Pete, please may I take you up on your offer of the larger scans when you have a few minutes?

Andy
 
Last edited:
M

monst

Guest
40mm VOSPER GUN

\ said:
Hi AndiI'm working on a Kingston Mouldings hull and plan. The hull is 35" long (without the exhaust platform and plane) and is quoted on the plan as being 1:32 scale - 3/8" to the foot.

Like you I've been looking for suitable Bofors kits (although it'll be a long time before I actually need it!), but can't see any that are the same version as that fitted to BB.

Pete
Hi Pete, just to let you know that I bought my 40mm BB Bofors Gun from Nautical Marine Models, they're based in the North West of England. The Gun arrived quickly and the kit they supply is very detailed and accurate in 1:32 scale for BB Boats.

Heres a picture off their website:


Hope this helps. MONST
 
M

Madmuffer

Guest
\ said:
Note, Thanks for the full-size BB photos Pete, please may I take you up on your offer of the larger scans when you have a few minutes?

Andy
Hi Andy

Find your way to my home page (link under my contact details) and add 'pictures.htm' (without quotes) in the adress bar after BraveBorderer/

The pictures page will load (slowly - they're fairly large files!). I couldn't fit the last couple within my allotted space, so e-mail me from the site and I'll put them up for you.

Are you planning to build a Brave?

Pete
 
M

martindu

Guest
\ said:
Hi GuysI'm new here and hoping to be allowed to jump on the Brave Borderer bandwagon.

How I got a 'Brave' hull, plans and pictures is a long story (and I've had 'em a long time), but suffice to say I've decided to convert the large lump of glass-fibre sitting on my garage shelf into a living, breathing vessel.

So here I am, bearing gifts from the darkest recesses of Cornwall.

It seems you have a need for detail information on the Borderer.

I'm happy to scan and e-mail the pictures to you, or anyone else, if interested (presumably it's okay to make contact outside of this forum?). At full size and 300 DPI it is possible to read many of the labels on the instruments (in the bridge picture), but the file is nearly 2.5 Mb - so it's probably best sent outside of the site if that's permitted. Alternatively I can scan a smaller area at higher resolution (up to about 1200 dpi) if required

In the meantime, the very best of luck with your own model, please get in touch if you want the photos.
Hi Pete,

If your offer for the Brave Borderer pic's is still available - I'm very interested as you appear to have some shots that I don't. My photo's are mainly internal but fortunate to have the Origianl Vosper drawings.

I'm currently building a 1:16 scale beast and hopefully to scale.

Should you require reimbursment - just let me know

Martin down under
 
L

lscc61114

Guest
Hi Guys,

I'm very interested in this thread,

If you would like to put your Brave or Perkasa on my site please drop me a mail,

also if anyone can support me with more information or pictures of these boats i'd like to here from you.

Best Regards

Dave
 
Top