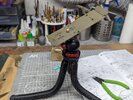
Comet-ed

Andy T

SMF Supporter
Joined
Apr 26, 2021
Messages
1,963
Points
113
Location
Sheffield
First Name
Andy
This all started when I ordered a new Tamiya Comet from John at the shop. Don't ask me how but I managed to add it to my basket twice so ended up with a pair of them :upside:

2023-05-02 19.01.13.jpg

Pretty soon I got the idea for a little scene so got hold of these guys too

2023-05-02 19.00.59.jpg


The story goes that our brace of Comets happened upon a rickety looking wooden bridge and one of them decided to have a go at crossing, with disastrous results. So we'll have a stuck tank, a collapsed bridge, another tank trying to tow it out, and a few guys lolling around watching the fun.

I may even add another vehicle or so to spice things up if I find something suitable but I still haven't got a full plan in my head. However, after some consultation with Mr Race I have an idea of where to get started (thanks again John) and I have a couple of pictures for inspiration, so will see what develops in my head as I build the two tanks.

First job was to get cracking on the tanks. Being a very newly released Tamiya kit I expect that part to be easy peasy, but to make painting easier later on I started with an idea developed from something I once discussed with the late great Simon T. He would glue a nut or use a rivnut on the base of an AFV to take a bolt which could then be used for mounting somewhere. Taking that a step further I've put some 1/4-20 brass inserts, made for the 3d printing lot, into the base of each tank. These have the same thread as most photographic equipment so I can bolt them to my mini tripod and paint/weather from all angles :nerd:

(more glue was added after these pictures)

2023-05-03 14.36.40-1.jpg

2023-05-03 14.37.18-1.jpg


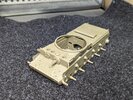
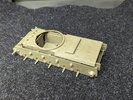
Not much longer after that we have a good chunk of the lower hull together. At first some of the parts looked like they weren't going to fit :surprised: but it turned out the clearances were just so fine that a little "click" was needed to get everything into place and fitting perfectly. Marvellous engineering.

2023-05-03 20.49.36.jpg

2023-05-03 20.49.43.jpg

That's all for now but this may be a long one (by my standards) so please bear with me.
 

Andy T

SMF Supporter
Joined
Apr 26, 2021
Messages
1,963
Points
113
Location
Sheffield
First Name
Andy
There'll be a little water Jim but the pictures I have show more like a large ditch, about 2 tank lengths wide, so it won't be a large expanse.

As usual the Tamiya kits are a bit lacking in fine detail but go together really well. I've looked at pe and even a fantastic resin upgrade kit but that isn't really my style, and with 2 to buy it would be a bit spendy, so they'll be pretty much oob.
 

JR

Member of the Rabble and Pyromania Consultant
SMF Supporter
Joined
May 26, 2015
Messages
17,275
Points
113
Location
lincs
First Name
John
Andy with all that happening I don't think you need to worry about any upgrades, it's not as if it's a stand alone model .
Will follow from the front row , tea would be nice and a bicy please.
 

stillp

SMF Supporter
Joined
Nov 17, 2016
Messages
7,224
Points
113
Location
Rugby
First Name
Pete
Good idea to use a tripod thread Andy.
Pete
 

Andy T

SMF Supporter
Joined
Apr 26, 2021
Messages
1,963
Points
113
Location
Sheffield
First Name
Andy
Good to have you John. The wife's RA is responding well to treatment so she may be able to knock up a batch of buns for the VIP's

It also lifts it to a more comfortable working height for me Pete. Better than balancing it on a stack of boxes!
 

The Smythe Meister

Born to be WILD....... until about 9pm
SMF Supporter
Joined
Jan 30, 2019
Messages
5,731
Points
113
Location
Devon
First Name
Andy
This all started when I ordered a new Tamiya Comet from John at the shop. Don't ask me how but I managed to add it to my basket twice so ended up with a pair of them :upside:
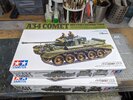
View attachment 480778

Pretty soon I got the idea for a little scene so got hold of these guys too
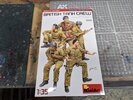
View attachment 480779


The story goes that our brace of Comets happened upon a rickety looking wooden bridge and one of them decided to have a go at crossing, with disastrous results. So we'll have a stuck tank, a collapsed bridge, another tank trying to tow it out, and a few guys lolling around watching the fun.

I may even add another vehicle or so to spice things up if I find something suitable but I still haven't got a full plan in my head. However, after some consultation with Mr Race I have an idea of where to get started (thanks again John) and I have a couple of pictures for inspiration, so will see what develops in my head as I build the two tanks.

First job was to get cracking on the tanks. Being a very newly released Tamiya kit I expect that part to be easy peasy, but to make painting easier later on I started with an idea developed from something I once discussed with the late great Simon T. He would glue a nut or use a rivnut on the base of an AFV to take a bolt which could then be used for mounting somewhere. Taking that a step further I've put some 1/4-20 brass inserts, made for the 3d printing lot, into the base of each tank. These have the same thread as most photographic equipment so I can bolt them to my mini tripod and paint/weather from all angles :nerd:

(more glue was added after these pictures)
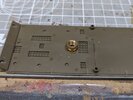
View attachment 480780

View attachment 480781


Not much longer after that we have a good chunk of the lower hull together. At first some of the parts looked like they weren't going to fit :surprised: but it turned out the clearances were just so fine that a little "click" was needed to get everything into place and fitting perfectly. Marvellous engineering.
View attachment 480782

View attachment 480783

That's all for now but this may be a long one (by my standards) so please bear with me.
Oh,a Comet :smiling3:
This is on my wish list,and the exact same Tamiya kit too,needless to say that I'm in and shall be picking up tips from the sidelines ;)
 

Andy T

SMF Supporter
Joined
Apr 26, 2021
Messages
1,963
Points
113
Location
Sheffield
First Name
Andy
Thanks Ian.

I don't know about you picking up tips Andy but I've already noticed a few places where I'll need to ignore the instructions or I'd have to paint it in one solid lump, wheels, tracks & all!
 

Andy T

SMF Supporter
Joined
Apr 26, 2021
Messages
1,963
Points
113
Location
Sheffield
First Name
Andy
Thanks Andrea.

I was going to title the build "The tale of two Comets" but it's a bit close to that of Steve/Stona's
 

Andy T

SMF Supporter
Joined
Apr 26, 2021
Messages
1,963
Points
113
Location
Sheffield
First Name
Andy
Cheers Paul, it came in handy for this bit too.

This afternoon was wheels & tracks. It's a job I despise and I'd probably build more tanks if it wasn't for this stage, but there we go. I was really pleased to get it out of the way but then realised I've got it all to do again on the other one :worried: I don't know how others approach link & length tracks, but since I took pictures I might as well share how I do them.
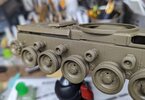
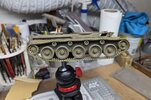
After the wheels & rollers were built I cemented them to the suspension with the merest dab of TET, just enough to hold them in place. Note how one of the return rollers has an alignment pin to make it impossible to get the tracks in the wrong place & direction.

2023-05-04 19.20.57.jpg

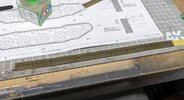
Tamiya provide a template for laying the track pieces out but in the past I found it hard to build them on their sides like that, and it left room for user error, so instead I put the pieces in order on a strip of masking tape and lightly cemented the joints. 19 pieces here.


2023-05-04 19.20.14.jpg

After a few minutes, once the glue had started to take effect but was still pliable, I wrapped the lot around the wheels, adding the lower section too. Once it was all in place I went round the outer edges of each joint with more cement, taking care not to stick the links to any wheels.

2023-05-04 19.28.04.jpg

I left this for half an hour while I went and had something to eat (chicken fajita wraps washed down with a fruity little red. Yummy )

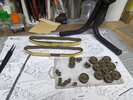
The tracks had hardened up by this time so I carefully removed them. The minimal cement on the wheels meant I could just rotate them to crack 'em free, and everything slid off nicely. I then went around the track joints once again with TET and will leave the tape on overnight.

I'll then be left with everything in separate pieces which should help with the painting. I'll no doubt add a bit of damage to the rubber tyres before I get to that stage.

2023-05-04 20.20.46.jpg

I'm probably teaching many of you to suck eggs, but if my method helps just one person out it'll be worth the typing.
 

adt70hk

I know its a bit sad but I like quickbuild kits!!!
SMF Supporter
Joined
Sep 4, 2019
Messages
9,499
Points
113
First Name
Andrew
This all started when I ordered a new Tamiya Comet from John at the shop. Don't ask me how but I managed to add it to my basket twice so ended up with a pair of them :upside:


Firstly Andy, you have to love a Comet!!

Even it was essentially a Cromwell on steroids, it nonetheless looks the business and something that has hints of a modern MBT. I've always had a soft spot for these ever since I had a couple of Matchbox ones as a kid.

Secondly, I can only commend you on your restraint. I have heard good things about these Tamiya kits, so I think you did well on not succumbing to more!!

I on the other hand suffered catastrophic shopping cart issues a couple of years ago, when Vespid bought out their VERY highly rated 1/72 Comet. This was the first Braille scale Comet since the Matchbox ones and so I ordered one from John or so I thought........

..........when I opened the box there were four inside......that's right......FOUR......you could hear the credit card complaining.......but absolutely NO idea how it happened....NONE whatsoever! :surprised::surprised:;)

Will try to drop in between my study sessions!

Good luck with the build.

ATB.

Andrew
 

Andy T

SMF Supporter
Joined
Apr 26, 2021
Messages
1,963
Points
113
Location
Sheffield
First Name
Andy
Four!

Now that would make a really interesting diorama... :thinking:
:tears-of-joy:
 
  • Haha
Reactions: JR

PaulinKendal

SMF Supporter
Joined
Jul 13, 2021
Messages
1,061
Points
113
Location
The Lake District
First Name
Paul
Cheers Paul, it came in handy for this bit too.

This afternoon was wheels & tracks. It's a job I despise and I'd probably build more tanks if it wasn't for this stage, but there we go. I was really pleased to get it out of the way but then realised I've got it all to do again on the other one :worried: I don't know how others approach link & length tracks, but since I took pictures I might as well share how I do them.
After the wheels & rollers were built I cemented them to the suspension with the merest dab of TET, just enough to hold them in place. Note how one of the return rollers has an alignment pin to make it impossible to get the tracks in the wrong place & direction.

View attachment 480842

Tamiya provide a template for laying the track pieces out but in the past I found it hard to build them on their sides like that, and it left room for user error, so instead I put the pieces in order on a strip of masking tape and lightly cemented the joints. 19 pieces here.


View attachment 480843

After a few minutes, once the glue had started to take effect but was still pliable, I wrapped the lot around the wheels, adding the lower section too. Once it was all in place I went round the outer edges of each joint with more cement, taking care not to stick the links to any wheels.

View attachment 480844

I left this for half an hour while I went and had something to eat (chicken fajita wraps washed down with a fruity little red. Yummy )

The tracks had hardened up by this time so I carefully removed them. The minimal cement on the wheels meant I could just rotate them to crack 'em free, and everything slid off nicely. I then went around the track joints once again with TET and will leave the tape on overnight.

I'll then be left with everything in separate pieces which should help with the painting. I'll no doubt add a bit of damage to the rubber tyres before I get to that stage.

View attachment 480846

I'm probably teaching many of you to suck eggs, but if my method helps just one person out it'll be worth the typing.
I don't build tanks, but if I ever did - this is ingenious!
 

Andy T

SMF Supporter
Joined
Apr 26, 2021
Messages
1,963
Points
113
Location
Sheffield
First Name
Andy
Always a good feeling to get the tracks made up and know they fit.
Shame I have another set to do on the next one.
I don't build tanks, but if I ever did - this is ingenious!
Cheers Paul, I try and avoid them when I can.

I don't mind sanding 4, 6, or 8 wheels but 40 is a bit much lol. Some have many more!
 
Top