de Havilland DH.87B Hornet Moth-New model build-A-Long

wonwinglo

SMF Supporter
Joined
Apr 18, 2004
Messages
6,754
Points
113
First Name
Barry
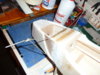
Started this DH.87B Hornet Moth scratch build a week ago and I thought it would make a good build-A-Long to show others how models are made from the ground up.

339655

This delightful gentlemans carriage was built in the pre war period as a two seat touring aeroplane,several examples are still flying today.

339656

Construction was started by building the cockpit area 'box' which an unusual outward bulge.


( Can the site owner please look into this posting problem,once again I cannot post more pictures,it keeps coming up with error messages )
 

Steven000

WWII and nuts.
SMF Supporter
Joined
Aug 29, 2018
Messages
1,945
Points
113
Location
Belgium
First Name
Steven
Interesting project Barry, looking forward to see the rest of the pictures. :thumb2:
Steven
 

wonwinglo

SMF Supporter
Joined
Apr 18, 2004
Messages
6,754
Points
113
First Name
Barry
This will be a live build,ie the model is currently this moment under construction,updates will appear as further parts have been built.
 
Last edited:

Steven000

WWII and nuts.
SMF Supporter
Joined
Aug 29, 2018
Messages
1,945
Points
113
Location
Belgium
First Name
Steven
Last edited:

wonwinglo

SMF Supporter
Joined
Apr 18, 2004
Messages
6,754
Points
113
First Name
Barry
The fuselage has been framed up and added to the centre cabin module,the reason for this is because on the Hornet Moth the fuselage curves outwards at this point.
Horizontal strips are made from square barbecue spears,very strong.

P1050701.JPG
 

wonwinglo

SMF Supporter
Joined
Apr 18, 2004
Messages
6,754
Points
113
First Name
Barry
The side frames are strengthened with 1/64th Miralyte ply biscuits giving triple gluing ( correct spelling by the way) area.

339680
 

wonwinglo

SMF Supporter
Joined
Apr 18, 2004
Messages
6,754
Points
113
First Name
Barry
Live from the workbench we continue the build on the Hornet Moth......

339753

The cabin side bulge has been sheeted with 1/32nd balsa grain vertical

339754

Both the upper and lower surfaces of the fuselage have been cross sheeted,the structure is very light and strong.

339755

339756

Brass tubing added to cowling where undercarriage compression strut is located,nose cowl tacked into place for further blending when dry.

339757

Engine module just prior to sanding,cowl upper is Miralyte ply

339758

Nose cowling was hollowed out from the back

339759

Simple tailskid was made from piano wire which is bound with thread to the sternpost then flooded with thin cyno,I have found a suitable tailwheel in my bits and pieces.
 

wonwinglo

SMF Supporter
Joined
Apr 18, 2004
Messages
6,754
Points
113
First Name
Barry
Live from the workshop as the tailplane,fin and rudder get underway on the Hornet Moth.

339977

Firstly the shapes were transferred onto Depron sheet and then outlined with square balsa for the hinged surface areas and for the rounded areas strips of 1/32nd x 1/4 balsa were soaked in hot water then gently curved around the basic shapes,no adhesive was applied to these at this stage as they will be allowed to dry out and then removed as the preformed shapes hold because the stresses were removed from them,then adhesive will be applied and the strips held in place while they dry with pins.
This method of construction makes for very strong and light tail surfaces.
 

wonwinglo

SMF Supporter
Joined
Apr 18, 2004
Messages
6,754
Points
113
First Name
Barry
Live from the workshop the latest parts to be built up,the stripwood wound around the tailplane and fin/rudder has dried out so each individual piece was removed in turn and laminated together wrapping them tightly around the Depron inner membrane shape,once dried off these assemblies will be sanded smooth with the edges rounded off.

The nose portion has been added to the main fuselage and this is standing upright drying out overnight.

340011


340012
 

wonwinglo

SMF Supporter
Joined
Apr 18, 2004
Messages
6,754
Points
113
First Name
Barry
Live from the workshop as the HORNET MOTH tail assembly gets worked on,the cloth hinges have been fitted and some blending work done around the nose area,all the tail surfaces got a good sanding outside blending in the edges,a brass tailplane joiner has been epoxied into place also.

340136

The fabric hinges done old school,still the most reliable hinge.

340137

Note the three balsa outline laminations around the tail surfaces,warp free and strong and light.

340138

Similar treatment for the fin and rudder.

340139

Balsa infills where the micro servos are located.

340140

Some blending going on around the nose to fuselage joint
 

colin m

Moderator
Staff member
Moderator
SMF Supporter
Joined
Dec 26, 2008
Messages
8,604
Points
113
Location
Stafford, UK
First Name
Colin
Well now, proper modelling from the days before plastic etc appeared on the scene. I'm looking forward to this one.
 
  • Like
Reactions: JR

wonwinglo

SMF Supporter
Joined
Apr 18, 2004
Messages
6,754
Points
113
First Name
Barry
The Build-A-Long continues this very moment as the undercarriage starts to get formed and soldered up,the blanks for the wing ribs have been made up into sets ready for the bandsaw to be cut out en block with the required slots for the wing spars.

340322

The lovely shape of a classic de Havilland aeroplane the Hornet Moth touring light aeroplane.

340323

Time to wrestle with the piano wire,the main legs are soldered up after binding with thin brass wire,another leg has to be added forward,there are sanding jobs to do as can be seen but the rain is pouring down outside,but plenty of other tasks to be done inside.

340325

Wing ribs ready for the bandsaw,the blanks are first taped together and PVA adhesive run all around the outside,this forms a membrane so the ribs can be cut as a block with great accuracy,I used to use screwed rod and wing nuts to hold the blanks together but this is far easier and I use it all the time to make lots of duplicate parts as there always is on wing ribs.

340326

340327

340328
 

Attachments

  • P1050760.JPG
    P1050760.JPG
    104.5 KB · Views: 0

wonwinglo

SMF Supporter
Joined
Apr 18, 2004
Messages
6,754
Points
113
First Name
Barry
Last job before I retire for the evening,the Build-A-Long has concentrated on the undercarriage this evening and the forward legs were just fitted,careful bending is essential on these wire undercarriages,the hole between the legs is where the lipo battery goes so the positioning is important,once the epoxy has gone off then some fabric is glued neatly around the joint,same as the rear postion of the legs,the next task is to make up the undercarriage fairing from balsa,this fairing in full sized practise is an airbrake as the fairing swivels,not that effective though !

340367

340368

340369

May old Hornet Moth was G-ADKC which is the one being modelled,this picture was taken at Sywell aerodrome where they had a Hornet Moth gathering a year ago.
 
  • Like
Reactions: JR

wonwinglo

SMF Supporter
Joined
Apr 18, 2004
Messages
6,754
Points
113
First Name
Barry
A dash into the shed in between showers moving some models away from doorway to outside so I could work to cut the wing ribs on the bandsaw,a nice set of crisp wing ribs all ready for making a start and laying down the root rib and tip rib as seen here in the Build-A-Long.

340394

340396

340397

Wingtip,root and tip rib,leading edge and trailing edge laid onto the depron lower membrane,a system used many times to avoid warps,once this stage has cured then the remaining ribs will be added and the upper spars fitted too,all this repeated four times.
 

colin m

Moderator
Staff member
Moderator
SMF Supporter
Joined
Dec 26, 2008
Messages
8,604
Points
113
Location
Stafford, UK
First Name
Colin
That's a clever trick with the ribs. A great time saver.
I see you have someone inspecting your work, or is it nearly dinner time ?
 

wonwinglo

SMF Supporter
Joined
Apr 18, 2004
Messages
6,754
Points
113
First Name
Barry
That's a clever trick with the ribs. A great time saver.
I see you have someone inspecting your work, or is it nearly dinner time ?

Chief inspector,he sits by my side all the time watching every move and knows he gets treats.
 

wonwinglo

SMF Supporter
Joined
Apr 18, 2004
Messages
6,754
Points
113
First Name
Barry
Wing construction under way,the ailerons will be built into bottom wings only once all four panels have been built,same as with the spars which will be built into the two centre sections.

340666

340668


340669


The undercarriage fairings were also fabricated and a slot recessed into them where the piano wire fits snugly.

340672
 

JR

Member of the Rabble and Pyromania Consultant
SMF Supporter
Joined
May 26, 2015
Messages
17,275
Points
113
Location
lincs
First Name
John
Brilliant work Barry, see the inspector has managed to just about fit in the box lid.:smiling3:
 

wonwinglo

SMF Supporter
Joined
Apr 18, 2004
Messages
6,754
Points
113
First Name
Barry
Brilliant work Barry, see the inspector has managed to just about fit in the box lid.:smiling3:

Yes I put it these for the scrap balsa offcuts and he took it over,cats love card boxes,sometimes he falls out of the box !
 
  • Haha
Reactions: JR
Top