Dougs VW Beetle

Waspie

SMF Supporter
Joined
Mar 13, 2023
Messages
2,481
Points
113
Location
Portland - Dorset
First Name
Doug
Todays the day! It arrived last week but I decided to have a week to chill with family and go out and do a few things. (When I say 'I'decided, it's more SWIMBO decided).
Anyway, here it is!
The box!
IMG_0943.JPG
Contents, not as many parts as the Challenger but I can see a few problems. Mainly getting a good finish on the bodywork!!

Box contains a few sprue's
1 x Chrome parts.
1 x Clear windows etc
1 x Black parts, mainly engine, transmission and floor pan.
1 x Cream coloured parts, mainly body parts
1 x Body shell.
1 x bag of tyres or tires if your across the pond!!
IMG_0944.JPG
Contents laid out!
IMG_0946 2.JPG

Been busy yesterday and today, duplicating instructions. Writing notes etc on copy. As I'll be doing a couple of mods if I can source a few bits and pieces. Adding my own paint scheme to reflect my own Beetle that it will be a rough copy of. (Shame it came in left hand drive format). To that end I have a nearly full bottle of a rust effect paint!!!! (Read into that what you will).
I also copied a couple of engine diagrams so that I get the routing of the HT leads right as well as the one electrical wire on the engine.
Also have a plan to replicate the window washer tubing which was quite unique on the Beetle as the spare tyre was used to supply the pressure for the window washer. You had to pump a little push/pull lever on the dash to get water into the windscreen. So I will try and copy the tubing for tin the bonnet area.

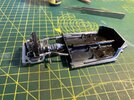
I did make a start on the boxer engine but stopped as in reality I need an aluminium paint before I proceed further.

Oh, and did I mention, I've never done a car before so again - another first!!!! Variety, the spice of life.
 

Waspie

SMF Supporter
Joined
Mar 13, 2023
Messages
2,481
Points
113
Location
Portland - Dorset
First Name
Doug
It's been a busy few days!!!
But! Managed to grab a swift hour today. I think I've managed to sort out a plan of action. Ordered a couple of paints and they arrived last night so I thought it would be nice to try and make a start.
I had already cemented a few parts together on Wednesday. Both sides of the engine and that was about it.
Today I set about priming the engine parts, floor pan and a few bibs and bobs to enable me to start painting the separate engine parts the correct colours.
TBH, I think I spent longer cleaning the AB than actually spraying.
That'll be me for a few days now, family visiting tomorrow and I don't think the 'she demon' aka grand daughter will let me!!
Anyway - here's the rimed bits!! Hopefully more progress next week.
IMG_0950.JPG

Edited add on bit!
I did decide to add the HT wires and the engines one electrical lead, just have to source the right size 'things' to use which will look ok. To that end I printed off diagrams of the engine compartment and the routing of the cabling.
The thing I found funny looking at many of the engine pics, I don't think I found any two engines that were the same!! I know when I had mine 1:1 Having had 3 engines in it non of them were standard!!
I also intend to replicate the windscreen washer piping in the bonnet area, that routes from the spare tyre to the front immediately behind the dash!!

So two questions,
1. How do you age tyres.
2. Replicating rust on wings and bodywork. A wash? or is there another way?
 
Last edited:

langy71

SMF Supporter
Joined
Apr 27, 2018
Messages
1,559
Points
113
Location
Nottingham
First Name
Chris
It's been a busy few days!!!
But! Managed to grab a swift hour today. I think I've managed to sort out a plan of action. Ordered a couple of paints and they arrived last night so I thought it would be nice to try and make a start.
I had already cemented a few parts together on Wednesday. Both sides of the engine and that was about it.
Today I set about priming the engine parts, floor pan and a few bibs and bobs to enable me to start painting the separate engine parts the correct colours.
TBH, I think I spent longer cleaning the AB than actually spraying.
That'll be me for a few days now, family visiting tomorrow and I don't think the 'she demon' aka grand daughter will let me!!
Anyway - here's the rimed bits!! Hopefully more progress next week.
View attachment 489790

Edited add on bit!
I did decide to add the HT wires and the engines one electrical lead, just have to source the right size 'things' to use which will look ok. To that end I printed off diagrams of the engine compartment and the routing of the cabling.
The thing I found funny looking at many of the engine pics, I don't think I found any two engines that were the same!! I know when I had mine 1:1 Having had 3 engines in it non of them were standard!!
I also intend to replicate the windscreen washer piping in the bonnet area, that routes from the spare tyre to the front immediately behind the dash!!

So two questions,
1. How do you age tyres.
2. Replicating rust on wings and bodywork. A wash? or is there another way?
Check out some of the builds by spanner570..(Ron), (he's our resident rustologist....is that even a word...it's an 'ology' so he must be a scientist...lol...for those who know..ha ha ha), he's produced some very realistic rusted builds...

There's also this vid from 'Andy's model Warehouse that's worth a look

Rusting models

And another good vid..

Rusted Chevy truck

for the tyres check this out..

worn tyres
 
Last edited:

Waspie

SMF Supporter
Joined
Mar 13, 2023
Messages
2,481
Points
113
Location
Portland - Dorset
First Name
Doug
A bit more done today. However, to be honest, it was too nice a day to be sat at a bench for too long. So after a stroll down to Portland Bill for an ice cream I decided sitting in the shade in the garage may not be too bad after all. Assembled the engine of the Beetle and did a small bit of hand painting. After a couple of pics I can see there is perhaps a need to get a magnifying glass and additional lighting!! As you will see in the pics of the assembled engine, it is in need of touching up in places.
Back end, gearbox, clutch housing, starter motor etc. plus the heat exchangers. I love the way Tamiya have cleaned up the seems on the heat exchangers when in reality they really are noticeable, the joining seams are about 3-4 mm. Not going to lose sleep though.
Really does need some rusting up to anything like the real things.
IMG_0959 copy.JPG
Looking from the back end of the Beetle!
This is the reason I like taking pictures. With the naked eye I thought it was not too bad but looking at the picture I can see loads that need a touch up. I may have a go at serrating the kevlar fan belt too. Still a few more additions to the engine but that's later on. (If I put them on now it would mean severe problems them placing the body over the engine.
I also had a play around with the suspension struts. Instead of painting the black as per the instructions I went off piste and painted part blue, part silver, (after market parts!! I remember the ones I fitted to mine after beefing up the engine were blue) - No pics!
IMG_0960 copy.JPG
A day out tomorrow so a few notes left on what to carry out next. (New Forest, hopefully see a few aircraft departing Bournemouth after the Air Festival this weekend.)
Notes for next bash!
Finish off touching up the engine.
Spray the floor pan ready to accept the engine.
Assemble the suspension and wheels!
 
Last edited:

Andy the Sheep

SMF Supporter
Joined
Apr 7, 2019
Messages
1,540
Points
113
Location
North Eastern Italy
First Name
Andrea
I'll follow your build Doug. That Beetle was my first car or, to be more precise, I owned 50% of her, the other half was paid by Dad on behalf of my sister who was still at the University.
She was black and tried to take off at speeds exceeding 110 Kph (68 mph) which happened only on the Aosta - Torino motorway on the long long long downslope near Ivrea...:smiling:. Driving on snow was real fun too! :cold-sweat:
 

Mickc1440

SMF Supporter
Joined
Apr 27, 2018
Messages
4,257
Points
113
Location
Sheffield
First Name
Mick
Pictures can be a pain Doug when you think you hit everywhere with paint. Good luck with this one
 

Waspie

SMF Supporter
Joined
Mar 13, 2023
Messages
2,481
Points
113
Location
Portland - Dorset
First Name
Doug
I'll follow your build Doug. That Beetle was my first car or, to be more precise, I owned 50% of her, the other half was paid by Dad on behalf of my sister who was still at the University.
She was black and tried to take off at speeds exceeding 110 Kph (68 mph) which happened only on the Aosta - Torino motorway on the long long long downslope near Ivrea...:smiling:. Driving on snow was real fun too! :cold-sweat:
Andrea. Beetle my first car too, learned much about car maintenance from that car. Apart from the floor pan, wasn't a lot I didn't change on it. Thats why this one isn't going to be a 'show room' version!!
Until I plonked a 1300 engine in it it was 0 to 60 in a day or two!! Stopping was what could be termed as exiting!! Drums all round!! They had to go! Upgraded to discs, now that slowed it down. A very old Scotsman told about driving in snow! Let some pressure out of the tyres, increases the footprint and gives you some grip. (Just remember to re-pressurise once on normal roads).

Pictures can be a pain Doug when you think you hit everywhere with paint. Good luck with this one
Mick, I actually take pics intentionally at the moment. It really helps me see what I can't see!! (If you see what I mean) :rolling:


Check out some of the builds by spanner570..(Ron), (he's our resident rustologist....is that even a word...it's an 'ology' so he must be a scientist...lol...for those who know..ha ha ha), he's produced some very realistic rusted builds...

There's also this vid from 'Andy's model Warehouse that's worth a look

Rusting models

And another good vid..

Rusted Chevy truck

for the tyres check this out..

worn tyres
Chris, thank you for the links. The tyres - just wow, the amount of effort the guy put into them - amazing. Given me some ideas!!
That guy applying rust. I did like that! :thumb2:
 
Last edited:

tigersteve

SMF Supporter
Joined
Jan 29, 2018
Messages
511
Points
93
First Name
Steve
Only just found your build, will be watching on with interest! Have fun...........
 

Waspie

SMF Supporter
Joined
Mar 13, 2023
Messages
2,481
Points
113
Location
Portland - Dorset
First Name
Doug
An admission to kick off.
I'm just not 'feeling it' for this kit. Don't know what it is but it's just not doing it for me. It's going together ok, it is certainly well built by Tamiya.
All that said, did a few bits today. Touched up the engine following what was noticed on the pics the other day. (Then later I threw some wash and rust over it to 'try' and simulate a rusty aged engine!!! Looks like it will need more work by the images!
The floor pan was sprayed. (That is due a mucking up later). The only time I saw my Beetles floor pan nice and black was when I just finished putting a new waterproofing layer on it!! (That lasted a week or so before being soiled by Scottish road dirt!!!)
Then!! Following something @Andy T did, I tried simulating the carpet!! Using what I had available I decided to initially paint on some Mr Hobby filler then stippled it. Once hard, it was given a couple of coats of black, again stippled on. Didn't look brilliant when it was wet but once dried it had the desired effect. Then once some wear in the form of mucky shoe marks, it'll be fine and dandy.
As a final act, I attached the engine to the rear chassis/floor pan.

Piccies!!
Clean floor pan and engine installed.
IMG_0969.JPG
Clean floor and and dirty engine!!
IMG_0972.JPG
Front seat area with stippling and wet paint!!!
IMG_0967.JPG

Rear view of slightly soiled engine
IMG_0970.JPG

Engine and floor pan area.
IMG_0971.JPG

Well, 'that's all folks'!! For today! Weather forecast is looking v-good for tomorrow so another day out is scheduled. Need to get the puppy used to the car on longer journeys. All barring Mondays adventure she has been ill every journey. However, we will try Mondays formulae and fingers crossed she will be OK tomorrow too.

All comments and criticisms accepted. Tis all about learning in the end.
 

Attachments

  • IMG_0968.JPG
    IMG_0968.JPG
    200.4 KB · Views: 4

Waspie

SMF Supporter
Joined
Mar 13, 2023
Messages
2,481
Points
113
Location
Portland - Dorset
First Name
Doug
I want to know how life is so full when you're supposed to be retired. Hardly had any time to sit and spend some time on my Beetle.
Managed a little bit today.
Assembled the front steering and hub etc.
Primed the main body shell and some internal parts. To be honest most of my time was cleaning the airbrush as I was getting frustrated removing some primer hanging on between the bowl and the button that controls air and paint distribution. Ended up with a complete strip down - every removable part was removed and there is still a small channel the needle passes through that I simple can't access.
Anyway - pics of progress today.
IMG_0976.JPG

IMG_0977.JPG

IF and I stress IF, I get time tomorrow, I'll apply another couple of layers of primer on the body to give a deeper grey colour.
Busy week coming up. Radiators to be installed. Not freezing this winter!!!!! Family visits and organising the Mem Sahib's next project!!
 

tigersteve

SMF Supporter
Joined
Jan 29, 2018
Messages
511
Points
93
First Name
Steve
That shape still makes me smile with memories of my first car! - Come on, even in primer it's great!
 
Top