Geoffers
SMF Supporter
Hello Chaps,
This is my entry to the group build

I’ve built the Mk.IIc version from Arma Hobby before and found it went together nicely with lots of detail too so am looking forward to this one.
This is the original release, which was marketed as an “expert set” which basically means it has a small photo etch fret and paint masks included.
Here are the pictures

Rear of the box.


Instructions.

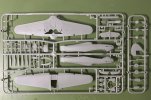
X2 plastic frames.

Very nice clear parts.

Extra goodies.

Nice decal sheet.
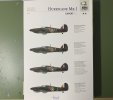
I intend to build the South African tropical version as highlighted above.
Looking forward to the start now.
Thanks for looking
Geoff.
This is my entry to the group build
I’ve built the Mk.IIc version from Arma Hobby before and found it went together nicely with lots of detail too so am looking forward to this one.
This is the original release, which was marketed as an “expert set” which basically means it has a small photo etch fret and paint masks included.
Here are the pictures
Rear of the box.
Instructions.
X2 plastic frames.
Very nice clear parts.
Extra goodies.
Nice decal sheet.
I intend to build the South African tropical version as highlighted above.
Looking forward to the start now.
Thanks for looking
Geoff.