Gregg's Corvette. Revell 1/72

Joined
Oct 16, 2011
Messages
2,149
Points
113
First Name
Gregg
The aftermarket looks exciting-what's the steam thing and how does it work?
Btw, great work

The tube has an element inside that warms up, the liquid is put into the tube via a dispenser.
The liquid heats up producing smoke., I have no idea what the liquid is but experimenting at the moment to see what else works.
 
Joined
Oct 16, 2011
Messages
2,149
Points
113
First Name
Gregg
Totally unheard of but for the 3rd day in a row have had some spare time to work on this.
As I have perceived from others builds, the fore to stern hull joint can be difficult due to poor moulding.
I clamped the sections together as tight as I could and drilled several small pilot holes through the plate joints.
After a liberal coating of poly cement to the joint, pulled them together and inserted cotton bud stems through the holes
previously drilled, following up with clamps.
Any gaps that may be evident I will fill with green stuff.
 

Attachments

  • Hull Joint 4.JPG
    Hull Joint 4.JPG
    55.2 KB · Views: 21
  • Hull Joint 3.JPG
    Hull Joint 3.JPG
    53.8 KB · Views: 21
  • Hull Joint 1.JPG
    Hull Joint 1.JPG
    53.9 KB · Views: 21
  • Hull Joint 2.JPG
    Hull Joint 2.JPG
    47.2 KB · Views: 22

stillp

SMF Supporter
Joined
Nov 17, 2016
Messages
7,218
Points
113
Location
Rugby
First Name
Pete
The tube has an element inside that warms up, the liquid is put into the tube via a dispenser.
The liquid heats up producing smoke., I have no idea what the liquid is but experimenting at the moment to see what else works.
Sounds like an e-cig!
 

Ian M

Administrator
Staff member
Administrator
Moderator
SMF Supporter
Joined
Dec 14, 2008
Messages
19,717
Points
113
Location
Falster, Denmark
First Name
Ian
I see you went for the pre-rolled funnel. Wise move.
I have a corvette with all the trimmings from GLS at the moment it's in a moving box in the stable. Did not fare the house move to well. One day I'll drag it out and see what can be salvaged.
I see you are RCing your one. Don't forget the ballast lol
 
Joined
Oct 16, 2011
Messages
2,149
Points
113
First Name
Gregg
Wow I'm an a roll, another day with spare time.
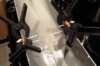
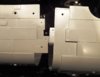
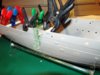
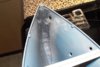
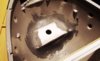
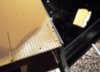
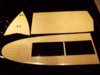
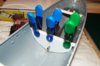
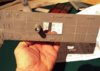
Keeping in mind other builders comments, I re-enforced the kit hull braces before fitting them inside the hull.
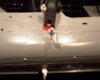
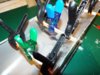
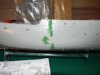
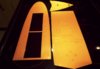
The joint done yesterday required a little green stuff, and plastic rod cut offs glued into the holes drilled for alignment.
These will be cut level with the surface.
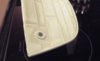
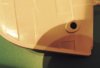
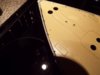
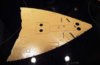
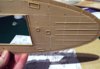
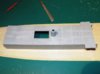
I have removed the porthole eyebrows, and removed the excess flash in the portholes themselves.

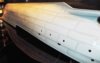
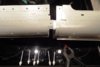
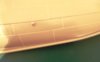
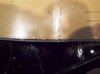
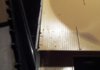
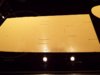
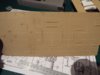
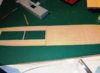
Next job is to wet sand the hull sides to lower the over scale plating, and remove the large flange to the bow.
I will keep the flange to the lower hull area, as this would usually never be seen, and it will keep hull joint strength.
The bow will need to be re-enforced internally to make up for the loss of the external flange
Who knows I might even get some more spare time tomorrow!!
 

Attachments

  • Hull Braces Fitted 1.JPG
    Hull Braces Fitted 1.JPG
    84.6 KB · Views: 18
  • Hull Dowels In Place.JPG
    Hull Dowels In Place.JPG
    76.7 KB · Views: 19
  • Joints Green  Stuffed.JPG
    Joints Green Stuffed.JPG
    66.5 KB · Views: 19
  • Flange 1.JPG
    Flange 1.JPG
    47.6 KB · Views: 18
  • Flange 2.JPG
    Flange 2.JPG
    41.1 KB · Views: 19
Joined
Oct 16, 2011
Messages
2,149
Points
113
First Name
Gregg
A little more of the boring stuff done today.
Bow and stern areas re-enforced with plastic metal. The bow as I need to remove the flange on the exterior, the stern to ensure the rudder stem doesn't move.
Even though I used the kit hull braces (strengthend) the deck has several gaps around the hull.
 

Attachments

  • Hull Re-enforcement.JPG
    Hull Re-enforcement.JPG
    66 KB · Views: 15
  • Flange 1.JPG
    Flange 1.JPG
    47.6 KB · Views: 15
  • Hull Re Enforcment Stern.JPG
    Hull Re Enforcment Stern.JPG
    62.4 KB · Views: 15
  • Hull To Deck Gap 1.JPG
    Hull To Deck Gap 1.JPG
    53.6 KB · Views: 15
  • Hull To Deck Gap 2.JPG
    Hull To Deck Gap 2.JPG
    49.6 KB · Views: 15
  • Hull To Deck Gap 5.JPG
    Hull To Deck Gap 5.JPG
    44.2 KB · Views: 15
  • Hull To Deck Gap 6.JPG
    Hull To Deck Gap 6.JPG
    52.3 KB · Views: 15
Joined
Oct 16, 2011
Messages
2,149
Points
113
First Name
Gregg
Managed to get a little more done the last few days.
After watching others builds & checking out several photo's of the real thing, I have removed all the moulded in deck planking.
The next step in to scribe deck plates where necessary, then use the kit stick on decking in the appropriate places.
I have also elected to put in several internal bulkheads to compartmentalise in case of leakage.
 

Attachments

  • Moulded Planking 1.JPG
    Moulded Planking 1.JPG
    43.5 KB · Views: 15
  • Moulded Planking 2.JPG
    Moulded Planking 2.JPG
    41.9 KB · Views: 14
  • Moulded Planking 3.JPG
    Moulded Planking 3.JPG
    49.1 KB · Views: 15
  • Moulded planking Removed 1.JPG
    Moulded planking Removed 1.JPG
    45.1 KB · Views: 15
  • Moulded Planking Removed 2.JPG
    Moulded Planking Removed 2.JPG
    42 KB · Views: 15
  • Bulkhead.JPG
    Bulkhead.JPG
    60.8 KB · Views: 16

Ian M

Administrator
Staff member
Administrator
Moderator
SMF Supporter
Joined
Dec 14, 2008
Messages
19,717
Points
113
Location
Falster, Denmark
First Name
Ian
Are you going to sand them off or fill them in? Which ever way, I foresee loads of sanding in you immediate future!
 
Joined
Oct 16, 2011
Messages
2,149
Points
113
First Name
Gregg
Are you going to sand them off or fill them in? Which ever way, I foresee loads of sanding in you immediate future!
Already sanded off as in the before and after photo's.
Lack of finger prints on fingers worth the effort.
 
Joined
Oct 16, 2011
Messages
2,149
Points
113
First Name
Gregg
Moving on.
With the moulded planking removed, time to replace them with deck plating.
Scribed the decks and some of the superstructure has been assembled.
 

Attachments

  • Deck Plates Scribed 1.JPG
    Deck Plates Scribed 1.JPG
    65.6 KB · Views: 15
  • Deck Plates Scribed 2.JPG
    Deck Plates Scribed 2.JPG
    73.9 KB · Views: 15
  • Deck Plates Scribed 3.JPG
    Deck Plates Scribed 3.JPG
    70.4 KB · Views: 15
  • Deck Plates Scribed 4.JPG
    Deck Plates Scribed 4.JPG
    55.7 KB · Views: 15
  • Superstructure Scribed.JPG
    Superstructure Scribed.JPG
    51.2 KB · Views: 15

james pithouse

Models are fun just ask kpnuts
Joined
Dec 21, 2014
Messages
1,183
Points
83
First Name
James
nice work so far keep it up, my brother started his and then turned it into rc but changed his mind and turned it into batman ship (kpnuts) he does things like that just changes his mind once in a while by changing the models from what it should look like to something different.:D
 
Joined
Oct 16, 2011
Messages
2,149
Points
113
First Name
Gregg
nice work so far keep it up, my brother started his and then turned it into rc but changed his mind and turned it into batman ship (kpnuts) he does things like that just changes his mind once in a while by changing the models from what it should look like to something different.:D

I have seen his build, certainly a different slant on it. Not sure about the jet engine though. ;)
 
Joined
Oct 16, 2011
Messages
2,149
Points
113
First Name
Gregg
Managed to get the excessively proud hull plates sanded down to a more acceptable level, also reduced the flange to the bow.
I have left a little flange bit in case I should have any collisions with any solid objects, or I want to ram any subs. ;)
 

Attachments

  • Flange Sanded Down 5.JPG
    Flange Sanded Down 5.JPG
    40 KB · Views: 12
  • Hull Sanded 3.JPG
    Hull Sanded 3.JPG
    62 KB · Views: 12
  • Hull Sanded 4.JPG
    Hull Sanded 4.JPG
    44.9 KB · Views: 12
D

Deleted member 3568

Guest
You're doing great work here (you've reminded me my bat boat has d stalled again) it's a massive project innit
 
Joined
Oct 16, 2011
Messages
2,149
Points
113
First Name
Gregg
You're doing great work here (you've reminded me my bat boat has d stalled again) it's a massive project innit

Thanks, just don't expect me to fit a jet engine to it! ;)
 

Ian M

Administrator
Staff member
Administrator
Moderator
SMF Supporter
Joined
Dec 14, 2008
Messages
19,717
Points
113
Location
Falster, Denmark
First Name
Ian
Coming along nicely.
If you need any info just let me know. I have a very good book on the Flower Class.
Are you going to do the hull rivets?
 
Top