Hello from NZ

Joined
May 27, 2022
Messages
2
Points
3
First Name
Keith
Hello, I’m Keith, a recently retired, 66yr old, Kiwi.

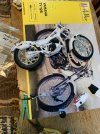
To help keep me busy, I’ve been given a 1/8 scale model of a Yamaha TY125 motorbike from Heller. To say the least I’m a little daunted, given that I haven’t done any modelling for half a century.

I am struggling with this and am wondering whether there is a better scale for a beginner with failing eyesight and dexterity. Looking through this topic, I take it that a 1:72 would be the best scale for a beginner. Correct?

A few questions about the model I’m working on. I’m using the liquid glue that welds the plastic together. I understand that this doesn’t work on the chromed parts, and you must scrape the chrome off. This can be difficult on some parts. Is there a different method?

Also, the soft black plastic parts used for cables and wires, doesn’t take the liquid glue either. What do I use there?

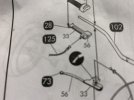
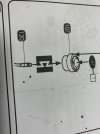
Finally, following the instructions. There doesn’t seem to be anywhere I could fine that explains some of the symbols. There are a couple of instructions on the Heller diagram I don’t understand. One is a black square with a white zig-zag in white. The other a black circle with what looks like pouring something. Hopefully I can attach some pictures.

Many thanks
 

Attachments

  • pour.jpg
    pour.jpg
    94.9 KB · Views: 21
  • zigzag.jpg
    zigzag.jpg
    105.8 KB · Views: 22

Geoffers

SMF Supporter
Joined
Jan 26, 2017
Messages
1,054
Points
113
Location
Shropshire
First Name
Geoff
Hello Keith, welcome :thumb2:

I build mainly build 1/72 scale models but am not sure it would be an easier scale to start your return.

A lot of the parts can be small and fiddly to handle although the kits are generally cheaper so less of a waste if you mess one up ;)

It depends what sort of genre you are looking at building.
I think 1/35 for armour or vehicles and 1/32 or 1/48 for aircraft would be the way to go.

Sorry I can’t really comment on your current build as I haven’t built a bike before but I’m sure some of the other guys will able to give you some advice on this and chip in regarding scales too.

Geoff.
 
Last edited:

Jim R

SMF Supporter
Joined
Apr 27, 2018
Messages
13,842
Points
113
Location
Shropshire
First Name
Jim
Hi Keith
Welcome to the forum. Many of us, like yourself, got back into modelling in their "later" years.
Your motor bike kit is perhaps not the best to start with. A cheap 1/35 kit would probably suit you. An older Tamiya kit would be a good choice, reasonably cheap and straightforward to build.
My guess for the symbols, and it is a guess, the circle suggests the end of the wire is stripped back and the rectangle may show a push fit.
Superglue is often useful where the normal styrene cement won't work.
Jim
 

peterairfix

SMF Supporter
Joined
Jul 19, 2012
Messages
7,387
Points
113
Location
Taunton
First Name
peter
Welcome Keith
I have been looking at pics the first one is a knife symbol and the second one is push fit.
I hope it helps
 

Andy the Sheep

SMF Supporter
Joined
Apr 7, 2019
Messages
1,553
Points
113
Location
North Eastern Italy
First Name
Andrea
Welcome Keith from your "down under" ;)
I see that your questions have already been answered and I can only agree with what has been suggested.
This is a very friendly community and I hope you are already feeling at home.

Andrea
 

Jakko

Way past the mad part
SMF Supporter
Joined
Apr 28, 2018
Messages
10,954
Points
113
First Name
Jakko
Oh, I see the instructions are available on Heller’s site. Looking at them, I get the impression that the zig-zag symbol means you should just push the parts together, in other words: “do not glue”.

For glueing the soft plastic parts, try superglue. That will probably also work to glue the chromed parts together, or to non-chromed bits.
 

tigersteve

SMF Supporter
Joined
Jan 29, 2018
Messages
511
Points
93
First Name
Steve
Hi Keith, Welcome to the forum :cool:
Loads of help and info here .
I am currently ( slowly! ) working on a Heller 1/8 BMW so feel your pain with instructions - the above answers are correct, I found the attachment of 'cables' pretty easy so far, if you have a thin tube to be fitted which seems too tight, try warming it with hot water and then push it on. Have fun and lets see some photos of your progress !
IMG_0835.jpg
 

Dave Ward

Still Trying New Things
SMF Supporter
Joined
Apr 27, 2018
Messages
8,718
Points
113
Location
South Gloucestershire
First Name
David
Kevin,
welcome to the forum! You're in the right place to ask questions - if you want to remove all the chrome from a part, put it in a glass jar & add household bleach, if it's the thick stuff dilute it, so it can get into all the recesses. Lid on & leave overnight. Rinse in cold water - chrome gone! Otherwise, scraping the plating away is the best method for ensuring good glue bonds. Using superglue can work, but it's only as strong as the plating bond to the plastic.
If you're into bikes, I'd suggest one of the Tamiya 1/12 motorbike kits, road cars, one of the Tamiya 1/24 offerings. Aircraft, I'd say 1/48 scale, and armour 1/35. All models have small parts, but the smaller the scale, the less physical area you have to fit them in. If you have a yearning for a particular model, do a bit of research, and ask on the forum - there'll be someone on here who'll have made it, or be able to give advise
Cheers,
Dave
 
  • Like
Reactions: JR

Ian M

Administrator
Staff member
Administrator
Moderator
SMF Supporter
Joined
Dec 14, 2008
Messages
19,807
Points
113
Location
Falster, Denmark
First Name
Ian
Welcome along for the ride.
If you are struggling with 1/8 going to 1/72 is not going to help. The bigger the second number the smaller the kit (and parts).
1/8 is an OK scale for a MC. Only topped by Tamiya 1/6 which are only a bit bigger.
Heller are not that bad a brand and have some great kits.
Getting chrome off parts. If it is just the contact point that you wish to remove a sharp knive to scrap it off, or a small sanding stick (sandpaper). If it is large odd shapes for the purpose of painting them. I believe that household bleach does the trick, as does brake fluid, if I remember correctly.
Plonk the parts in a dish cover with the fluid and leave over night. Rinse off and brush under a running tap. (for the bleach at least.)
 

adt70hk

I know its a bit sad but I like quickbuild kits!!!
SMF Supporter
Joined
Sep 4, 2019
Messages
9,526
Points
113
First Name
Andrew
Welcome to the madhouse Keith!!

Whereabouts are you in the land of the 'long white cloud'? My wife grew up in NZ and so I've visited a few times and we actually got married in Auckland.

I think the others have covered it all and as they have said going down to 1/72 is not going to help......whilst it s of course the one true modelling scale and my favoured scale, the bits can be tiny!!!

Hope you manage to sort out the issues with the bike.

ATB.

Andrew
 

JR

Member of the Rabble and Pyromania Consultant
SMF Supporter
Joined
May 26, 2015
Messages
17,375
Points
113
Location
lincs
First Name
John
Welcome Keith .
 
Joined
May 27, 2022
Messages
2
Points
3
First Name
Keith
Welcome to the madhouse Keith!!

Whereabouts are you in the land of the 'long white cloud'? My wife grew up in NZ and so I've visited a few times and we actually got married in Auckland.

I think the others have covered it all and as they have said going down to 1/72 is not going to help......whilst it s of course the one true modelling scale and my favoured scale, the bits can be tiny!!!

Hope you manage to sort out the issues with the bike.

ATB.

Andrew
Many thanks everyone for your help

After much study I've decided to make my next project a 1:35 Tamiya tank. (I've been spending my drying time hours on the Yamaha, studying the tank instructions in great detail and plotting my approach).

I've pretty much finished the Yamaha but I'm afraid I've made a dog's breakfast of it. All of the small, delicate, parts are just a bit too much for me. Misreading the diagram and putting bits in the wrong way round leading to the next bit not fitting, etc.

I've also now broken two parts and don't know whether they are repairable. I have broken a flange off the forks that hold the headlight shield on. These parts are chrome and I'm not sure whether I could make a repair that would then hold the headlight shield.

The other broken piece is the end of the handle bars. Again they are chromed parts and the area I am looking at is so small. Probably a circle of around 1mm dia.

Any ideas?

Keith (in Wellington)
 

Attachments

  • IMG_0920.JPG
    IMG_0920.JPG
    284.3 KB · Views: 8
  • handlebar.jpg
    handlebar.jpg
    180.7 KB · Views: 8
  • headlight.jpg
    headlight.jpg
    147.3 KB · Views: 7

boatman

SMF Supporter
Joined
Nov 8, 2018
Messages
13,027
Points
113
Location
NORFOLK UK
First Name
christopher
HI Keith welcome to our forum from me also an its a great place to be nice an freindly
ATB
chrisb
 

stillp

SMF Supporter
Joined
Nov 17, 2016
Messages
7,240
Points
113
Location
Rugby
First Name
Pete
Keith, the handlebar end would probably fasten back on with a tiny drop of CA (superglue). Same with the bracket for the headlamp shield - that shield will also add a bit of strength.
Don't worry about breaking bits, that's all part of the experience - at least it is for me!
Pete
 
Top