LB Works KenMary Skyline

M477

SMF Supporter
Joined
Oct 3, 2023
Messages
27
Points
13
Location
Uk
First Name
Matt
Hey All,

Straight on to the next project to keep me entertained now the darker rainier nights are setting in. This will be my third build since I got back into 1/24 scale cars recently, and only my second build on this friendly forum!

Let me introduce the LB Works KenMary Skyline!
20231010_175608.jpg
I love how crazy tuner car this is, I only stumbled across it on eBay by accident but it turns out theres a whole series of them which to my understanding follow a series of one off builds from different tuner outfits in Japan.

This will also be my first non-Tamiya kit and from first impressions its a different type of plastic and a bit more invovled/advanced. The box contains a standard model kit (1977 skyline I think it is) plus all the modified parts, bodykit etc. so I guess its an easy way to get everything rather than have to buy a kit plus aftermarket parts separately (and no resin either!). This does mean there will plenty of leftover parts, so useful for other builds or testing paints, techniques, etc. Apparently "KenMary" is a misnomer of "Kenmari" which comes from Ken and Mary who featured in the Japanese adverts for the original model Skyline. Who knew?!

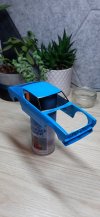
Heres the various sprues in no particular order:

20231010_145256.jpg
20231010_145319.jpg
20231010_145342.jpg
20231010_145429.jpg
20231010_145451.jpg
20231010_145540.jpg
20231010_145552.jpg
20231010_145604.jpg
Can't wait to get stuck in, definitely needs some fettling and modification and head scratching!
 
Last edited:

M477

SMF Supporter
Joined
Oct 3, 2023
Messages
27
Points
13
Location
Uk
First Name
Matt
Managed to get a run at the baseplate chassis and interior bits and bobs. I bought the kit because it looked amazing on the box, and in my first post I was happy it had lots of content and options.

The reality, however, I'd say its a bit underwhelming. I've only ever built Tamiya kits so maybe I'be been spoiled but the quality of this kit is fairly poor and its made from horrendous plastic thats hard and brittle and doesn't take to plastic cement at all so reverted to classic superglue, which is fine and at least it doesn't stink like cement does!

The scale of the car is questionable, it says 1/24 but it feels larger and many of the interior parts thus far are not in proportion with themselves at all.

Fair to say that I won't spend a lot of time on the interior, a basic blast with flat grey or black from the airbrush should do it for the interior and underside. I'll focus on the body which I think I'm going to hit with a flat green-blue colour.

Also, as you build it, it has a battery box that takes 2xAA under the bonnet and a weird spring arrangement for the rear through axel. At one point in the kits lifecycle the baseplate chassis bit was made to fit a small electric motor, likely just for forward drive but maybe there was an RC kit for it at some stage - would be pretty cool and it feels a lot less flimsy than a Tamiya kit for example so maybe thats what the original intent was but it died off.

Anyhow, an interesting and slightly puzzling evening! I'll take some more progress photos and upload later this week.
 

M477

SMF Supporter
Joined
Oct 3, 2023
Messages
27
Points
13
Location
Uk
First Name
Matt
Heres a few photos of the progress... starting with the weird battery holder:
20231012_202412.jpg
Followed by the weird spring (there must have been a motor that sat on top as you assemble a hinged plate so it would have had rudimentary rear suspension):
20231012_202433.jpg
The scale of the front seat compared to the rear just looks entirely wrong to me:
20231012_202458.jpg
And had to sand down the moulded "skyline" logo to be able to fit the rear ducktail spoiler, but its left pock marks so will need to fill and sand:
20231012_202519.jpg
I can't say I'm enjoying the build if I'm honest, the quality is just not there, both the plastic and fit is poor. The weird repurposed RC thing is annoying me and I cant actually see how the wheels will fit so I might have to build it and just blutac them in after.

It honestly feels like they have taken some old stock models that were not selling anymore and just reboxed it with a bodykit as an afterthought?
 

Andy T

SMF Supporter
Joined
Apr 26, 2021
Messages
1,964
Points
113
Location
Sheffield
First Name
Andy
It honestly feels like they have taken some old stock models that were not selling anymore and just reboxed it with a bodykit as an afterthought?
I think you are right.

According to Scalemates it was originally tooled in 1982 and has undergone several reboxings,some with additional parts added.


Scroll down to the timeline section.
 

Ian M

Administrator
Staff member
Administrator
Moderator
SMF Supporter
Joined
Dec 14, 2008
Messages
19,727
Points
113
Location
Falster, Denmark
First Name
Ian
Your on a roll.

Could I ask that you turn your camera on its side when you take photos? When the photos are tall and thin, you need to scroll through the page to see the whole image. In Landscape; Short and wide, like a computer screen, we can see the whole picture in one go.
 

M477

SMF Supporter
Joined
Oct 3, 2023
Messages
27
Points
13
Location
Uk
First Name
Matt
Your on a roll.

Could I ask that you turn your camera on its side when you take photos? When the photos are tall and thin, you need to scroll through the page to see the whole image. In Landscape; Short and wide, like a computer screen, we can see the whole picture in one go.
Gotcha, yes apologies, still new to a lot of this!
 

M477

SMF Supporter
Joined
Oct 3, 2023
Messages
27
Points
13
Location
Uk
First Name
Matt
I think you are right.

According to Scalemates it was originally tooled in 1982 and has undergone several reboxings,some with additional parts added.


Scroll down to the timeline section.
Oh wow thats a really useful website and definitely confirms my suspicions. Of course there is nothing wrong with that approach, but it feels like 1980s plastic and QC still which is a shame as they look really cool but its proving a bit of a nightmare to get right.

Id love to know a bit more about the whole motor/RC parts, im guessing these were either an upgrade, or the baseplate part of the chassis is from something else to begin with and made its way into the first kit and never left.
 

M477

SMF Supporter
Joined
Oct 3, 2023
Messages
27
Points
13
Location
Uk
First Name
Matt
Bit of an update, got most if not all of the parts cut from their sprues and organised into colour buckets for spraying, fairly simple for this build; black, body colour and metallic. The roll cage is yellow so thats on its own!

I primered the body and bumpers after a bit of sanding just to check for any final sanding requirements before spraying body colour. I am struggling with the vallejo primer, however, seems to block the airbrush fairly quickly and even though its "grey" its more like white so priming white plastic proves to be a pain. I need to try some thinners I think for the next coat.

I hit all the black parts with a flat black, its really helped take the nasty shiny hard 80s plastic look away thankfully!

As mentioned before Im not spending a lot of time on the interior for this one, straight up flat black and done. The parts left on the sticks are external body parts so will go back for a coat of satin varnish - wheels, front grills and wheel arches.
20231014_085458.jpg
 

M477

SMF Supporter
Joined
Oct 3, 2023
Messages
27
Points
13
Location
Uk
First Name
Matt
Pictures of the chassis, flat black interior:
20231014_170558.jpg
I note the floor in general is rough, like unfinished/moulded and there are holes/slots cutout in the footwells (I assume for wiring for the RC parts once upon a time) so going to add a bit of sandpaper cut to size as a floor, just to cover it up.

The bonnet was essentially cutout apart from a few tabs - again I think the reason for this to access the battery box to replace them. I finished the cuts and sanded edges so this will be sprayed and fitted as a separate part:20231014_170703.jpg
20231014_170612.jpg
I also filled the pock marks after sanding the moulded badges off on the rear quarters. You can just see the pink putty I used:
20231014_170637.jpg
20231014_170623.jpg
I also sanded the body with 2000grit so I think its good for basecoat which is on order (vallejo light sea blue to match the box art) and also some vallejo premium gloss varnish which is supposed to spray well and give a much better finish than the standard version which I tried on my last model and it wasn't great.

Yes I could use mr colour or tamiya but I like the simplicity of a true water based acrylic so Ill stick with it for now.
 

M477

SMF Supporter
Joined
Oct 3, 2023
Messages
27
Points
13
Location
Uk
First Name
Matt
And final update for today, let the interior bits dry and then decided to make a carpet out of some self adhesive grip tape I had lying around (basically coarse grit sandpaper but sticky backed). Also glued the seat runners and seats in. I'm undecided on the parcel shelf carpet so I've left the backing paper on for the time being.
20231014_221405.jpg
20231014_221415.jpg
20231014_221426.jpg
Annoyingly the door cards and dashboard fit directly to the inside of the body shell so whilst I can test fit them I can't really fix them in place permanently as the alignment could end up way off.
 

M477

SMF Supporter
Joined
Oct 3, 2023
Messages
27
Points
13
Location
Uk
First Name
Matt
Before the body gets painted I almost forgot that the wheel arches need cutting/modifying to accommodate the ridiculously low stance this car has. Test fitted the arches and marked with a pencil before attacking with the dremel and a sanding wheel attachment.
20231015_202418.jpg
20231015_202425.jpg
The finished cuts, can tidy them up a bit but they won't be seen once painted and wheel arches are fitted at the end - I'd rather take too little than too much and end up with a gap showing above where the arches attach!
20231015_205244.jpg
Still waiting on my ebay order of the body colour so will prime over and sand back again and should be ready for the blue :smiling:
 

M477

SMF Supporter
Joined
Oct 3, 2023
Messages
27
Points
13
Location
Uk
First Name
Matt
Body colour paint arrived a few days ago. I noticed when cleaning the body off for spraying that the front wings needed a bit of filling from where I'd removed the moulded indicators from the wings. I filled, sanded and only after a coat of blue was it apparent that I'd over sanded one side and left an obvious filler mark plus the wing fronts were no longer symetrical.

After a bit of self-debate I decided to do the right thing and sand the wings back again, this has resulted in dulling/removing the original body line, but it fortunately goes with the overall smoothed look of the car. I need to test fit the arches again and see if its made any noticible gaps.

Gave it another coat lastnight and I think we're good to varnish. I ordered some Vallejo Premium gloss varnish, which should hopefully be better than their standard stuff - its airbrush ready out of the bottle and intended for spraying RC car body shells, motocycle helmets etc. Fingers crossed it doesnt ruin the blue coat as I'm really happy with it!
20231018_075856.jpg
20231018_075922.jpg
 

M477

SMF Supporter
Joined
Oct 3, 2023
Messages
27
Points
13
Location
Uk
First Name
Matt
Thanks all, also should note the body is the same colour as the separate parts in the second pic, was just a lighting thing when i took the photo!
 

M477

SMF Supporter
Joined
Oct 3, 2023
Messages
27
Points
13
Location
Uk
First Name
Matt
I masked off the window trims and sprayed them flat black. Even with masking I managed to get a bit of overspray so had to do a couple of small touch ups with the blue. I then bit the bullet and sprayed the clear varnish - I must say this vallejo premium sprays really really well straight out the bottle but my inexperience showed and I got bits of fluff in the bonnet and rear bumper as well as a small patch of running on the chassis...

20231021_094318.jpg
20231021_094312.jpg
20231021_094324.jpg
I need to have a think about correcting this, but given its a water based varnish whatever I do will have to be really gentle - open to suggestions here!

Other chassis parts (sorry for the poor lighting):
20231021_094221.jpg
Overall coming together nicely, I just find the more i try to perfect it the worse results I get, Im inclined to just assemble it and leave it be, fairly sure if I try to mess with the clear coat it will create me more problems - maybe chalk it up to experience and adapt for the next one?

Also the varnish didn't take to the wheel arches at all for some reason, so these will need to be sanded and sprayed again.
 

Attachments

  • 20231021_094303.jpg
    20231021_094303.jpg
    122.9 KB · Views: 0

Snowman

We come in peace, so shoot to kill!
SMF Supporter
Joined
Oct 20, 2014
Messages
1,996
Points
113
First Name
Gavin
Some times Halfords rattle cans are all you need for civi vehicle builds.
 
Top